Device Configuration
flexiEdge devices can be configured and centrally managed from flexiManage.
Device settings
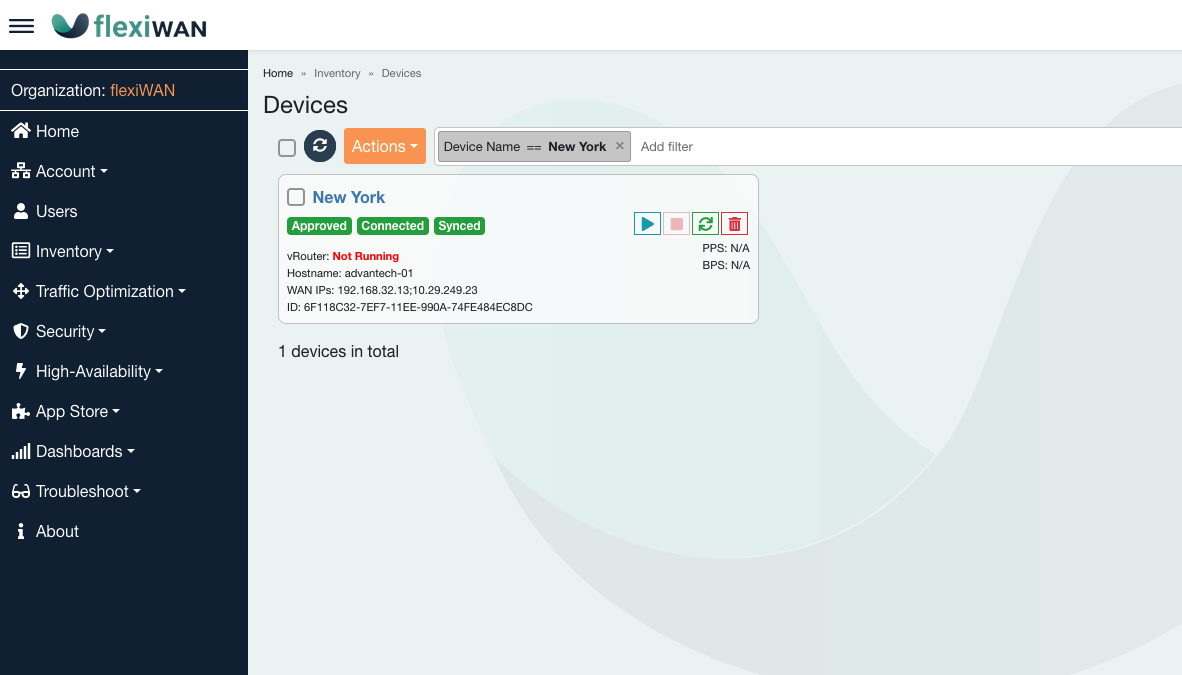
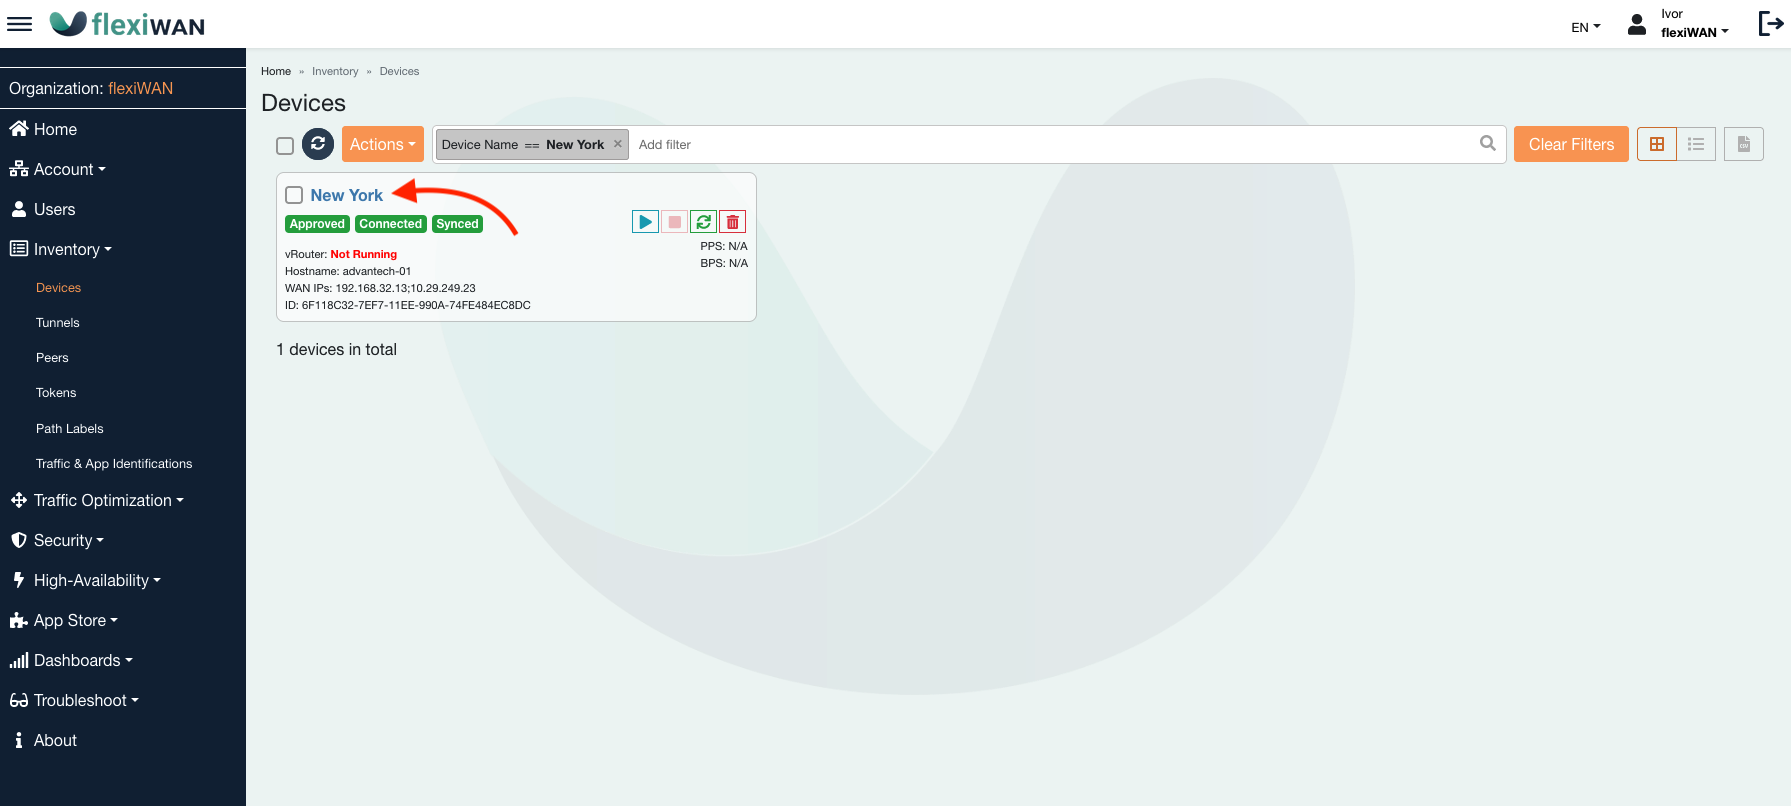
Each device settings can be accessed by clicking on a device name from Inventory > Devices. If the device has been just added or not yet approved, vRouter will not be in running state.
Interfaces settings will open by default, showing current networking configuration.
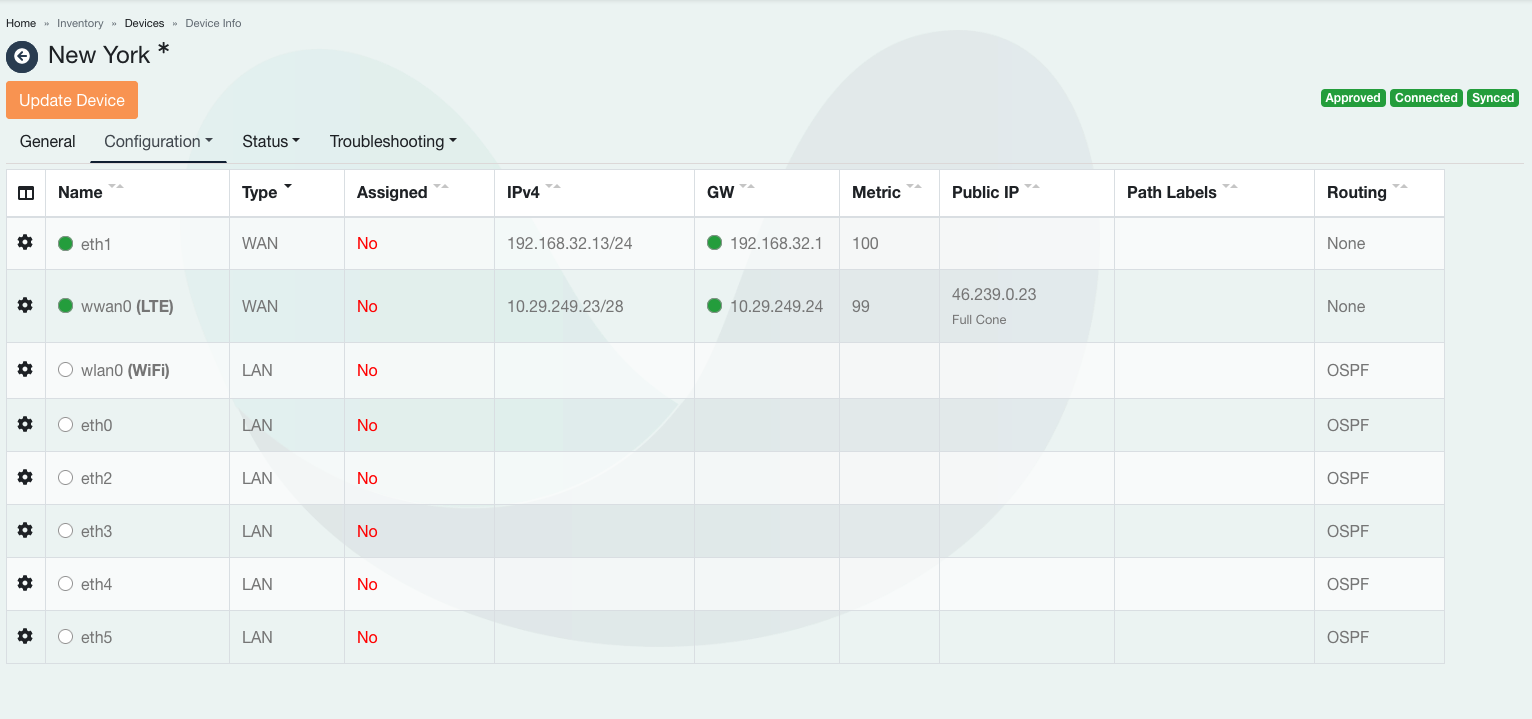
If the device was approved but not yet configured, all interfaces are shown grayed out as they are not assigned yet. To configure an interface it first must be assigned.. Some interfaces may show IP’s since initial configuration was done using local flexiEdge UI.
Network Configuration
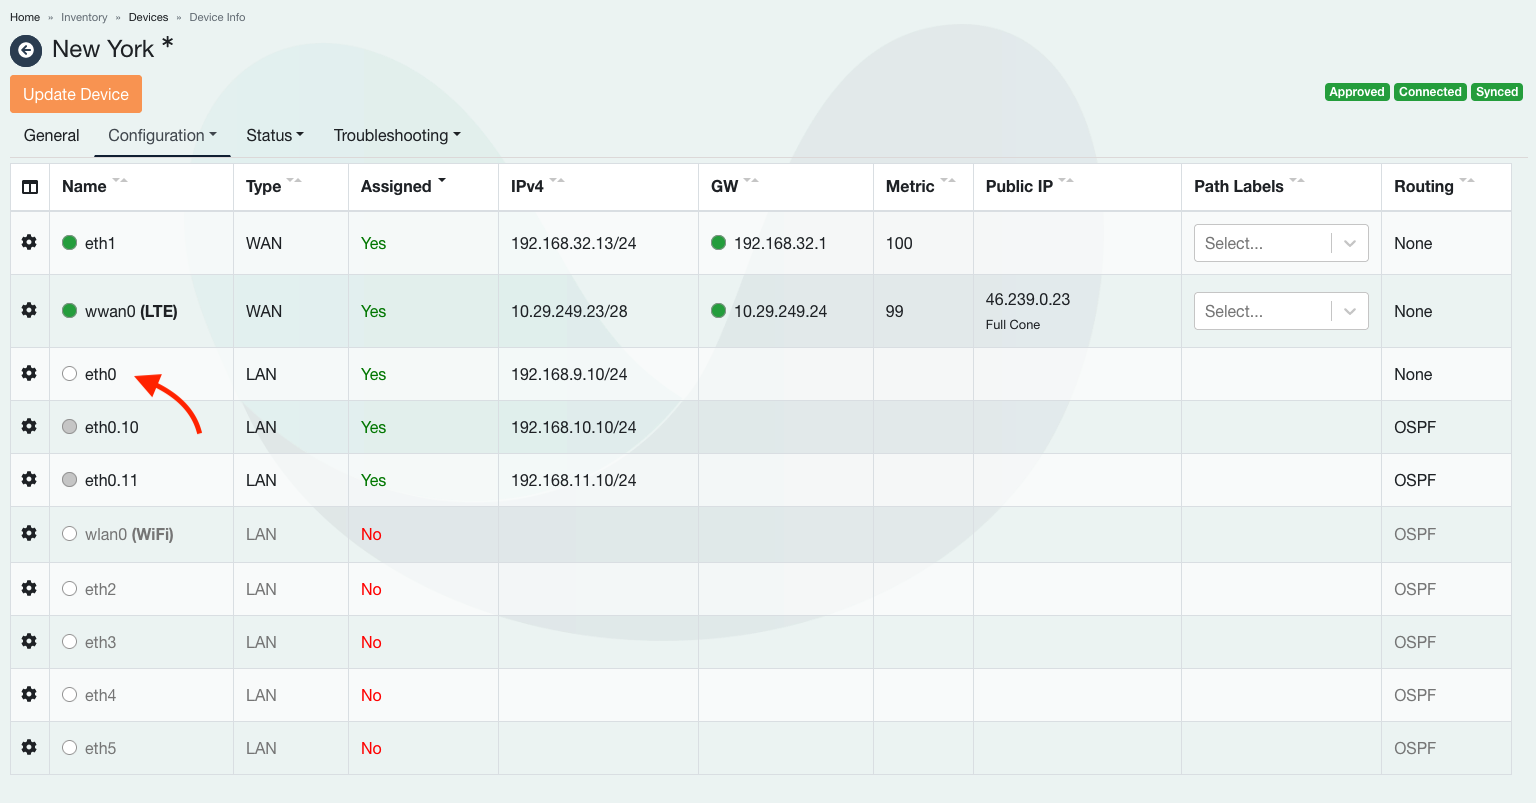
Interfaces page shows columns through which networking can be configured. The following columns are shown by default:
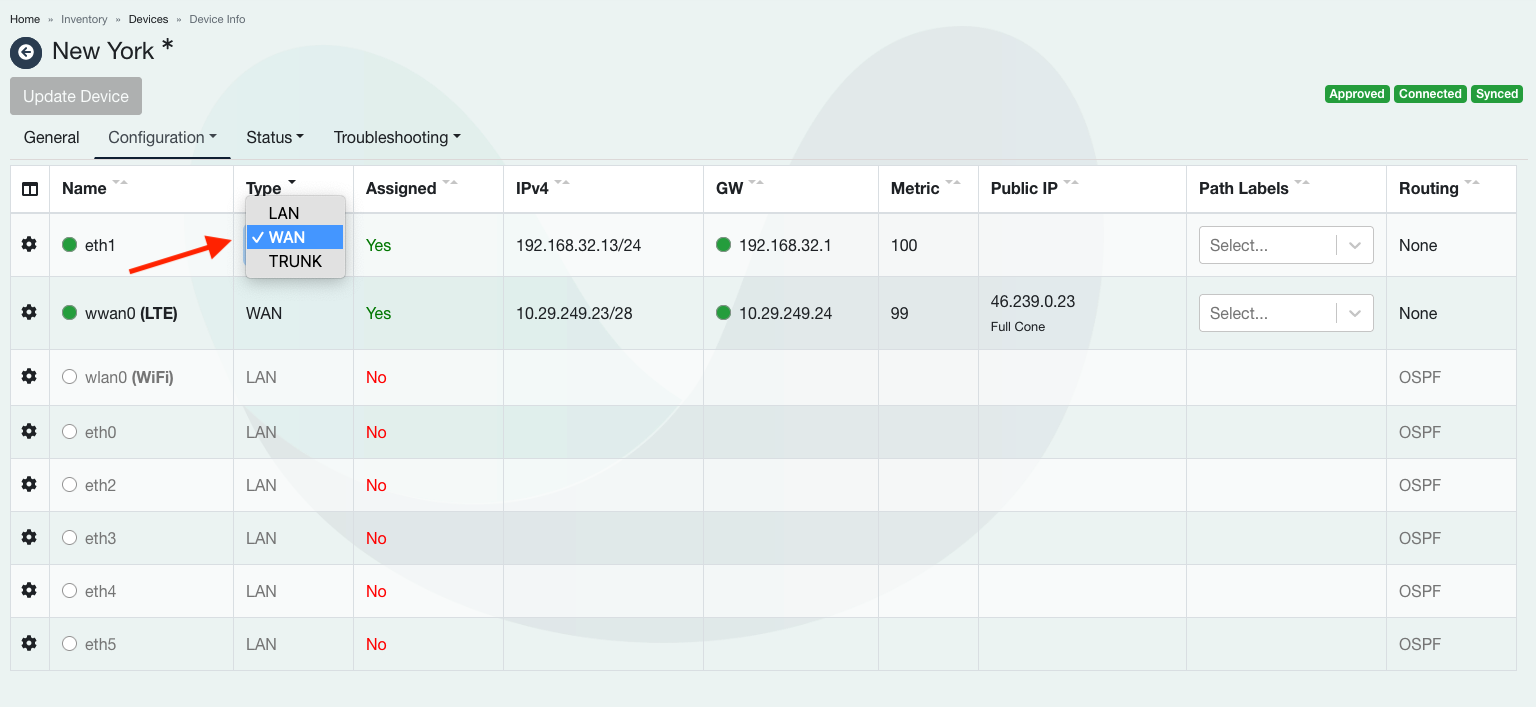
Type - Marks interface as WAN, LAN or TRUNK. flexiWAN requires at least one WAN and LAN for operation. Multiple WAN and LAN interfaces are supported. TRUNK is used for VLAN operation.
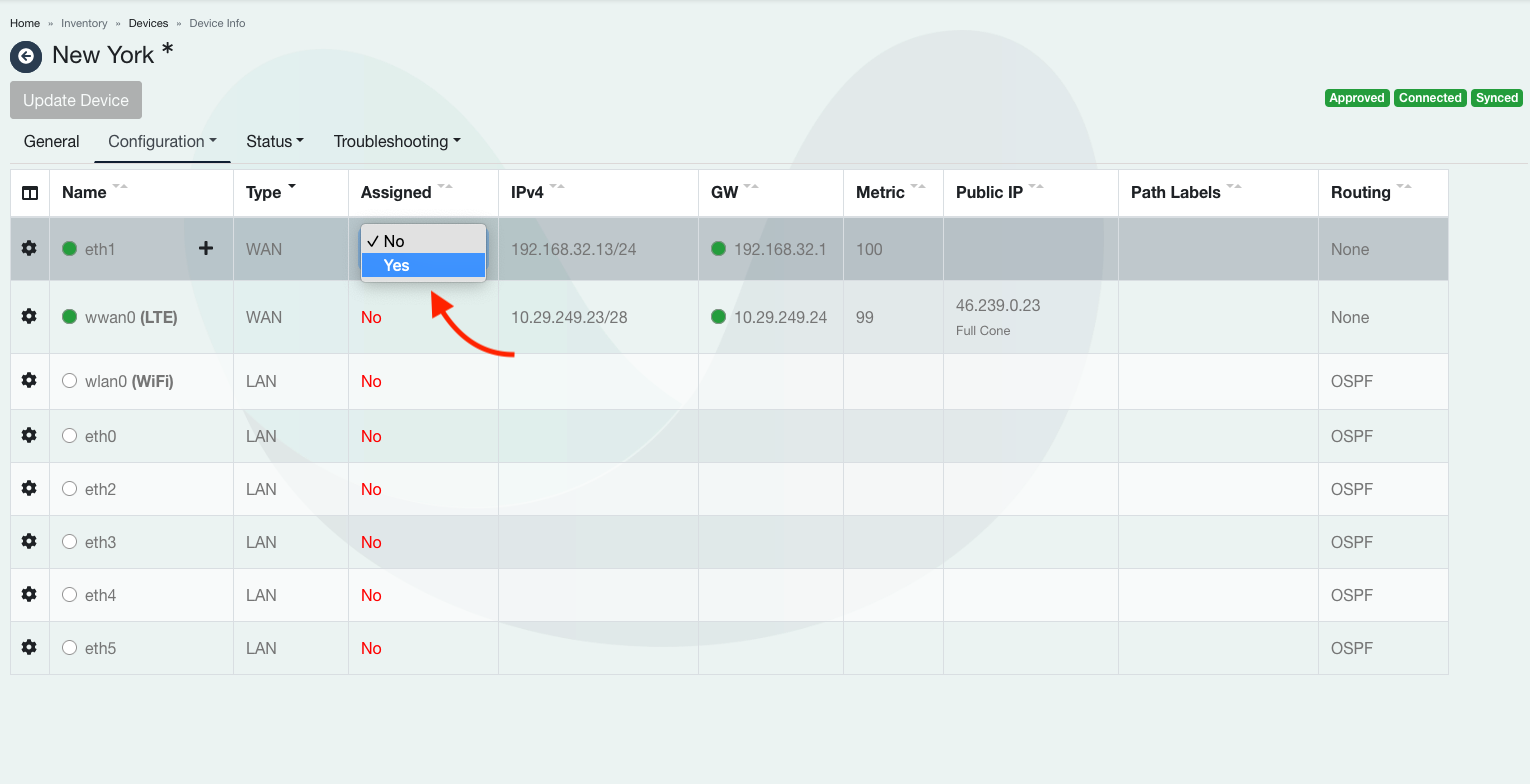
Assigned - When set to “Yes” interface can be configured. Select “No” to not use the interface with flexiWAN.
IPv4 - Shows interface IP
GW - Shows upstream gateway
Metric - Each interface has its own metric. Use metrics to set interface priority (primary, secondary etc.)
Public IP - Automatically detected external IP using STUN. If your flexiWAN device is behind a NAT or a router, the public IP colunm will show the external IP.
Path Labels - Assign Path Lables to logically label or filter traffic. See Path Labels section for more detials.
Routing - LAN interfaces support OSPF and BGP. By default OSPF is enabled on LAN
More columns can be added (or removed) by clicking on Modify columns icon in top left corner of the table. Other available columns:
MAC - Displays interface MAC address
MTU - Shows interface MTU size
DHCP/Static - Used with WAN interfaces, WAN can be configured with static IP or set to receive an IP via DHCP.
QoS - Used for setting ISP throughput / speeds so QoS can properly schedule traffic.
Note
Wired ethernet, PPPoE and LTE interfaces are supported as WAN interfaces.
Wired ethernet or WiFi AP mode are supported on LAN interfaces.
VLAN’s are supported on both WAN and LAN.
Make sure to assign interfaces by changing “No” to “Yes” in the Assigned column.
Multiple LAN and WAN interfaces are supported.
Status icons (green, red, gray) in GW column show if the device has internet connectivity.
Netplan is used for networking configuration, all flexiManage network configuration is saved to Netplan.
Configuration
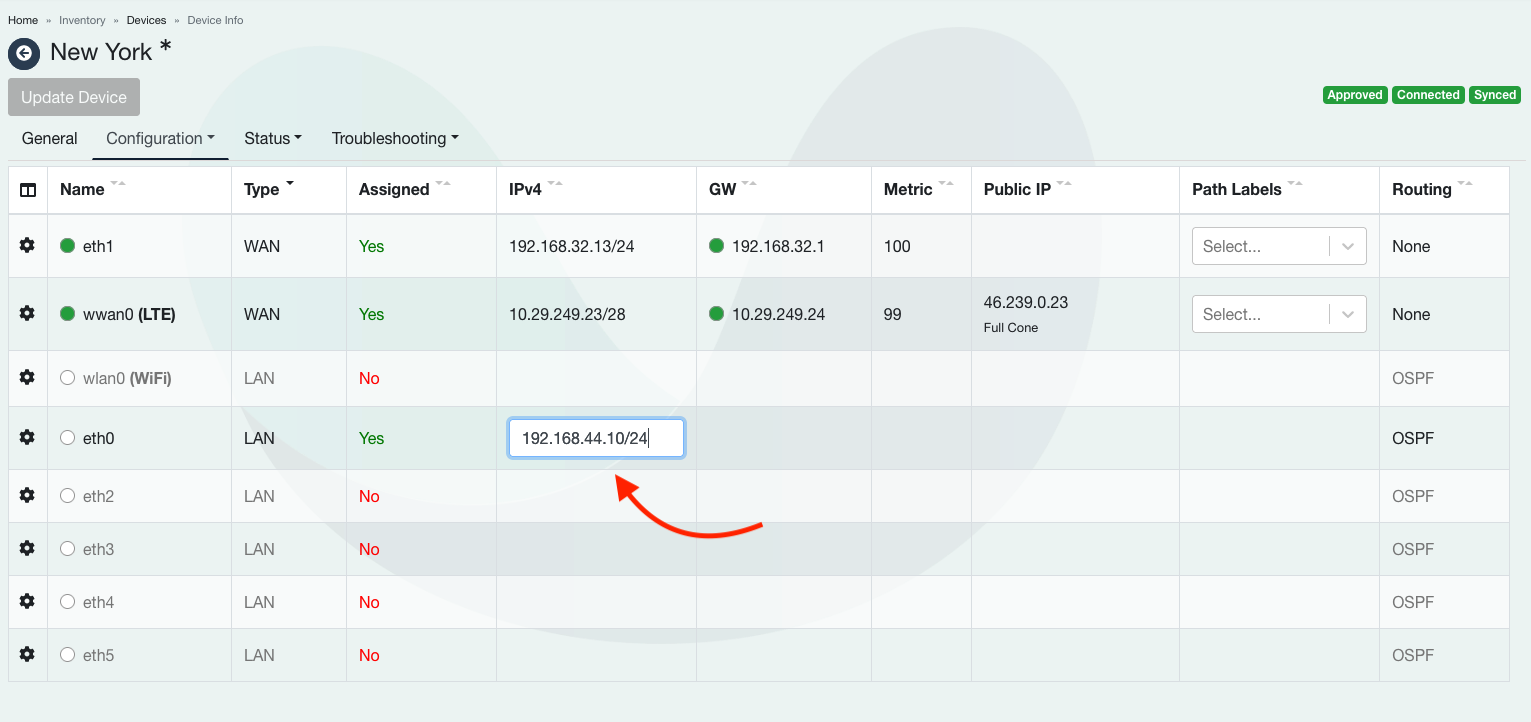
Network interfaces can be configured from the interfaces table or each interface directly through its settings section. Table offers networking information and configuration at a glance while each interface settings offers configuration in greater detail. To configure an interface using table, simply switch the Assigned column item to Yes from No. This will allow interface to be configured and used with flexiWAN.
Once the interface is assigned, next important step is set interface as WAN, LAN or TRUNK port. For vRouter to start, WAN and LAN interfaces are required. TRUNK port is relevant for VLAN’s, read more below in separate section on VLAN’s. Multiple WAN and LAN interfaces are supported.
When assigning a WAN or LAN interface, click on IPv4 column to configure an IP. Remember to use CIDR format.
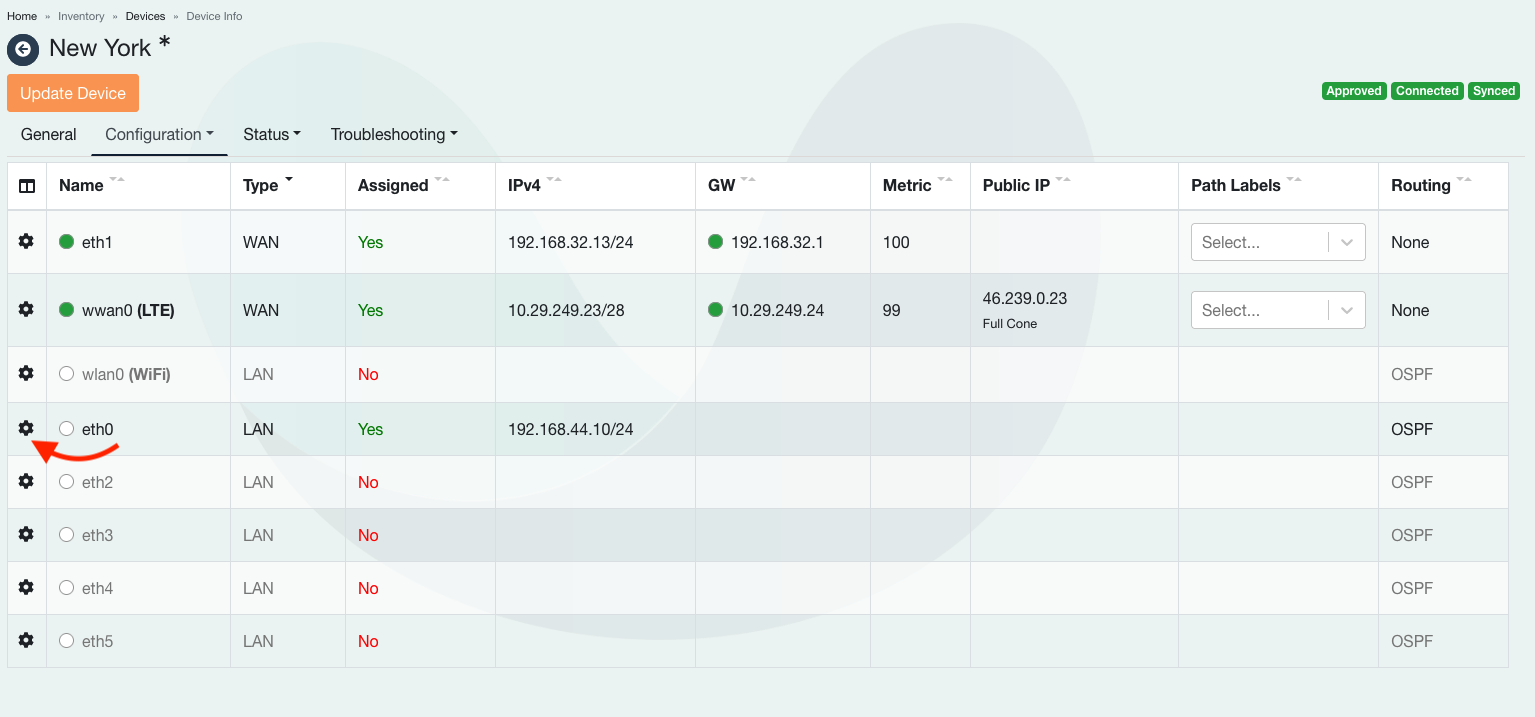
In addition to table view, each interface can be configured in greater detail by simply clicking on settings icon next to interface name.
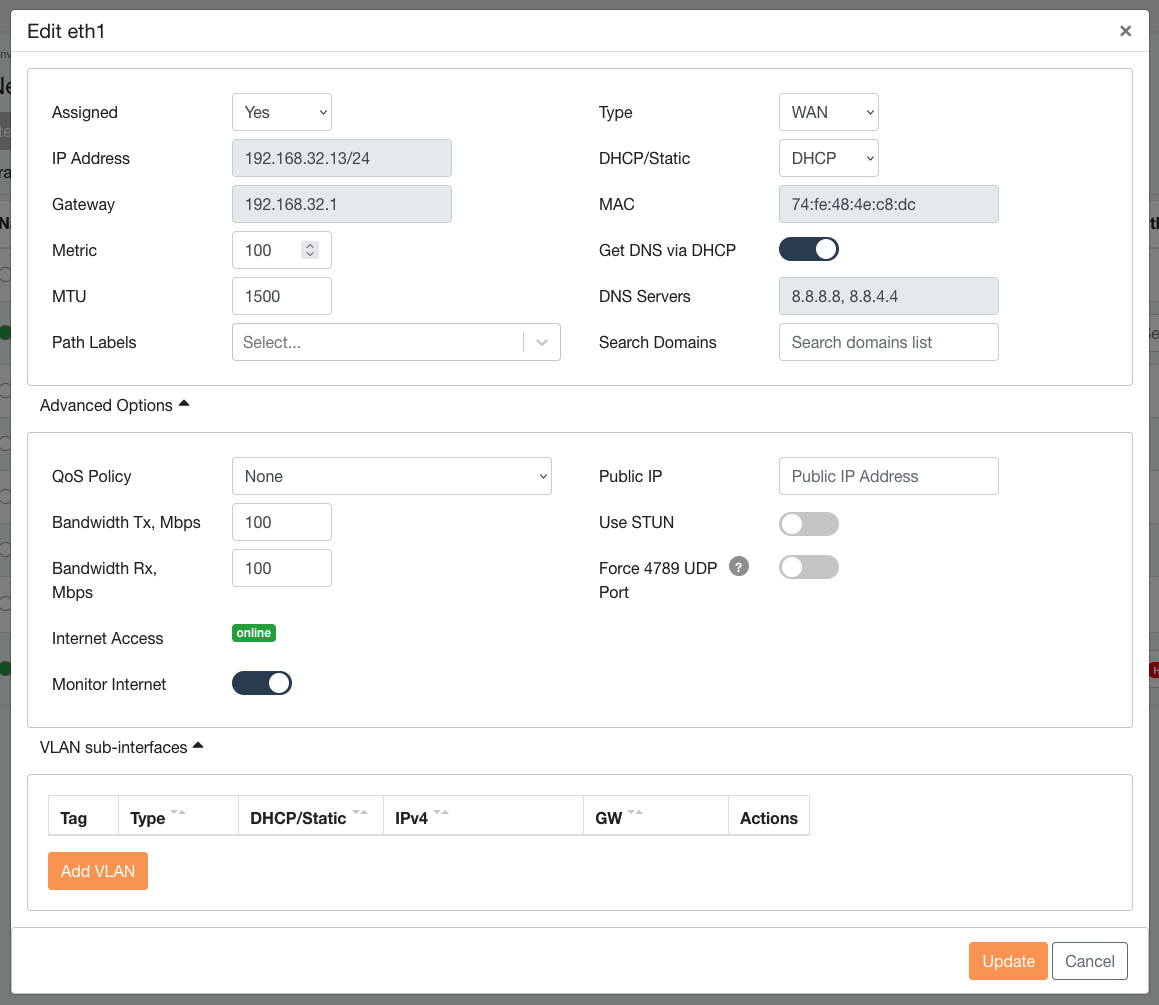
Interface settings offer complete and advanced options, starting with settings for WAN interfaces:
Assigned - When set to “Yes” interface can be configured. Select “No” to not use the interface with flexiWAN.
Type - Marks interface as WAN.
IP Address - Displays / sets IP address of WAN interface. If DHCP is set under “DHCP/static” then IP will be received via upstream.
Gateway - Displays upstream gateway which flexiWAN is using.
MAC - Displays MAC address of the interface.
MTU - Shows interface MTU size, default 1500 for all interfaces.
Get DNS via DHCP - When enabled, WAN will use DNS received by upstream. When not selected allow setting DNS servers.
Path Labels - Used for granular tunnel creation and Path Selection policies (application based routing).
QoS Policy - Allows selecting QoS policy for the particular WAN interface. Learn more about QoS in its own documentation section.
Bandwidth Tx / Rx - Set upload / download throughput.
Public IP - Displays detected public IP.
STUN - When enabled, allows detection of public IP and establishing tunnels behind NAT (NAT traversal). Enabled by default.
Internet access - When “Online” is show, device has internet connectivity.
Force 4789 UDP port - When enabled, flexiEdge devices establishing tunnels to this device will use destination port 4789.
Monitor internet - Enables internet monitoring. When disabled, device assumes interface is always online.
VLAN sub-interface - Add VLAN sub-interface to the selected parent interface. Can be used with WAN, LAN or in pure TRUNK (untagged) mode.
Note
By default each WAN interface has gateway monitoring enabled. Its purpuse is to monitor and signal to the user if WAN interface is down. Gateway monitoring is part of automatic failover functionality, allowing failover between multiple WAN interfaces. Automatic failover works out-of-the-box and automatically when there are multiple WAN interfaces present. Interface which has lower metric, will have higher priority. Eg. bottom interface from the screenshot has higher priority.
Note
flexiWAN enables NAT Traversal by default, allowing devices to establish tunnels behind NAT, when there is a private IP on flexiEdge WAN. NAT Traversal setting is automatically adjusted if it detects public or private IP on WAN, so there is no need to disable it in most cases.
The following settings are available for LAN interfaces:

Assigned - When set to “Yes” interface can be configured. Select “No” to not use the interface with flexiWAN.
Type - Marks interface as LAN.
IP Address - Shows IP address of LAN interface. IP set here is used as gateway for LAN clients.
MTU - Set Maximum transmission unit (MTU). Default 1500 for all interfaces.
Type - Marks interface as WAN or LAN. flexiWAN requires at least one WAN and LAN for operation. Multiple WAN and LAN interfaces are supported.
DHCP/Static - Used with WAN interfaces, WAN can be configured with static IP or set to receive an IP via DHCP.
MAC - Displays MAC address of the interface.
Routing - LAN interfaces support OSPF and BGP. By default OSPF is enabled on LAN so interconnected sites can communicate out-of-the-box.
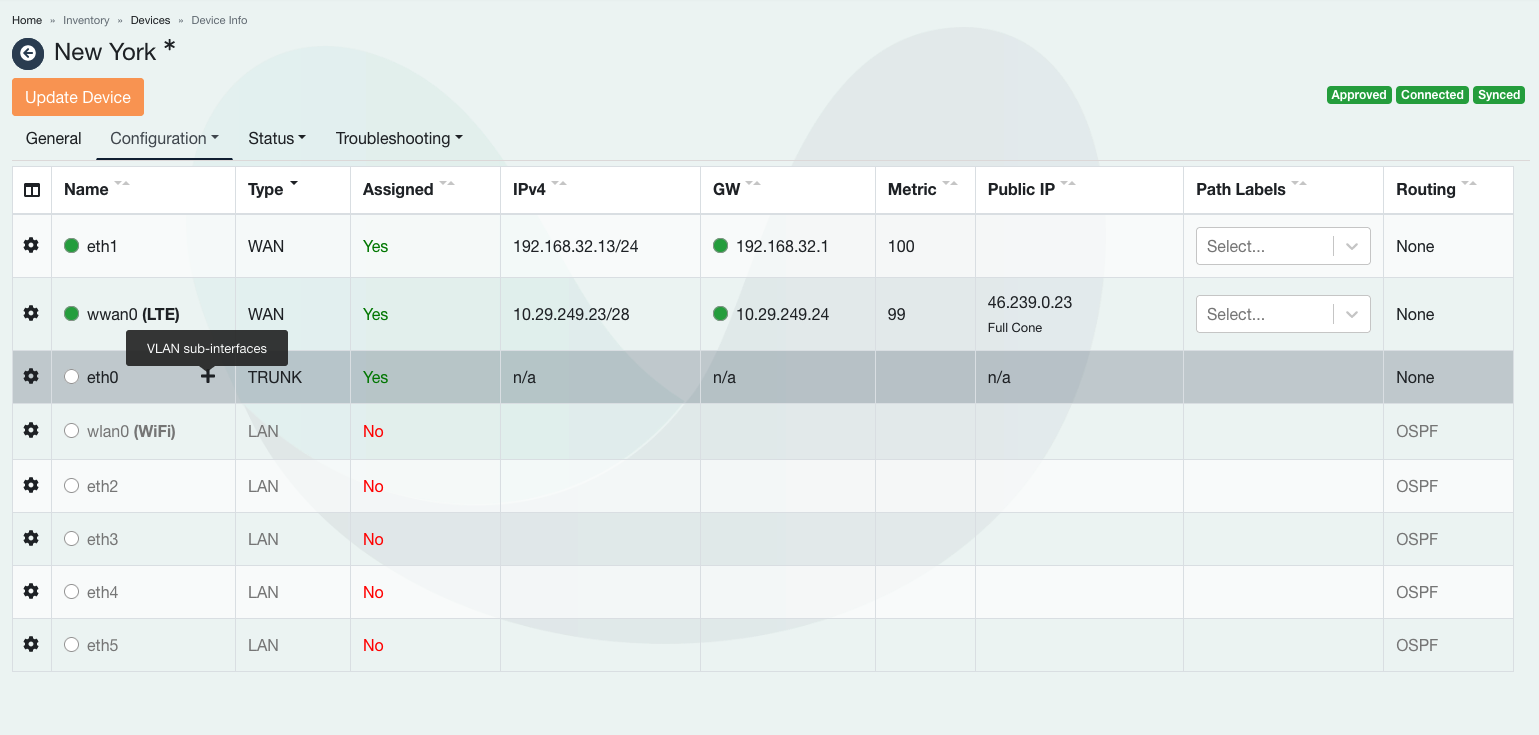
VLAN sub-interfaces - Add VLAN sub-interface to the selected parent interface. Can be used with WAN, LAN or in pure TRUNK (untagged) mode.
DHCP Server
flexiWAN offers DHCP server support for LAN interfaces. When setting up a LAN interface, users will have the option to create a DHCP server, and it is also possible to configure the DHCP server through the interface settings.
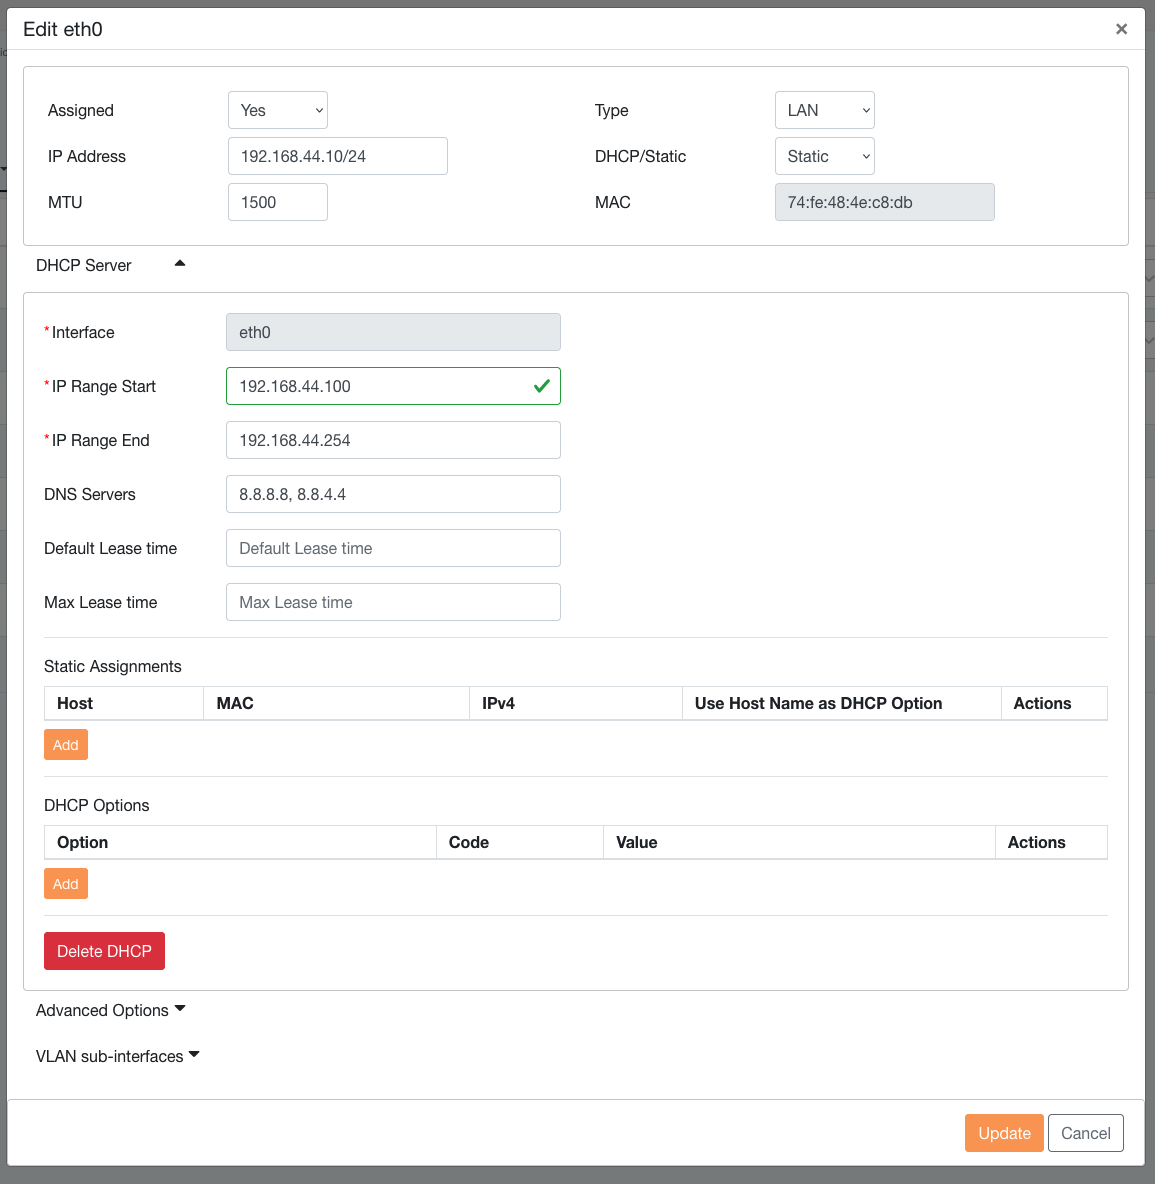
flexiWAN’s DHCP server provides a range of supported features, enhancing your network management capabilities:
IP Range Configuration: You can define the specific range of IP addresses that the DHCP server will allocate to LAN clients. This allows you to control the IP address allocation within your network.
DNS Server Configuration for LAN Clients: flexiWAN allows you to configure DNS server settings for LAN clients. This ensures that your clients can resolve domain names and access resources on the internet effectively.
Default and Maximum DHCP Lease Time: You have the flexibility to set both the default and maximum DHCP lease times. The default lease time determines how long a client holds an IP address by default, while the maximum lease time can limit the maximum duration of a lease.
Static IP Assignments: flexiWAN enables you to assign static IP addresses to specific devices on your LAN. This is useful for ensuring that critical devices always receive the same IP address, simplifying network management.
Support for DHCP Options: The DHCP server in flexiWAN supports various DHCP options, including options like 42 and 66, among others. These options allow you to customize and optimize DHCP behavior to suit your network requirements.
By leveraging these features, you can tailor your DHCP server settings within flexiWAN to meet the unique demands of your network, whether it’s for IP management, DNS configuration, or specific DHCP options.
LAN Bridge
Two or more network interfaces can be bridged when assigned the same IP and CIDR. Clients connected to both or more interfaces will assign or receive an IP from the same range.
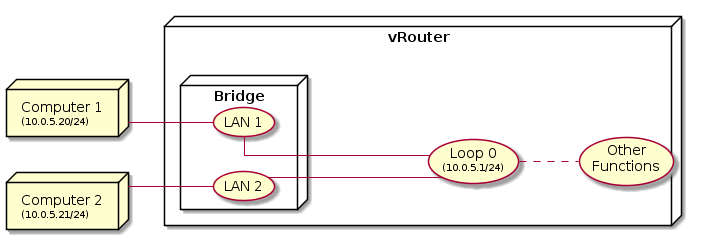
Bridge is automatically created when multiple LAN interfaces are configured with the same IP address and CIDR. Both DHCP server and OSPF continue to work on bridged interfaces.
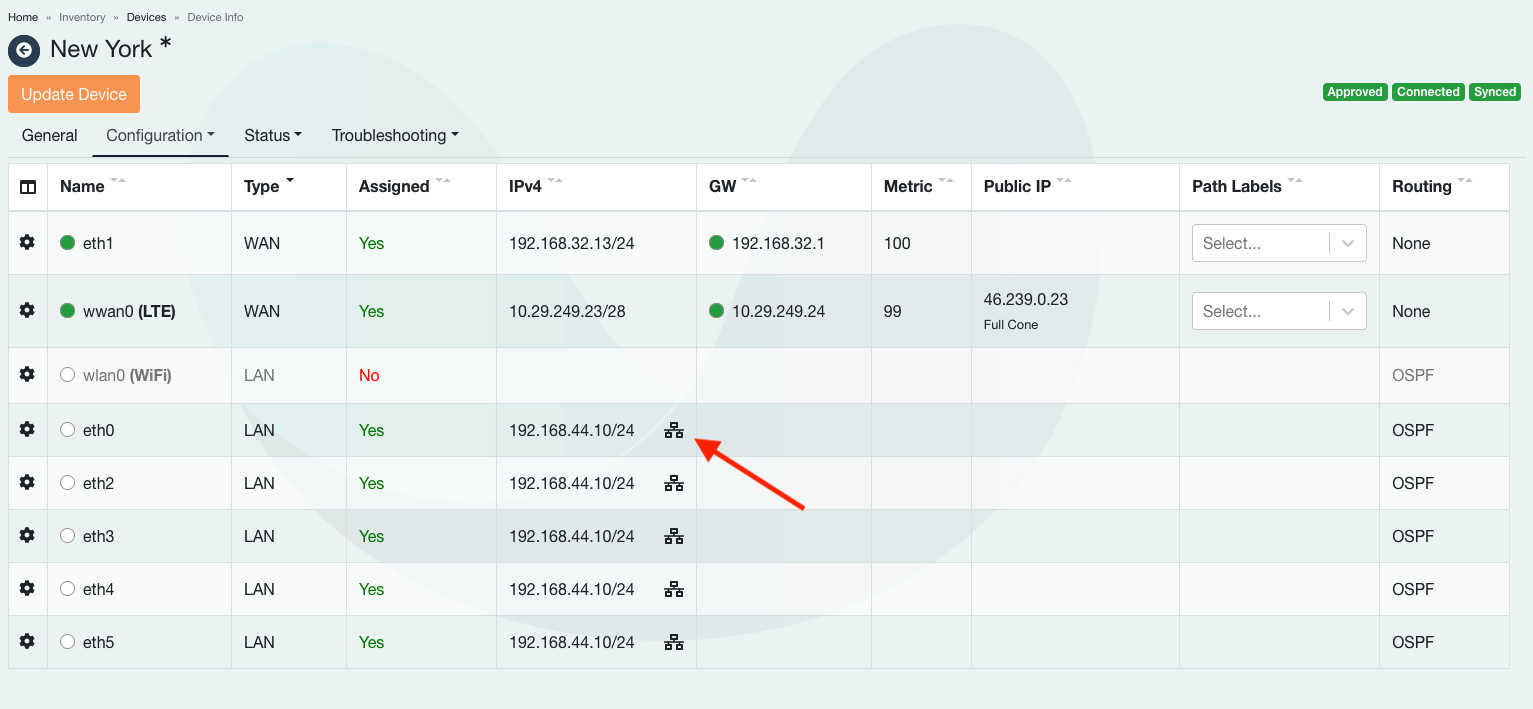
Once two or more interfaces are configured with the same IP and CIDR, the symbol  will indicate bridge mode is configured. Make sure to update device to apply changes.
Note
Vhen using virtual machines make sure to attach different virtual switch to each LAN interface, in order to avoid network loops.
VLAN setup
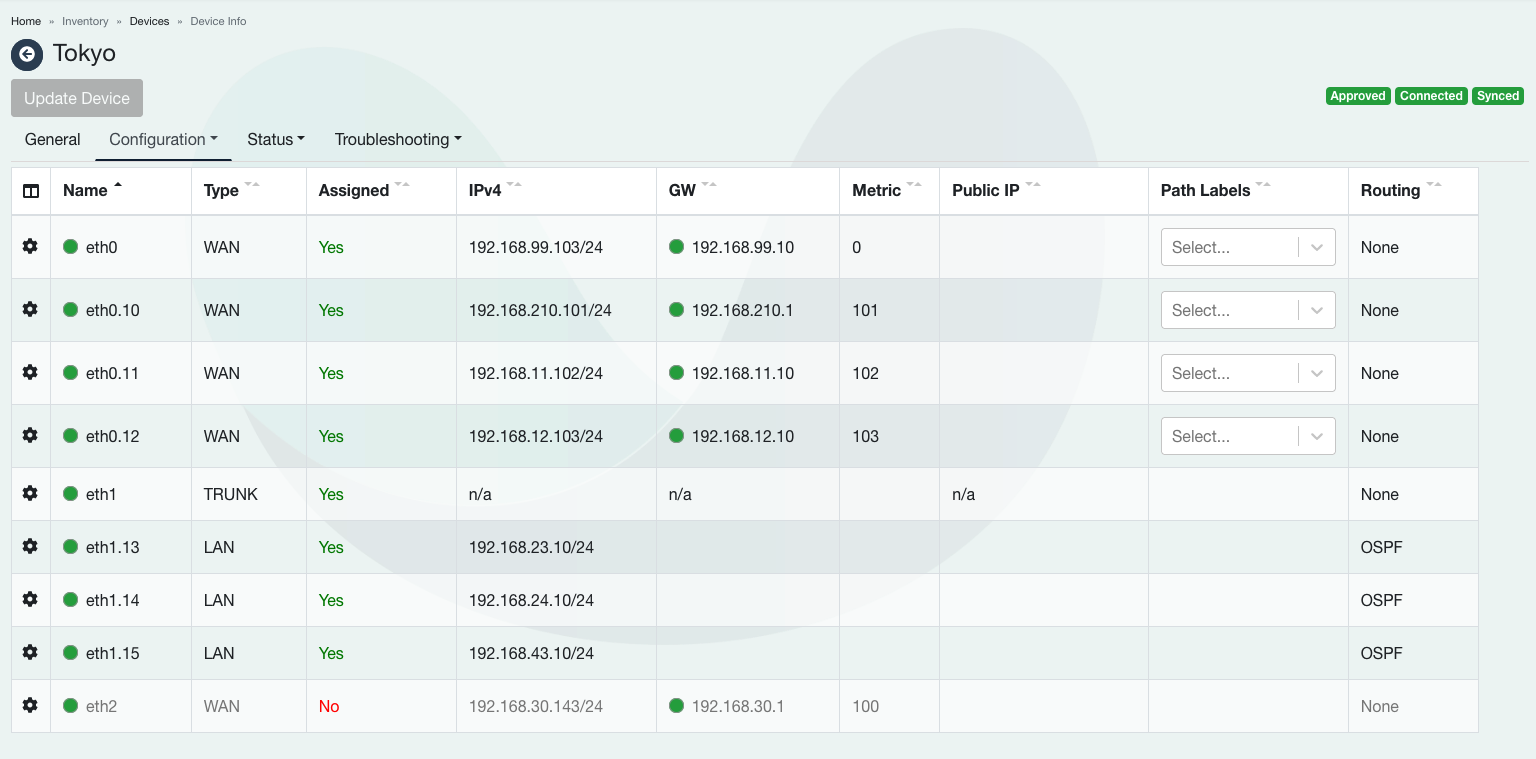
flexiWAN supports VLAN’s on all wired interface types. VLAN’s can be added as sub-interfaces of assigned interfaces, supporting VLAN’s on the following:
WAN and LAN - VLAN’s can be added on both types. Adding VLAN’s on these interface types will mix tagged and untagged traffic which may not be ideal.
TRUNK - Use this type when flexiWAN interface is connected to a layer 3 switch. TRUNK interface cannot have an IP or any untagged traffic.
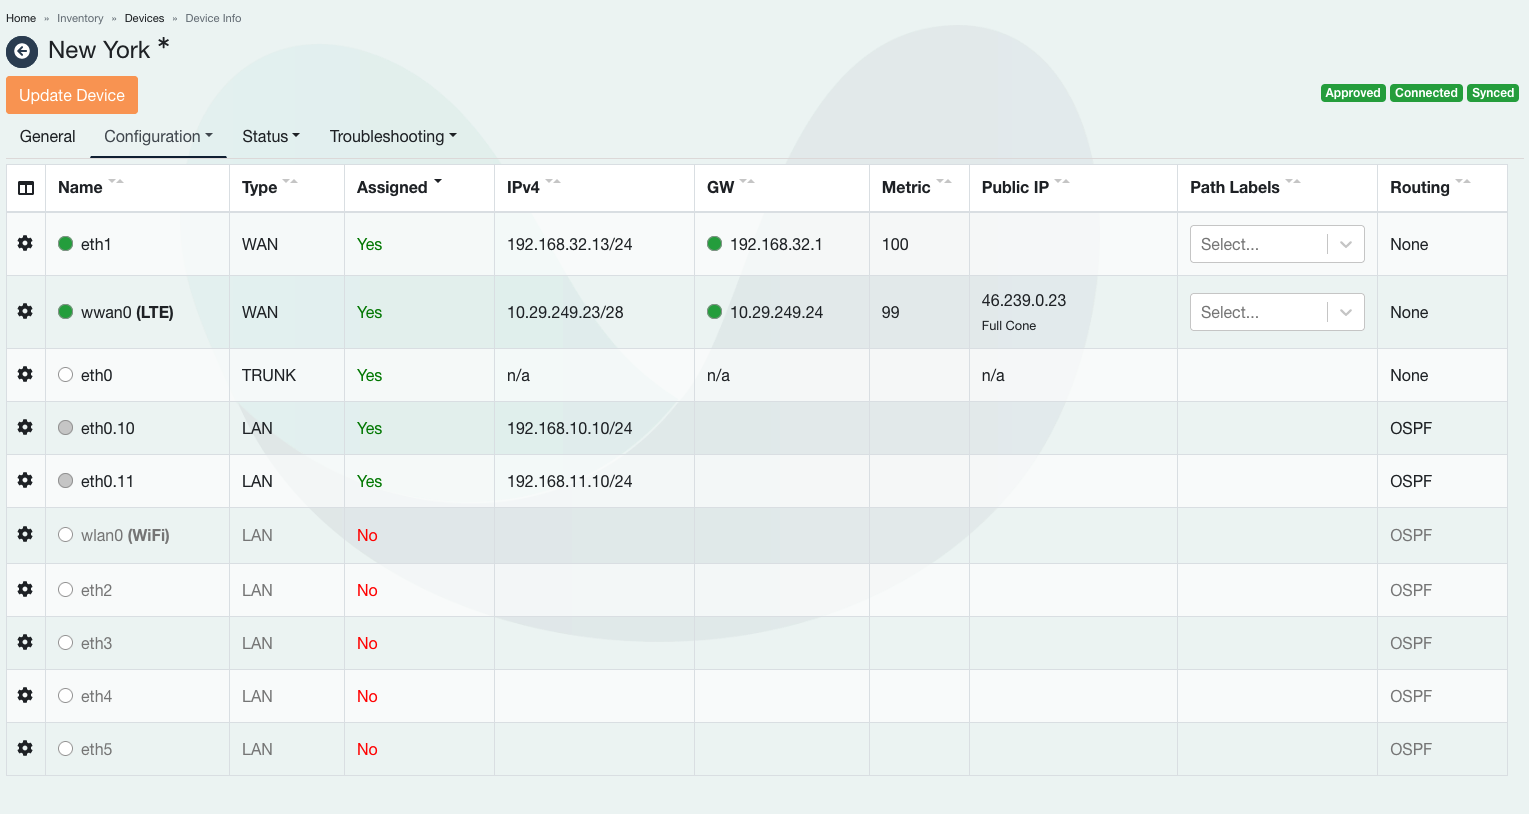
Once added, VLAN’s will be displayed as sub-interface of parent interface. If parent interface is eth0 and VLAN is created with VLAN tag 10, then VLAN sub-interface will eth0.10.
Most common and recommended use case is to add VLAN’s to TRUNK interface. This way only tagged traffic will be present on the interface. In the following example, adding VLAN sub-interfaces to parent TRUNK interface is shown.
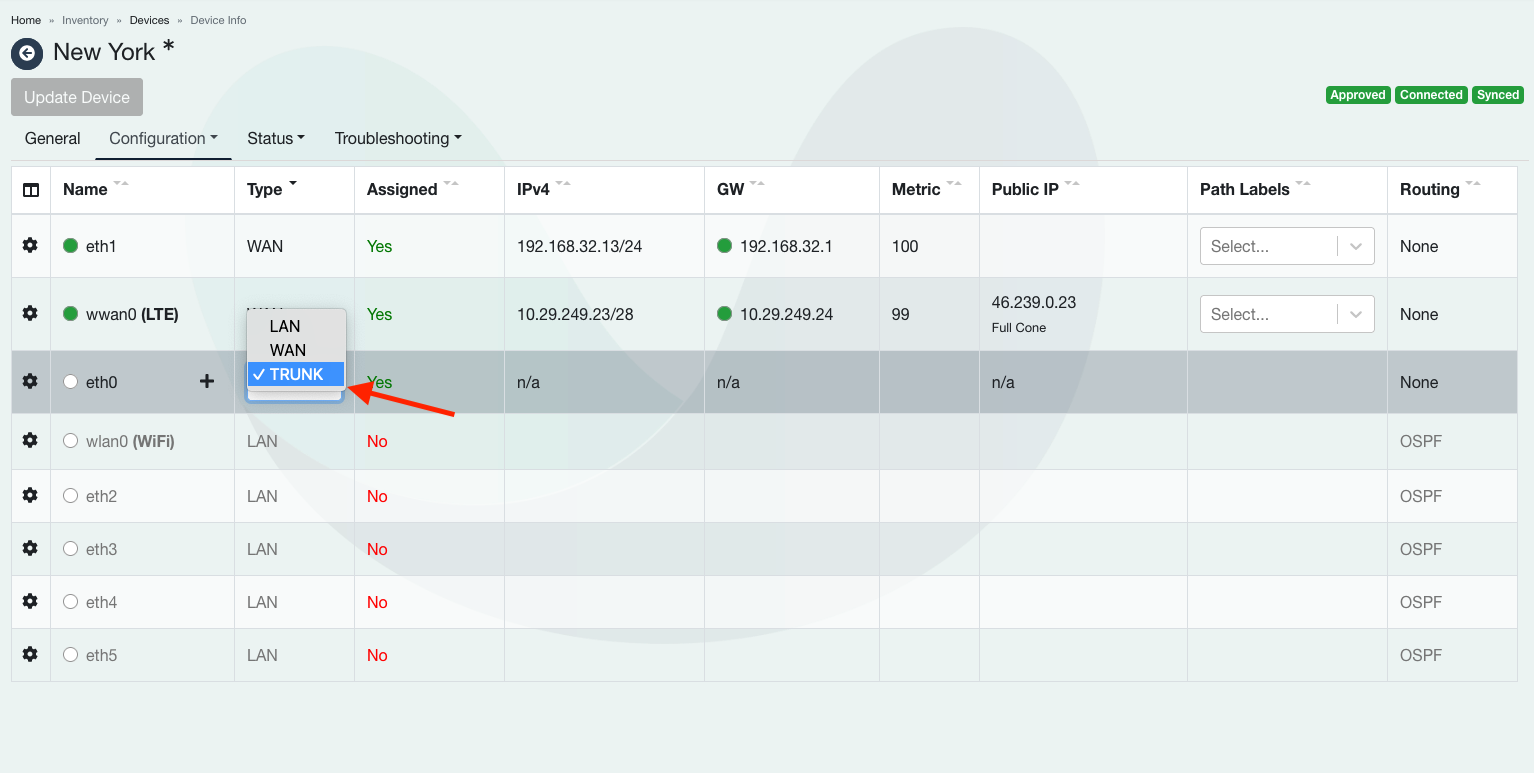
Once interface type is set to TRUNK, click on a + sign next to interface name.
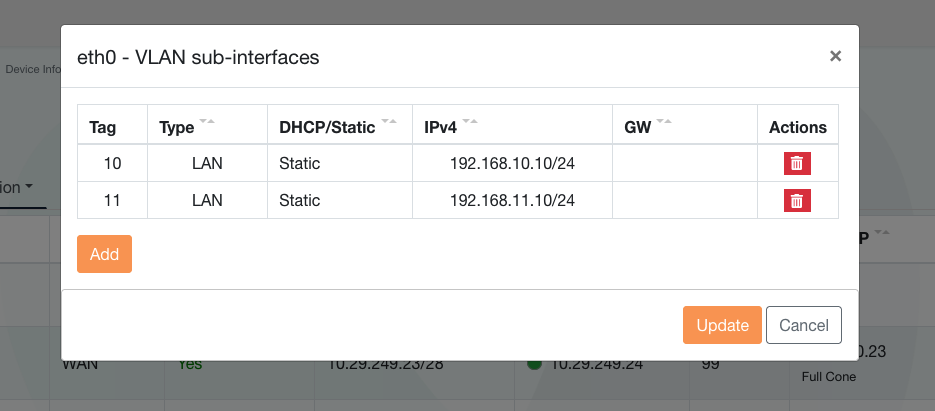
Click on Add button to define VLAN’s, starting from VLAN Tag ID. Confirm LAN is the type and static is configured in order to assign an IP. Use an example below to add two VLAN’s with tags 10 and 11, configured as LAN. Click Update to confirm and add new VLAN’s.
That’s it, two new VLAN sub-interfaces are added and configured as LAN. Finalize by clicking on Update device in top left corner. Note, don’t forget to add DHCP server to each of newly created LAN interfaces.
VLAN’s can also be added on WAN or LAN interface types using the same procedure as above. It is fully suported to combine all three interface types with VLAN’s if needed.
Note
Please note that when using WAN or LAN interface type, interface will contain tagged and untagged traffic. This may be a security risk, therefore it is recommended to TRUNK interface type when possible.
LTE setup
flexiWAN also supports LTE network interfaces in addition to its support for wired interfaces. To set up LTE functionality from the flexiManage environment, it’s crucial to have an active wired network interface alongside the LTE interface. This wired interface doesn’t need to be assigned but must be recognized by the system and have internet connectivity to ensure that the device stays accessible to flexiManage (common for staging and LTE only deployments).
Please be aware that flexiWAN currently supports a specific range of LTE modems, which are listed on our website among the devices officially certified by flexiWAN. For optimal compatibility and performance, we highly recommend confirming with our support team or your hardware vendor that the LTE or WiFi module in your chosen device is certified for seamless integration with flexiWAN.
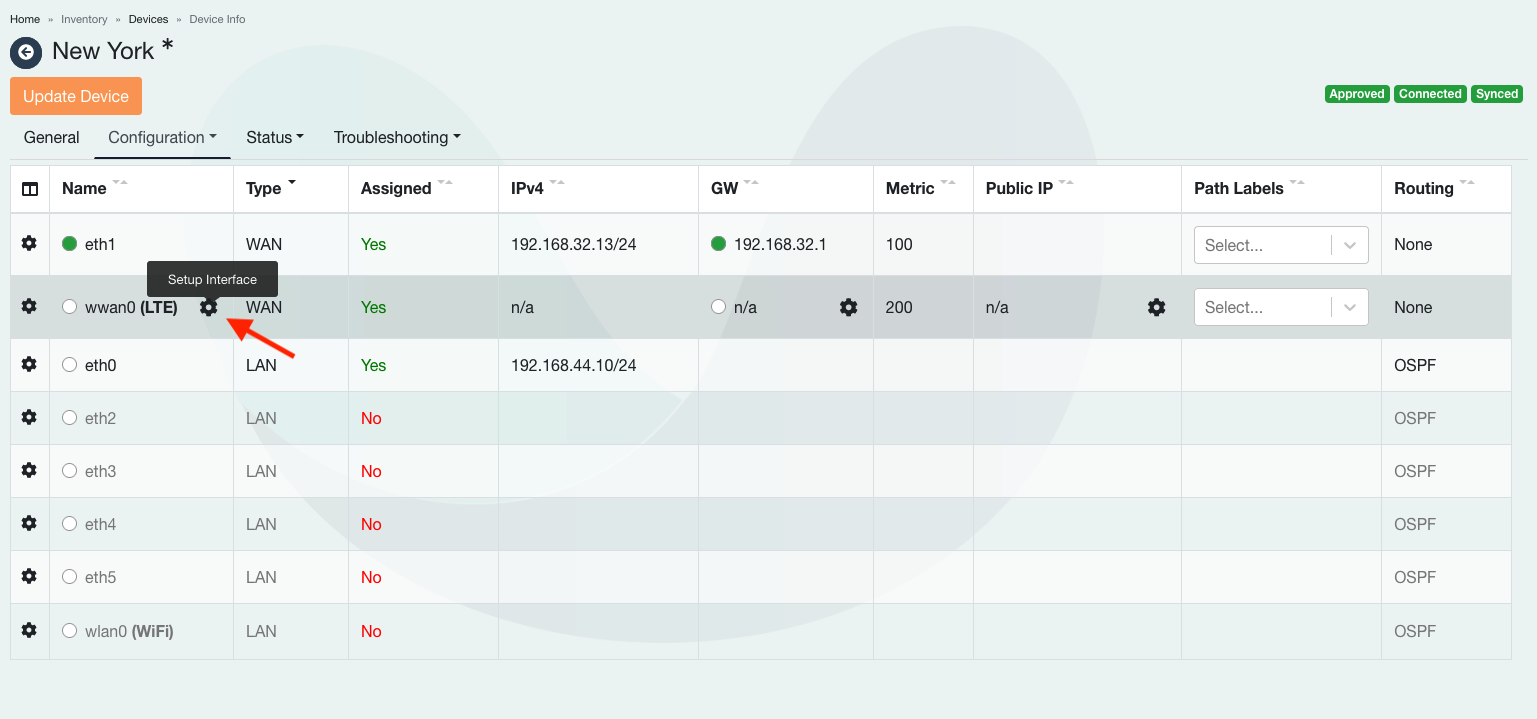
In order to configure the LTE interface, navigate to device settings and click on Interfaces from the Configuration tab. From there, assign the LTE interface and click on settings (Gear Icon):
After clicking on the LTE settings, LTE configuration options will appear. Configure the following settings:
Correctly enter SIM PIN.
Set the LTE to enabled.
Enter interface metric (must not be same as wired WAN).
Confirm APN is detected correctly. In case the APN is not detected, enter the APN manually.
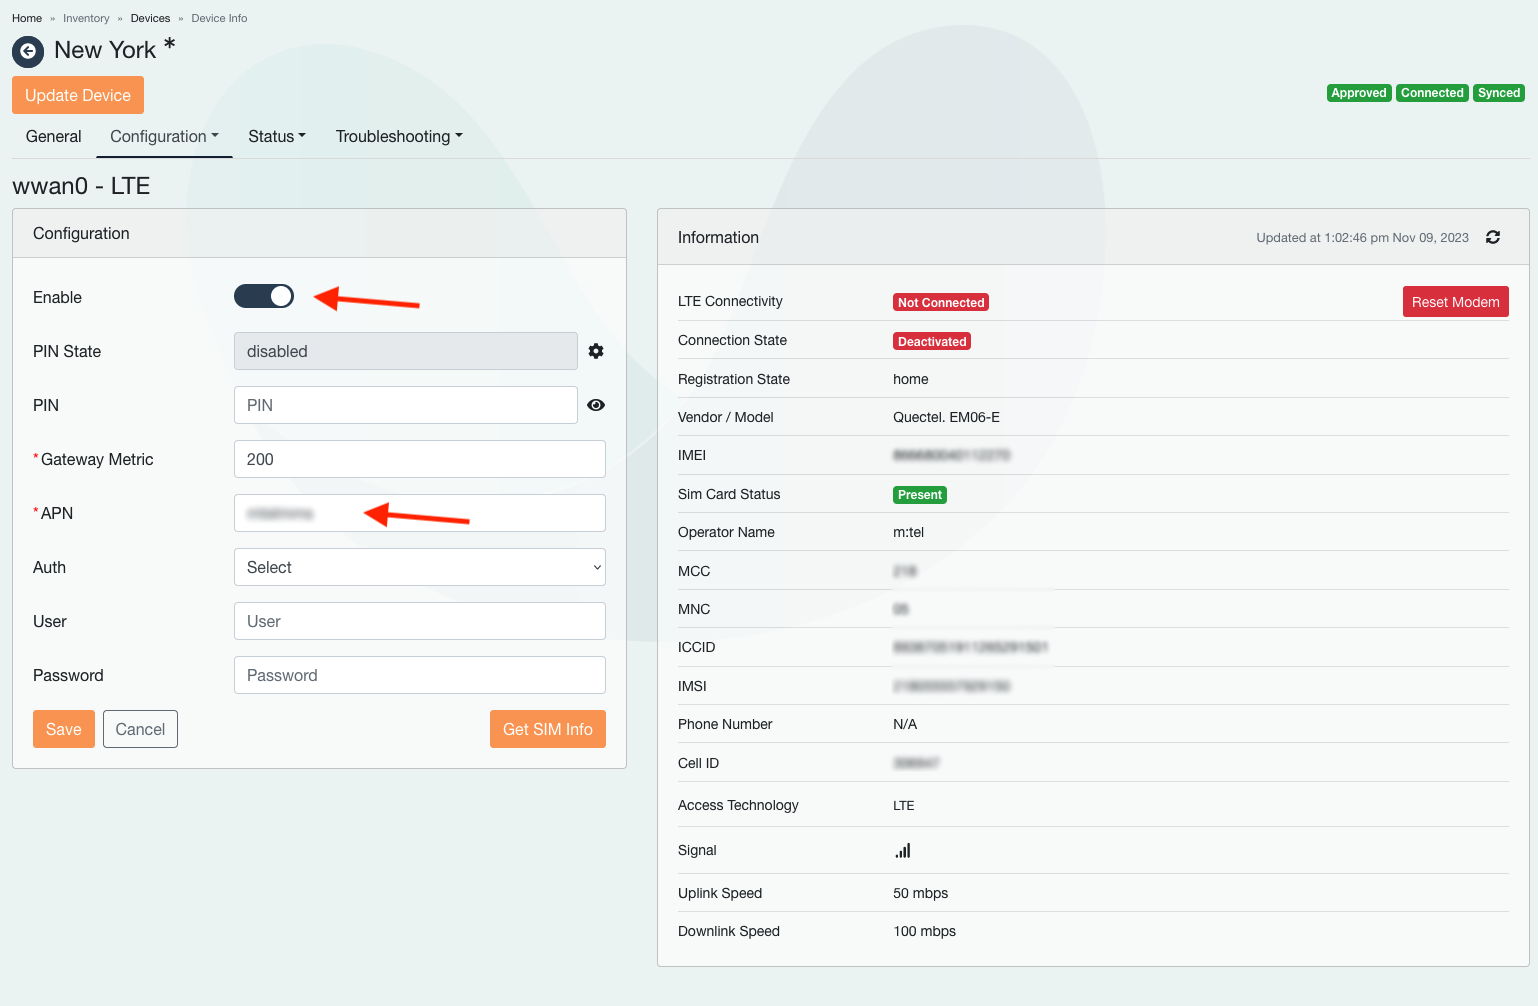
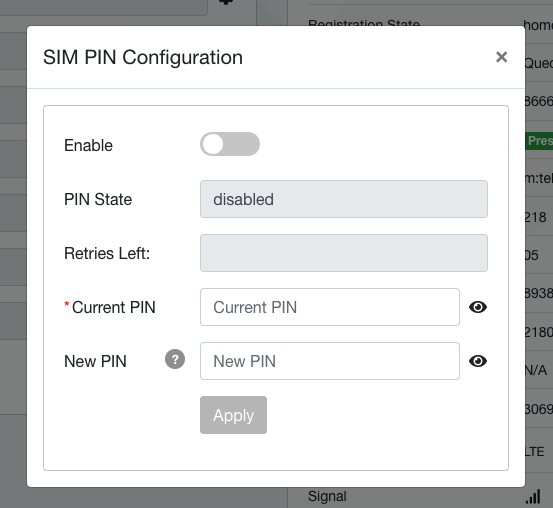
SIM PIN can be changed or disabled by clicking on settings icon next to PIN state.
After entering settings, click Save and then click on Update Device from Interfaces tab.
Note
Important considerations when configuring LTE network interfaces:
Always make sure to keep NAT Traversal enabled for LTE interfaces, otherwise tunnels may not connect as most of carriers utilize CGNAT.
When adding tunnels between LTE and other devices, STUN can take up to several minutes until providing port to NAT Traversal. Monitor “Device-modify” and “add tunnel” jobs from Troubleshooting > Jobs section.
If interfaces page doesn’t show LTE interface, try to reset and re-add the device to flexiManage.
Supported LTE cards are listed under system requirements. Using non-supported LTE cards require testing prior to deployment.
WiFi AP setup
flexiWAN supports WiFi AP for LAN, assuming the WiFi card is recognized and supported by the underlying Ubuntu (see list of pre-tested WiFi cards below). flexiWAN uses hostapd for wireleess access point, supported standards are b/g/n and AC. Both 2.4Ghz and 5Ghz modes are supported, however dual band is not supported currently.
WiFi cards tested by flexiWAN:
Module |
Driver |
Notes |
|---|---|---|
QCA6174 802.11ac |
ath10k |
Out-of-the-box (OOB) support |
ALFA AWUS036AC |
RTL8812AU |
requires drivers via DKMS |
ALFA AWUS036NEH |
RT3070 |
OOB support |
ALFA AWUS036NH |
RT3070 |
OOB support |
ALFA AWUS036NHR v2 |
RTL8188RU |
OOB support |
Comfast CF-812AC |
RTL8812BU |
requires drivers via DKMS |
TP-LINK TL-WN722N v1 |
ath9k_htc |
OOB support |
Note
Most WiFi cards can work if the correct drivers are installed. Use DKMS and install approperiate WiFi drivers with it.
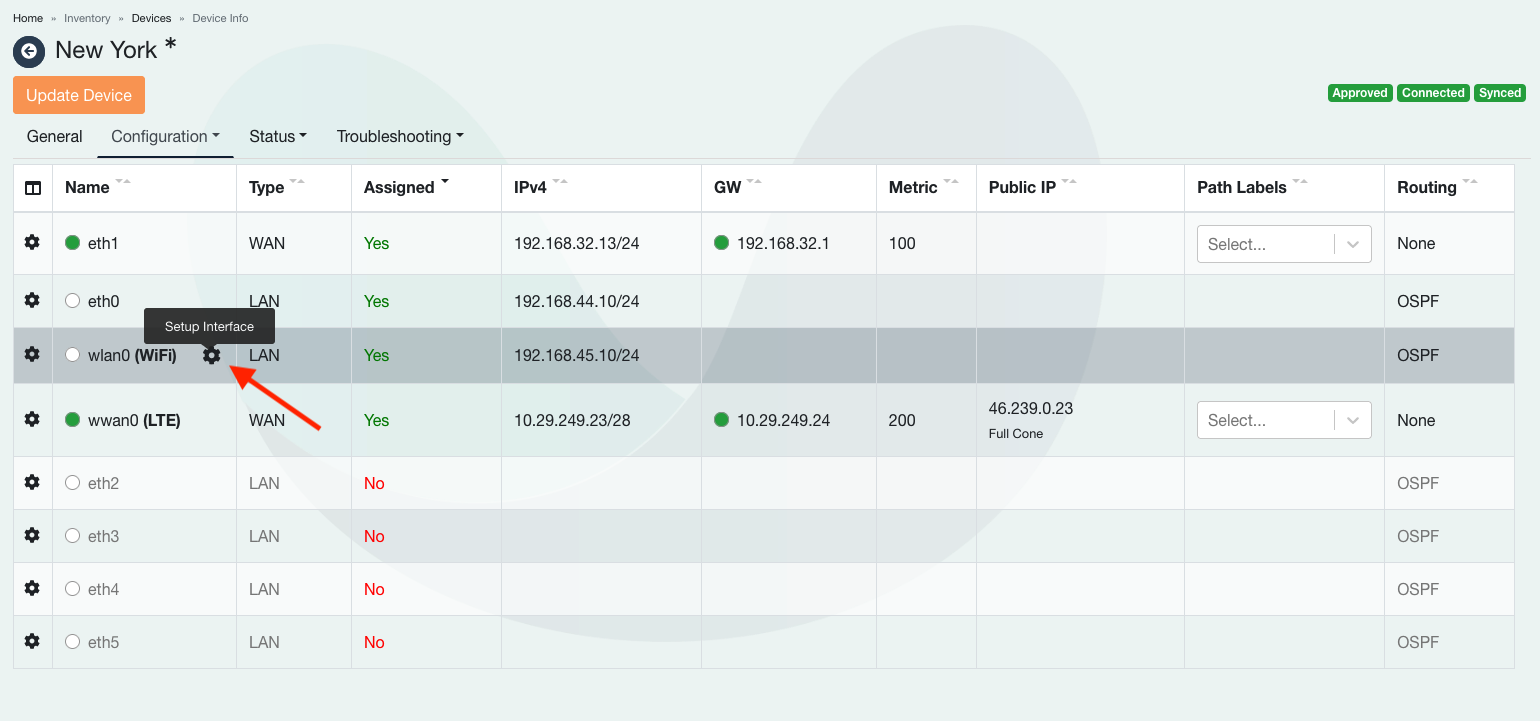
In order to configure WiFi AP on LAN, navigate to the device settings and click on Interfaces tab. From there set the WiFi recognized interface as assigned and add the local IP. Then click on the settings icon next to WIFI interface name.
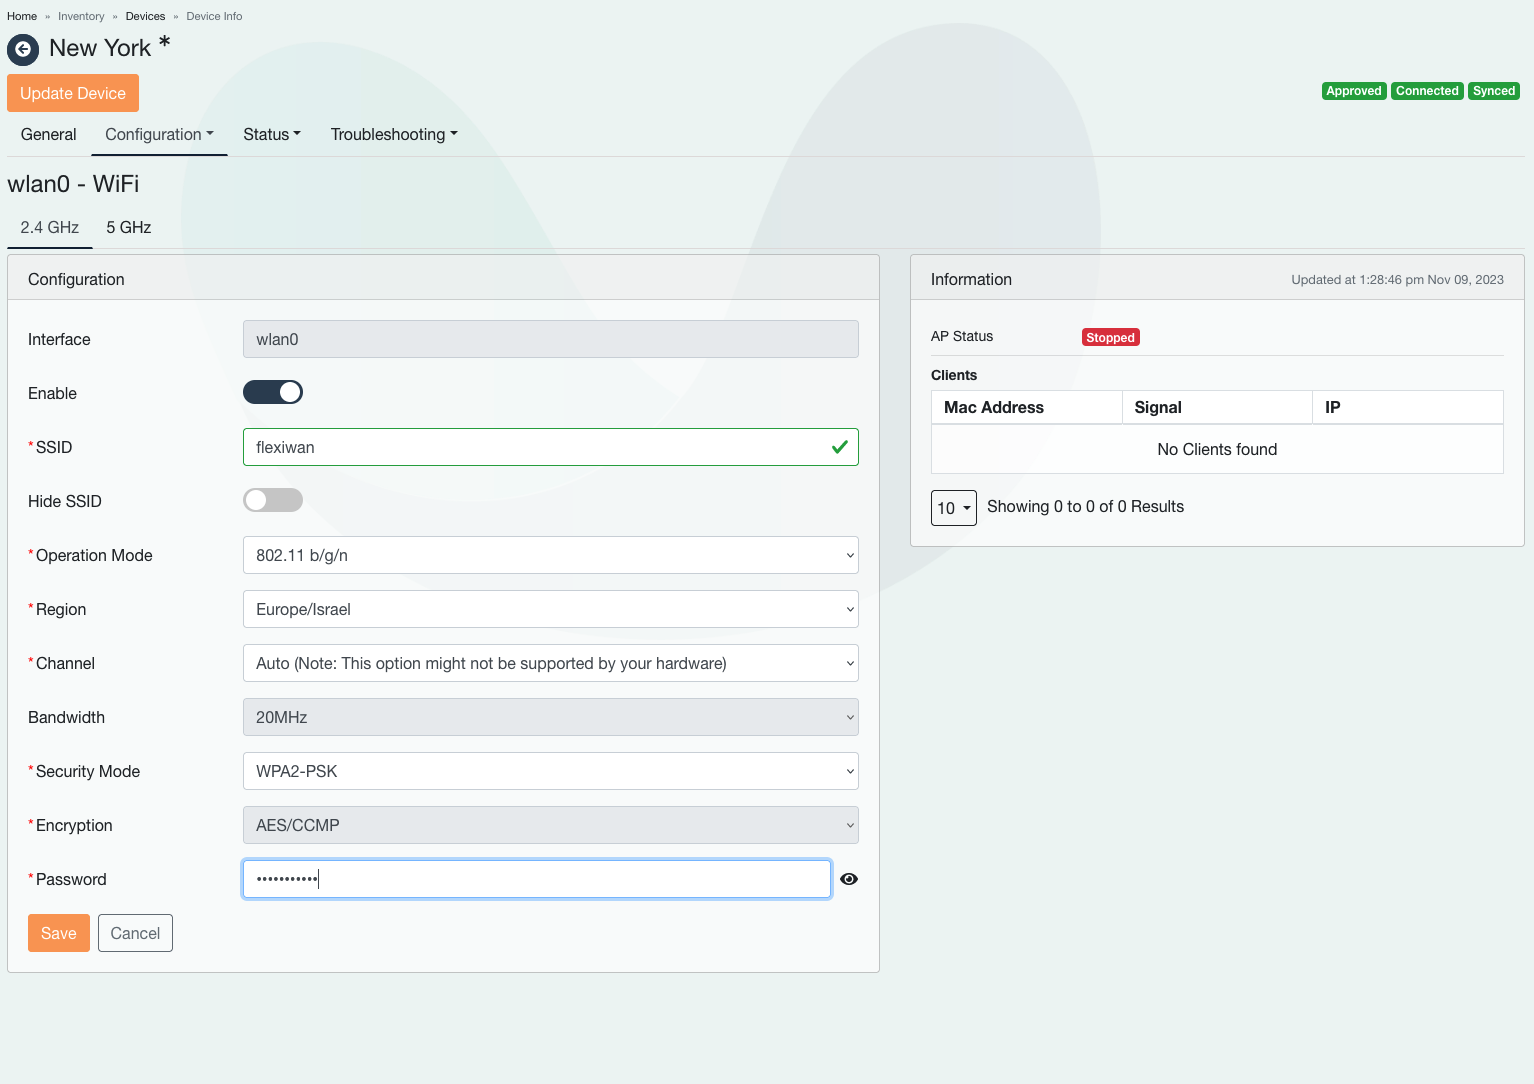
On WiFi settings page, configure the following to enable its operation:
Select between 2.4Ghz and 5Ghz bands via tabs on top.
Enable the wifi interface
Add SSID / WiFi network name
Choose Operation Mode. Make sure your WiFi card supprots the selected mode.
Pick a Region.
Set Channel or keep it set as Automatic. In most cases Automatic moode will select the best Channel, however with some cards it is required to manually set the Channel.
Pick security Mode and enter WiFi network password.
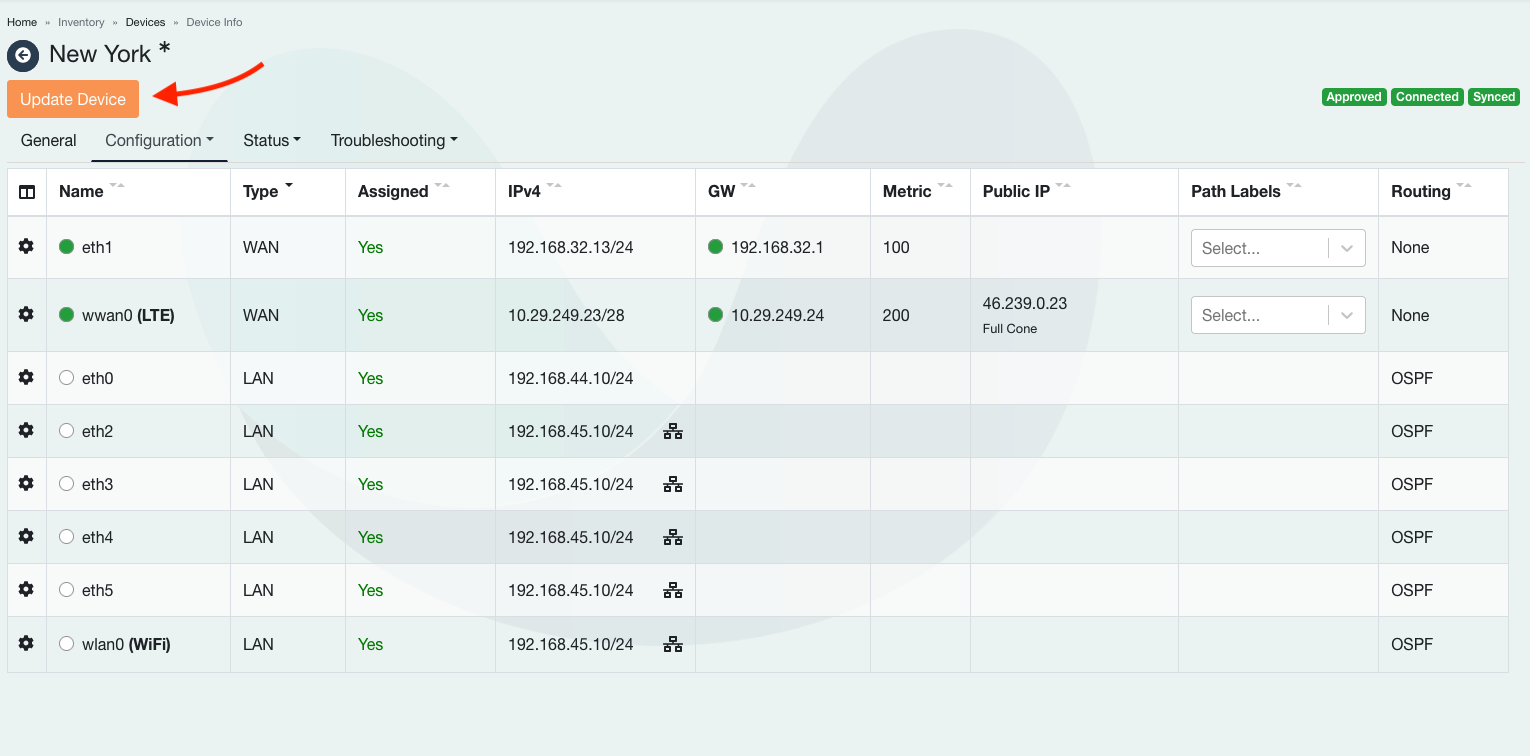
Enter WiFi AP settings and click save at the bottom of the page. Make sure to also click on “Update Device” while on Interfaces page.
Note
WiFi AP considerations:
WiFi functionality is limited to the WiFi card capabilities.
When using 5Ghz, the vRouter may fail to start due WiFi ACS not collecting survey data. Try setting the Channel manually instead of configuring it as Automatic.
If your WiFi card is not recognized, try to reset and re-add the device to flexiManage.
In most cases, if your WiFi card is not recognized, but has support for linux, drivers for it can be added via DKMS and it should work with flexiWAN afterwards.
Some WiFi cards have world regulatory domain hardcoded and may not be able to run when configured to some specific Channels.
Be sure to enable DHCP on WiFi LAN interface so AP clients can get an IP.
Note
When installing flexiWAN on Ubuntu 20.04 LTS instead of using flexiWAN image, 5Ghz WiFi may not work due diferent kernel.
Completing the configuration
Once network interfaces are configured, click on “Update Device” button to apply your configuration.
Note
Changes to the device configuration can be applied dynamically even when the device is running
Changes in the interface assignments will result in router restart
WAN changes may momentary disconnect tunnels.
WAN IP change will trigger automatic tunnel reconstruction.
After the device is approved and interfaces configuration is complete, it will show status as approved, connected and synced after a few seconds.