Path Selection Policy
Overview
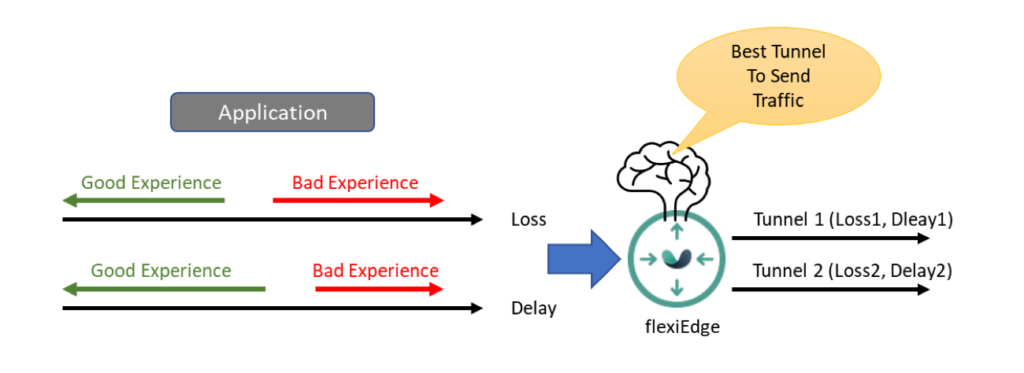
Path Selection enables application based routing with flexiWAN. With Path Selection policies users can decide through which interface or tunnel certain outgoing traffic is routed, whether using tunnels, peering, or a local internet breakout. Path Selection includes Quality Based Routing (QBR) option for a given application or application categories (e.g. category, importance and service-class). The system collects link quality characteristics (e.g. loss and latency) per tunnel and decides which tunnel would be best to route the application on in order to meet the application network quality requirements. The system will try to balance the applications across the links to utilize the available links in the best way.
Path Selection uses the following components:
Traffic & App Identifications: L3/L4 application identifications and categorization with user configurable custom App Identifications.
Path Labels: Path Selection uses Path Labels through which outgoing traffic is routed. Tunnel or internet breakout / Direct Internet Access (DIA) Path Labels types can be used for Path Selection application based routing.
Policies: Allows users to define policies with rules, which route all or specific traffic using Path Labels. Afterwards a policy can be installed on single or multiple devices.
Before trying out Path Selection, be sure to first cover Path Labels overview section and create a few Path Labels in order to successfully follow the Path Selection guide. Make sure to have tunnel and DIA Path Labels created prior to reading further. Also check out Traffic & App Identifications to better understand Application Identifications and their categories.
Path selection and routing work together in combination, however a policy is only applied on interfaces with Path Labels. In order to make sure traffic is always routed via a rotatable path, routing takes priority over path selection. The shortest path routes to a given destination are found first. The policy selects which and how to use the available routes. If no route exists, the traffic is routed only according to the policy.
In a typical deployment where multiple tunnels to a given destination are available, there are multiple routes with the same cost, the policy will choose the route according to the policy definition.
Policies, Rules and Traffic classification
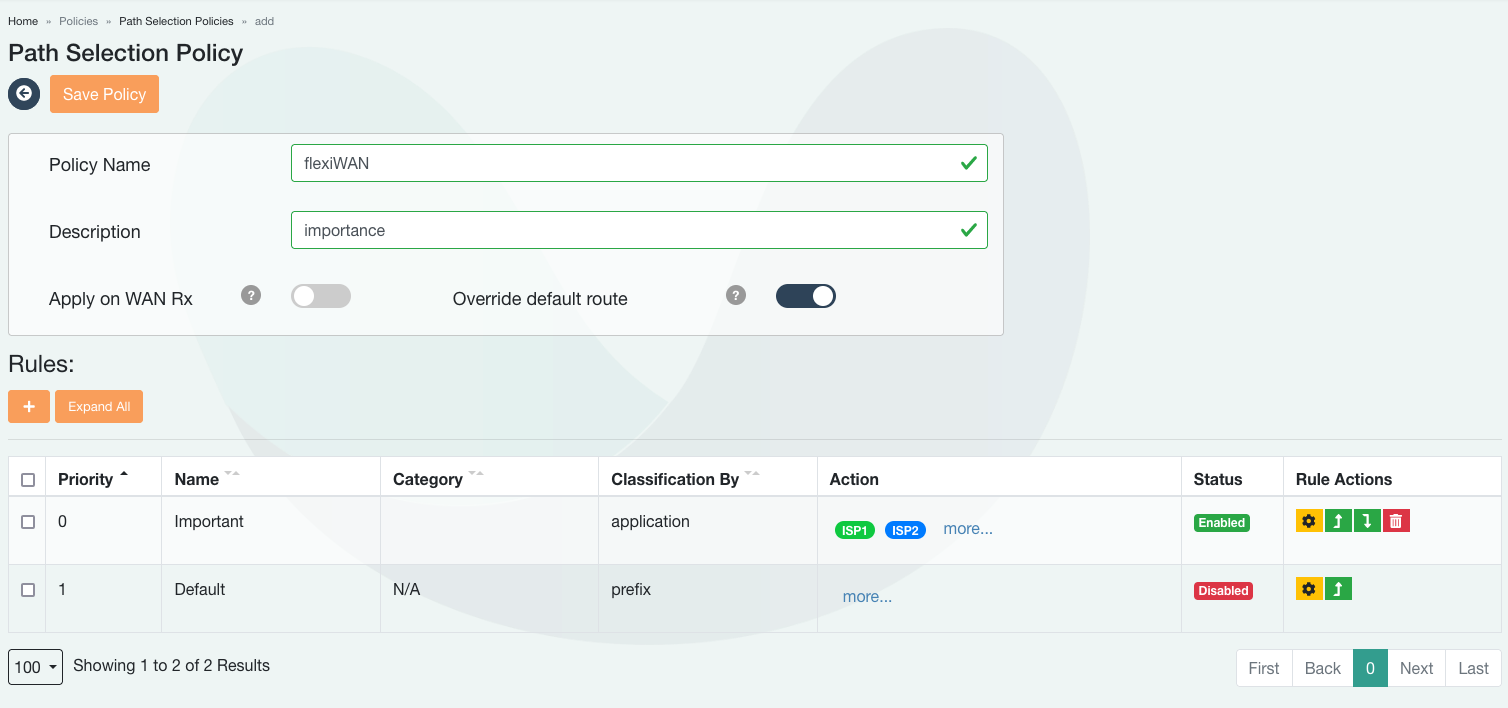
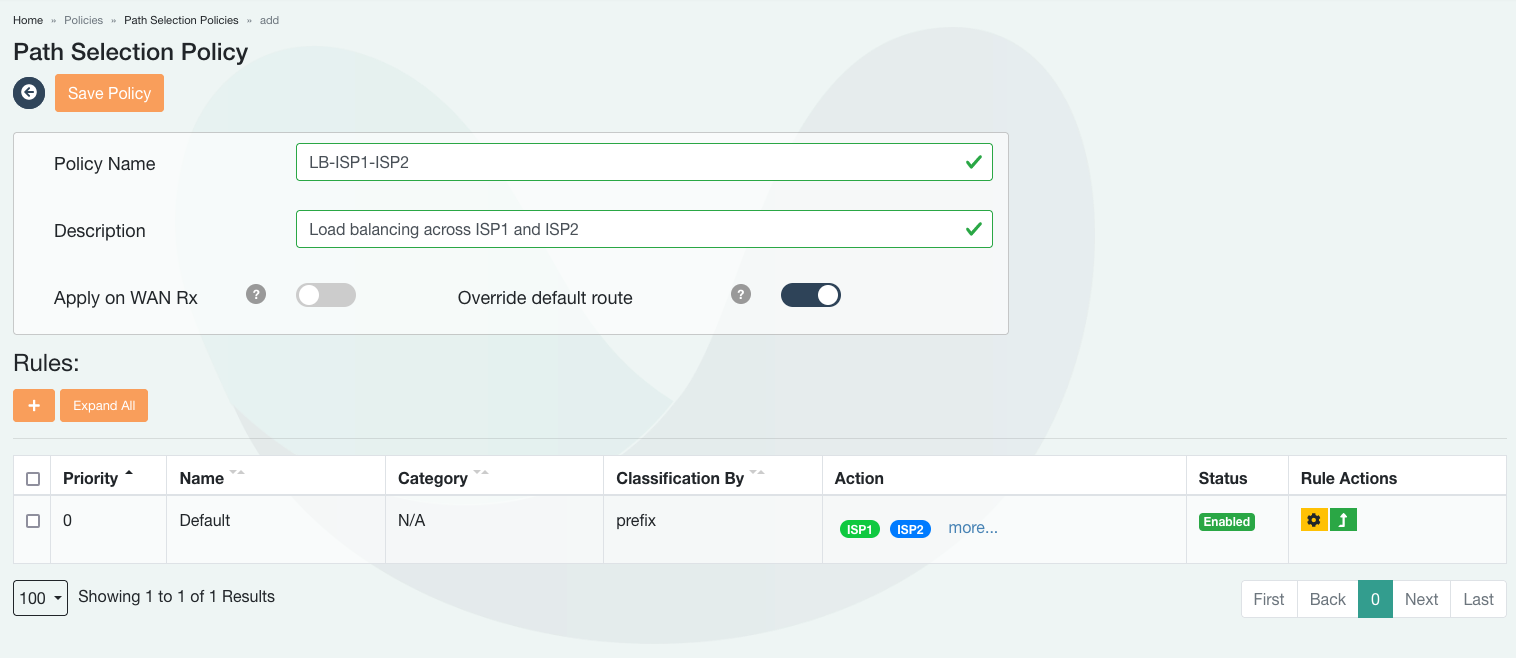
Path Selection Policy is available from Traffic Optimization section in side bar. Multiple policies can be defined and different devices can have their own separate policies, however a device can have a single policy installed. Path Selection policy contains rules, and each policy can have a single or multiple rules.
Path Selection Policies page shown below contains multiple example policies. Policy page provides installation status of policies as well as actions to:
Create a new policy
Edit an existing policy
Filter and display all devices installed per specific policy
Delete a policy
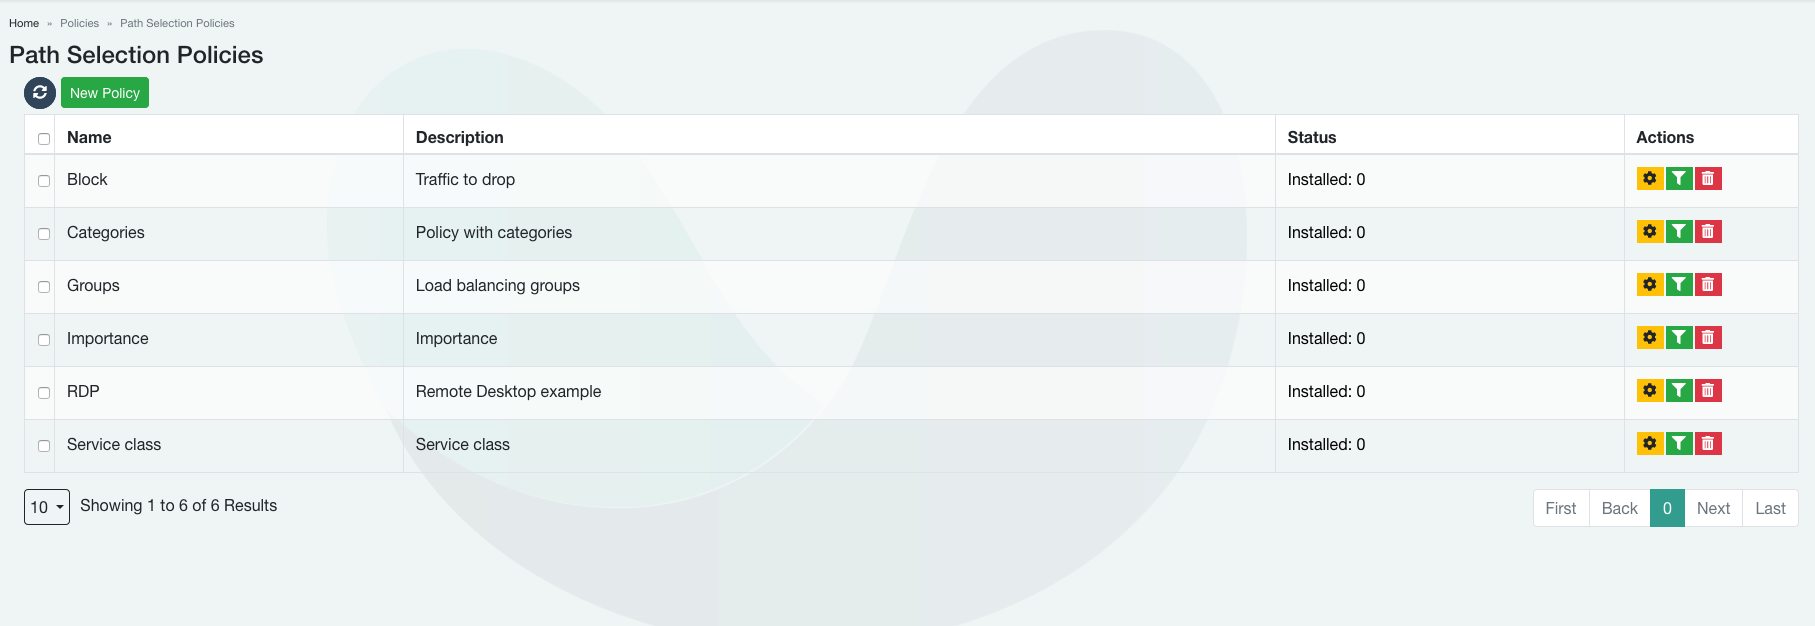
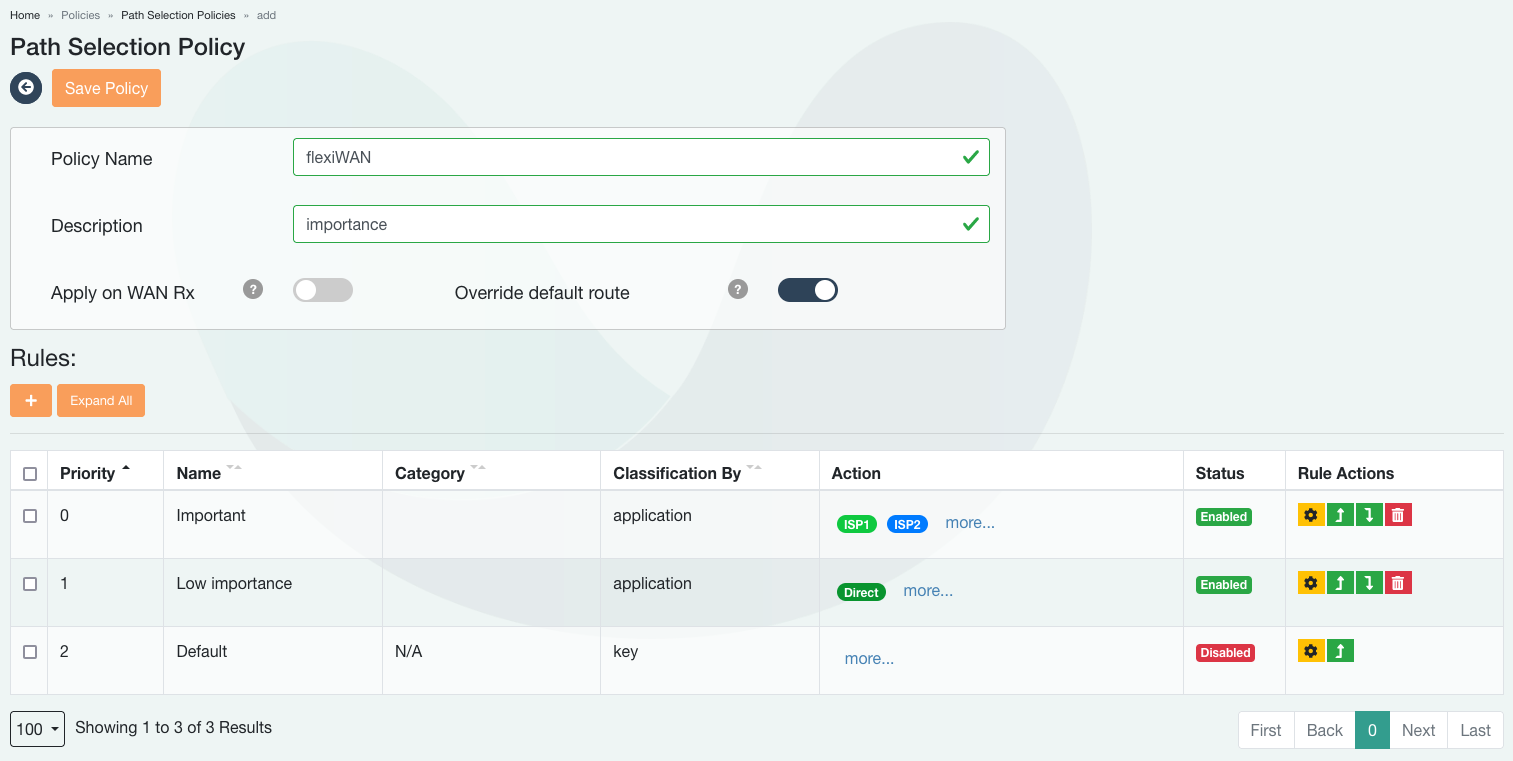
Each policy contains rules in which users can configure application based routing parameters. Every new policy has a “Default” single rule which is disabled by default, with the purpose to match all traffic that is not matched by other higher priority rules.

Rules and Traffic Classification
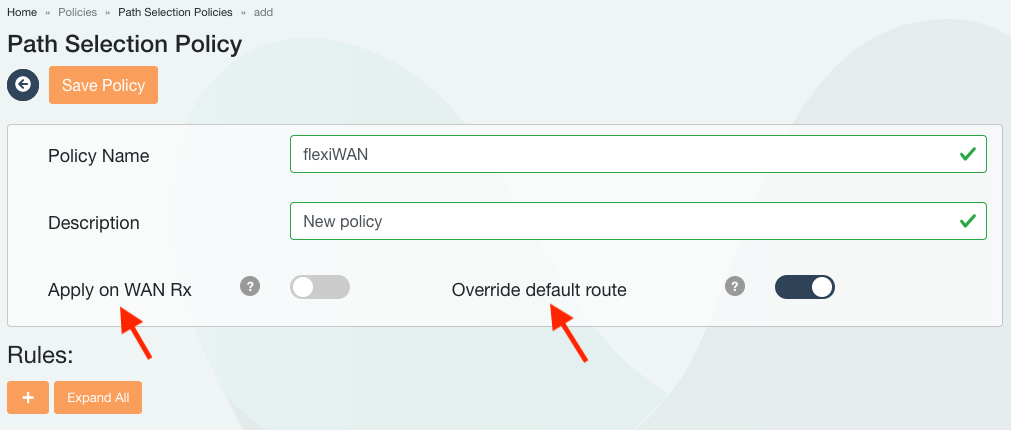
Navigate to Traffic Optimization > Path Selection and click on New Policy to create a new policy. Add a name and description to it.
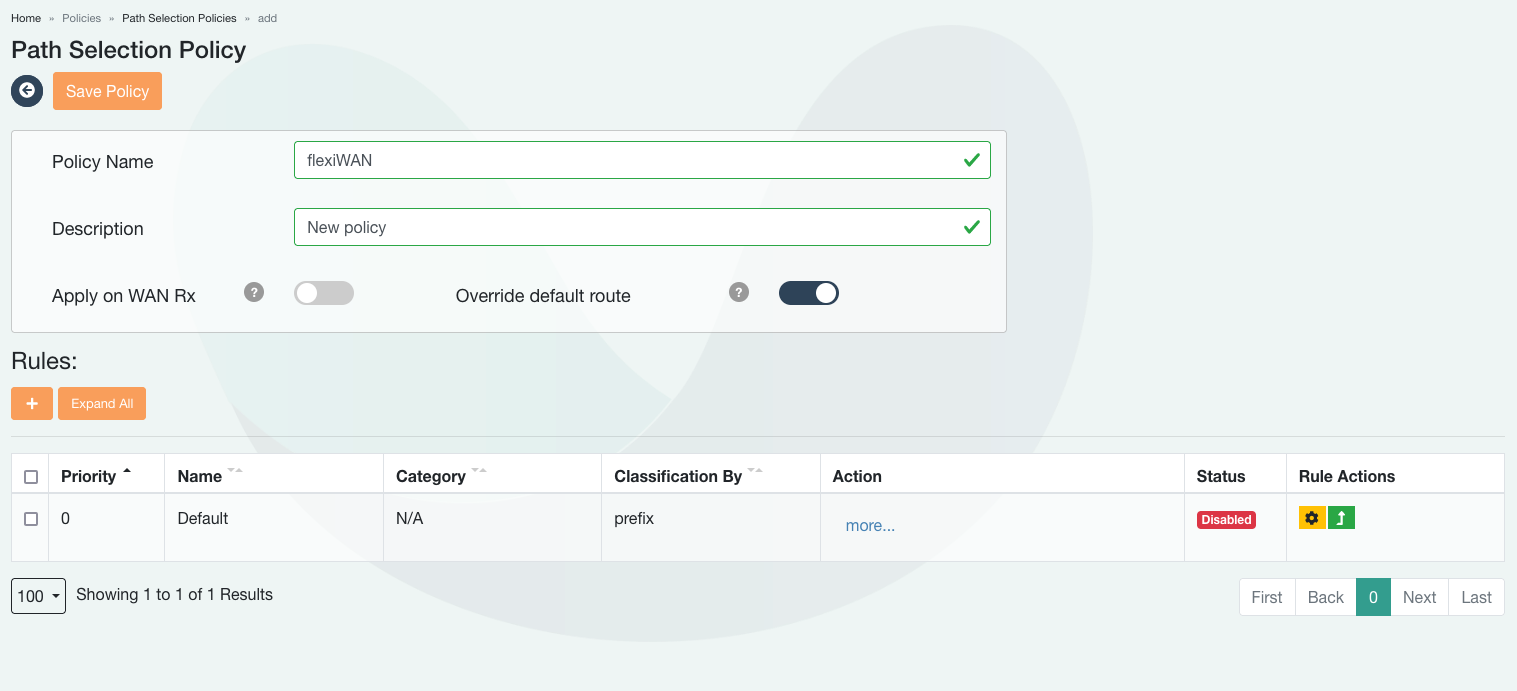
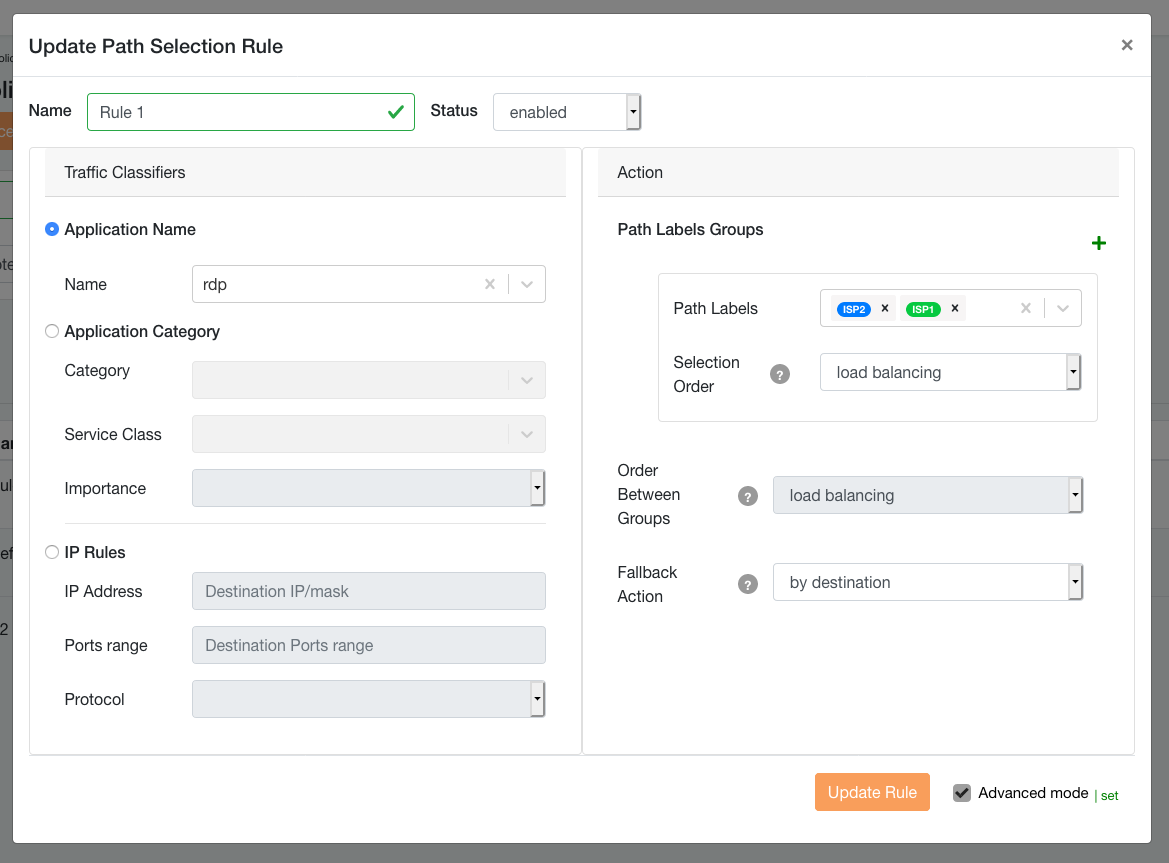
When configuring a new policy, rules can be added to it by clicking on the + sign within the Rules section. Every rule includes the traffic classification section and action section.
The classification section defines the type of traffic applied by the rule. Classification can be based on individual application, application categories and / or IP/Port rules. Classifications can be used separately or combined.
In the action section Path Labels through which the specified traffic will be routed are defined.
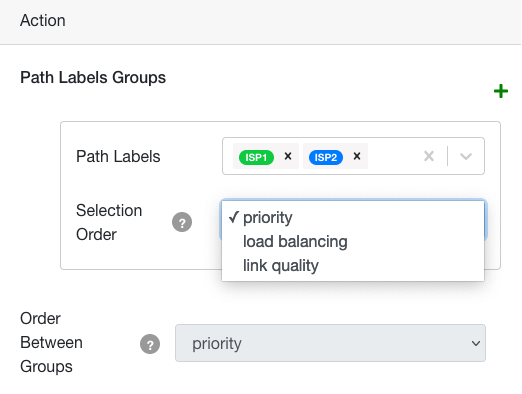
With selection order users can specify how traffic is ordered between Path Labels, supporting priority (failover), load balancing or link quality.
By default, creating new rules will be in “Simple” mode, which offers a quick and easy way to add new rules.

In most cases, using simple mode for rules will suffice, however “Advanced mode” enables selection between multiple Traffic Classification categories and advanced actions. Below is a breakdown of all types of traffic classifications; for best results make sure to follow the best practices section.
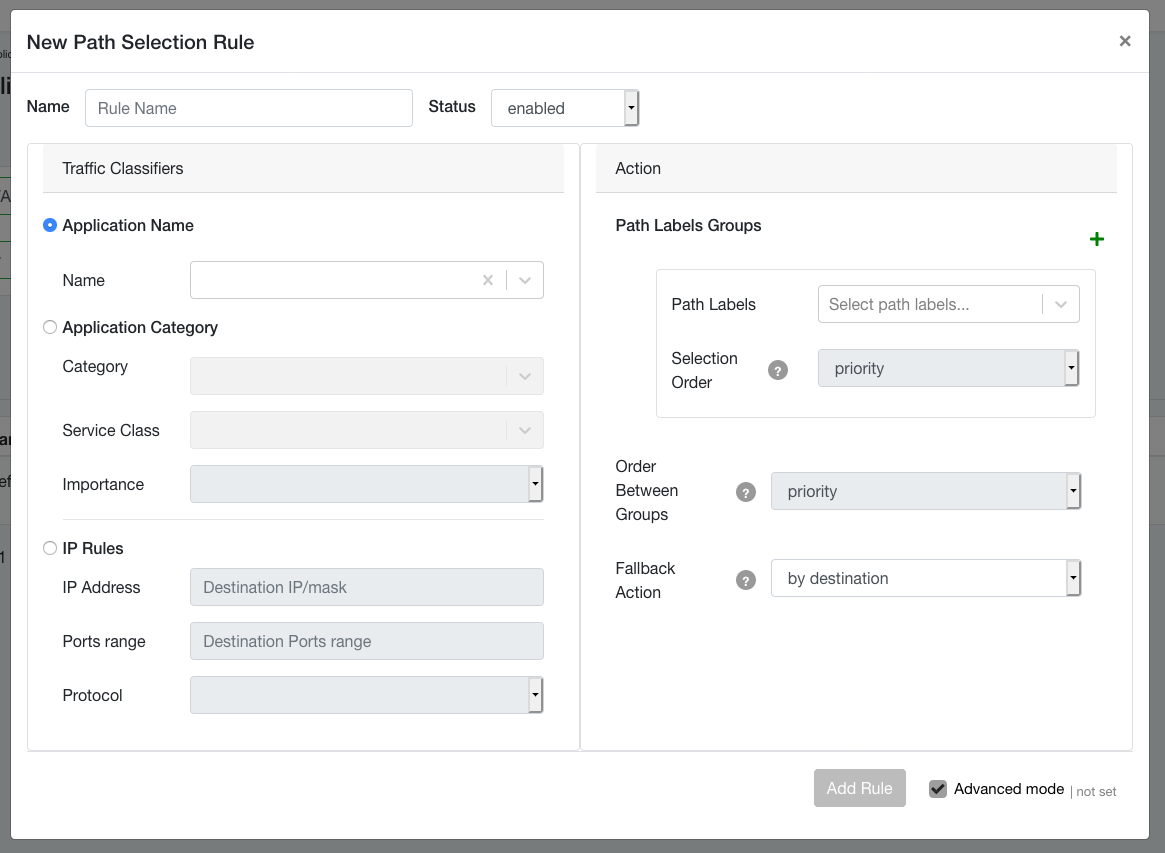
The following Traffic Classifications are available within advanced mode:
- Application name
Uses a Traffic & App Identifications with predefined application identifiers relying on IP ranges and ports.
- Application categories
Three different categories, where each can be used separately or combined:
- Category
Defines what the application is used for. e.g. “file-sharing”, “management”, “auth-service” etc.
- Service class
Defines the traffic type. e.g. “default”, “real-time”, “high-throughput”.
- Importance
Defines the priority of the application, “High”, “Medium” or “Low”.
- IP rules
Using destination IP and mask, port range and protocol type.
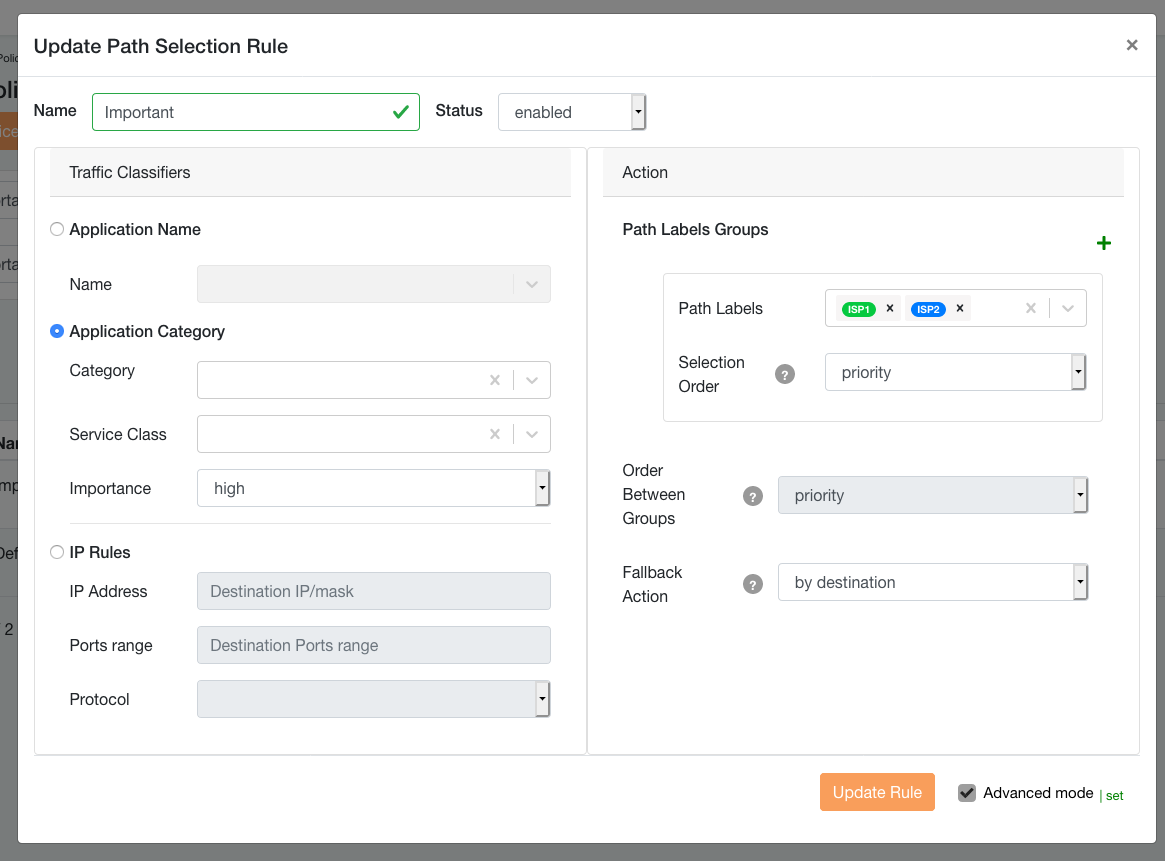
In the Action section users can define how the traffic will be routed and through which interfaces (with Path Labels). Within the Groups area assign the Path Labels to be used with the rule. These can be Tunnel or DIA (Direct Internet Access / local internet breakout) Path Labels types. The order in which Path Labels are added is respected, and within Selection Order choose between prioritizing, load balancing or Quality Based Routing between multiple Path Labels, which in turn are assigned to WAN interfaces.
The Actions section allows a flexible configuration on where and how traffic is routed:
- Path Labels
List of the path labels to use for the action
- Selection Order
How to route the traffic between labels. See next section for more details.
- Order Between Groups
Allows setting selection order when multiple groups are defined.
- Fallback Action
Default action to perform when no policy label is available, includes:
- By Destination
Use normal routing
- Drop
Drop the traffic (be careful when defining this option to prevent network blackholes)
The action section also supports adding multiple groups and ordering them per load balancing or prioritization. See advanced configuration examples for more information when using multiple groups.
Once the rules are added, each can be viewed in the Policy table. Rules with a policy are executed in order, the first rule that matches the traffic classification will be used.
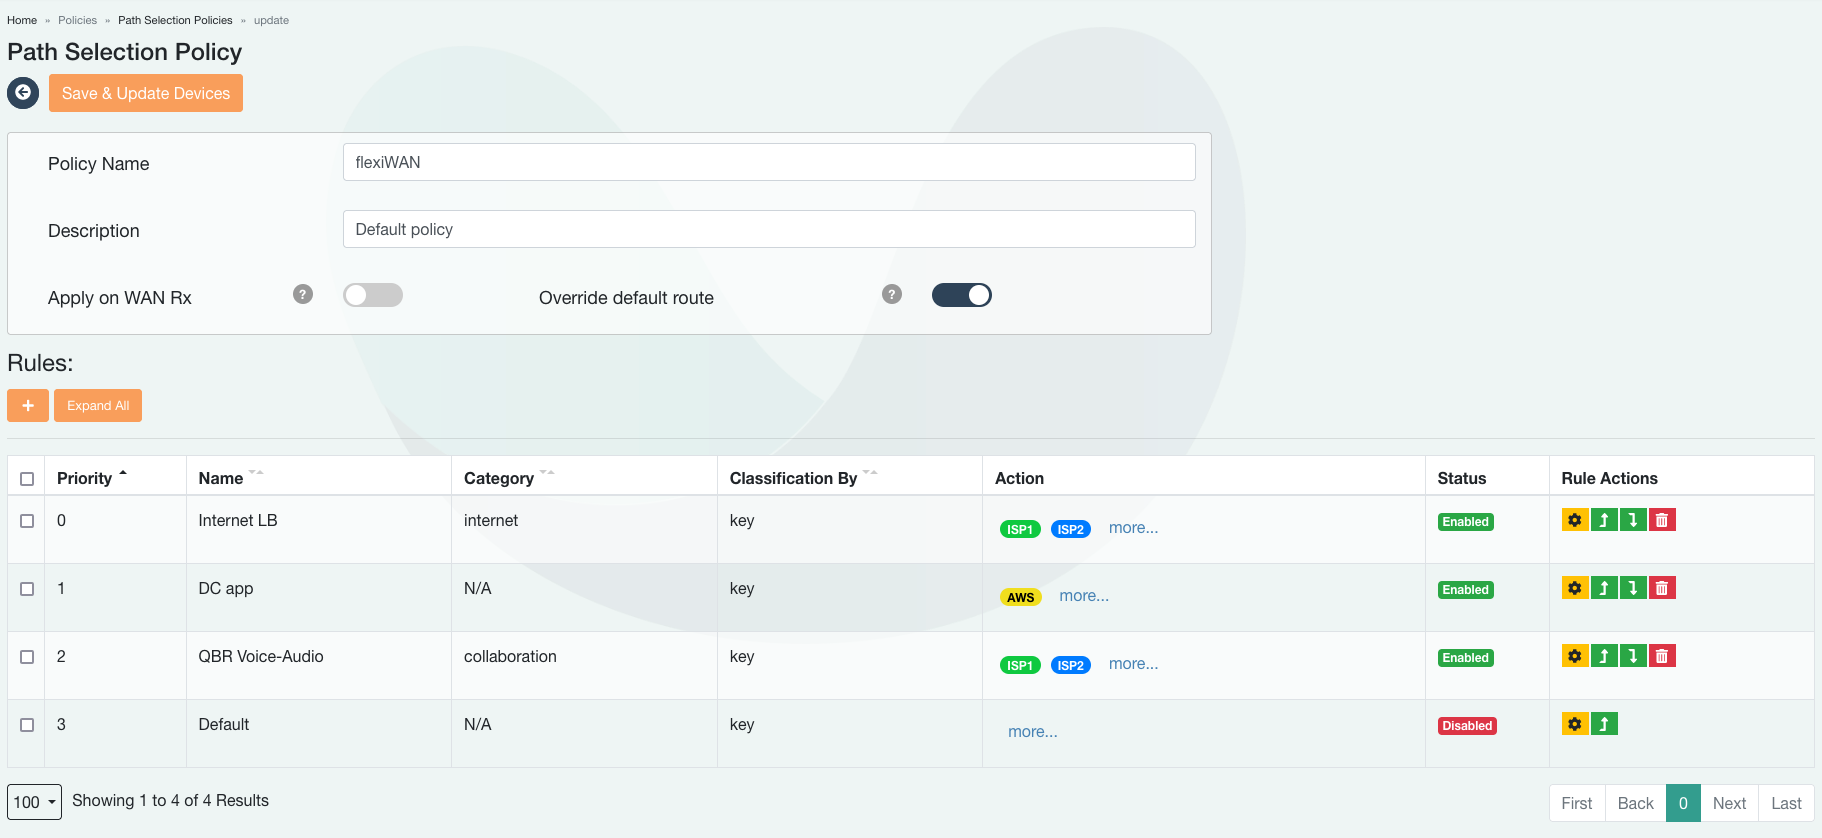
Each rule has a priority, with 0 being highest priority. Selecting each rule will allow moving rule up or down the priority list.
Selection order
The purpose of “Select by” is to define how specified traffic will be ordered between Path Labels. Once policy is installed to a device, Path Selection will order traffic per interfaces on which Path Labels are assigned. When defining a new policy and its rules, traffic can be ordered between Path Labels using the following options:
- Priority
Enables failover between Path Labels and the interfaces they are assigned to. Order in which Path Labels are added is respected, where first added label is considered primary, second added label secondary etc.
- Load Balancing
Distributing traffic across multiple Path Labels and respective interfaces.
- Link Quality
Traffic will be load balanced between Path Labels using link quality measurements and application characteristics, in order to minimize traffic interruption.
Note
Link quality requires to define classification by application or application categories (e.g. category, service-class, or importance)
See use cases section below for the examples of each of the above ordering options.
Advanced options
When creating or editing a Path Selection offers advanced settings to adjust the policy to match different use cases. By default, two options are set:
- Apply on WAN Rx
Disabled by default. When set to disabled, When enabled policy is applied on arriving traffic from WAN side. This only applies to internet breakout / DIA traffic.
- Override default route
Enabled by default. Policy will take precedence over default route in routing table on flexiEdge device. When disabled, Path Selection policy will send traffic according to the default route in the flexiEdge device’s routing table.
Applying policies to devices
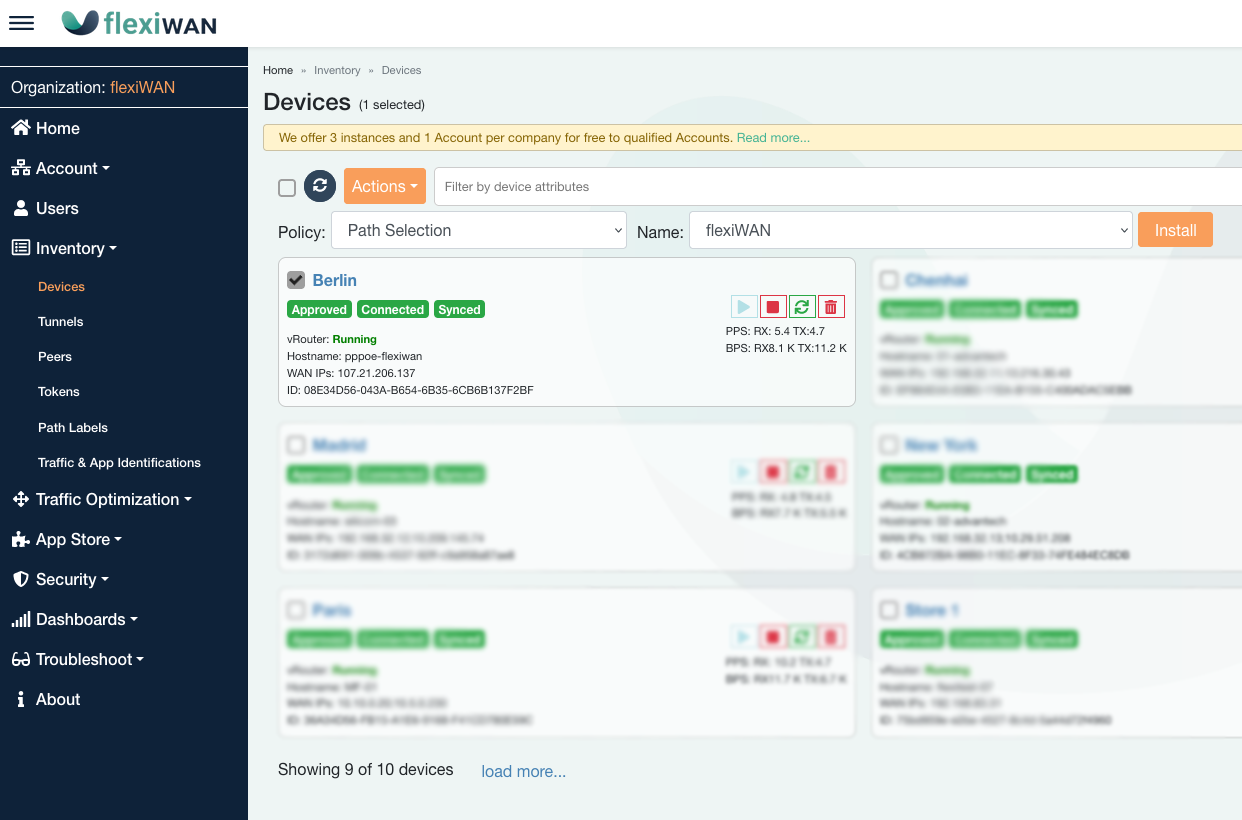
After successfully creating a policy, navigate to Inventory > Devices page in order to install the policy. The procedure is very similar to the way tunnels are added. Simply select one or multiple devices and click on the action button.
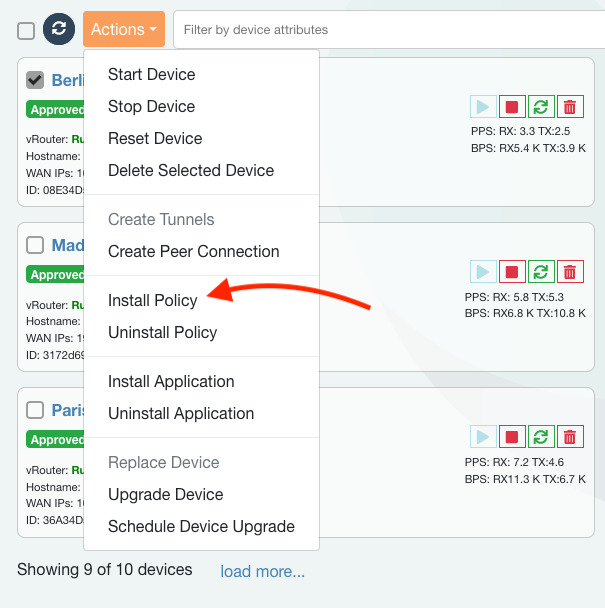
Within the Actions menu select Install Policy. A new section will show a menu and from there select Path Selection. Finally select the that was previously created. After selecting policy click on the Install button.
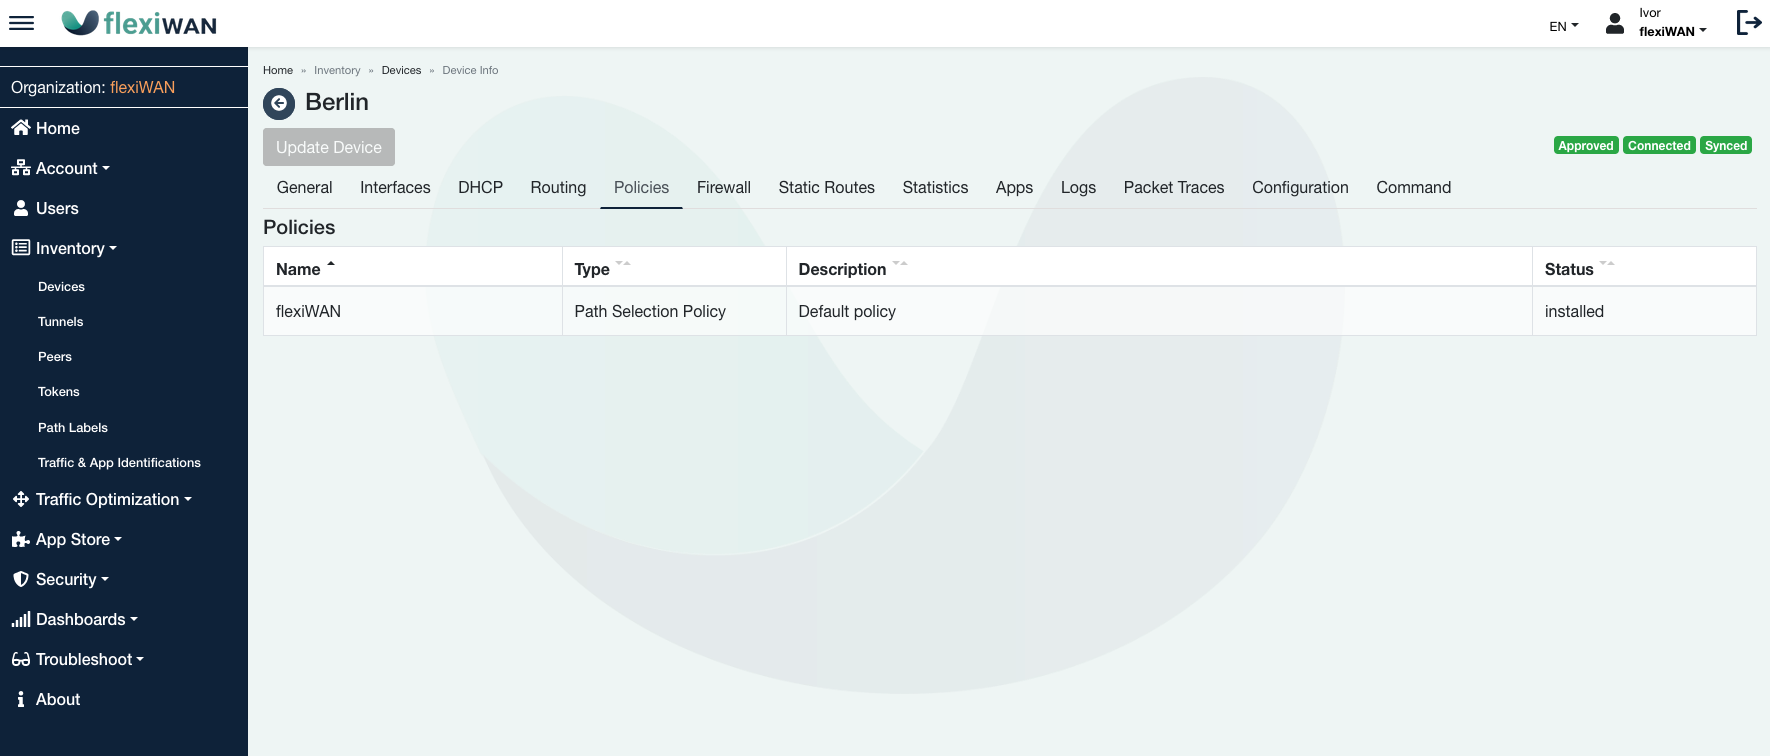
To verify that the policy has been installed on a selected device, navigate to the device settings and click on Policies tab.
Policy routing options and best practices
Prior to continuing with this section, create the following Path Labels:
ISP1
ISP2
WAN1
WAN2
Direct (DIA)
Direct2 (DIA)
After creating the Path Labels, navigate to Inventory > App Identification and read the rules per its importance, in order to understand what is included in the high, medium and low importance category. For the easier viewing table offers sorting by importance and at the bottom part of the screen number of items can be changed to up to 100 results.
All of the below policy routing examples will rely on the above Path Labels.
Policy Routing with importance category
This is the quickest and recommended way to route traffic per its importance. See Traffic & App Identifications page to view traffic importance classifications. For the following example we will failover / prioritize traffic with high importance, while low important traffic will utilize the direct link. While not covered in this section, it’s possible to use route high importance traffic using Link Quality selection.
Navigate to Traffic Optimization > Path Selection and click on “New Policy”. Enter the Policy Name and its description. Click on + sign to add a rule. In the new rule click on “Advanced mode” checkbox.
Fill in the rule as screenshot above and click add rule. This rule will prioritize the ISP1 label over ISP2 and act as failover in case ISP1 is unavailable.
Now click on + sign to add another rule. This time we will create a rule for all the low importance traffic and assign it to the Path Label “Direct”, which is Direct Internet Access.
Verify that the both rules are configured correctly and click on “Save Policy”.
flexiEdge devices with this policy installed will route all traffic of high importance across two interfaces, where interface with ISP1 will be prioritized while ISP2 labeled interface will act as failover. Also, low importance traffic will be applied to direct internet access / local internet breakout.
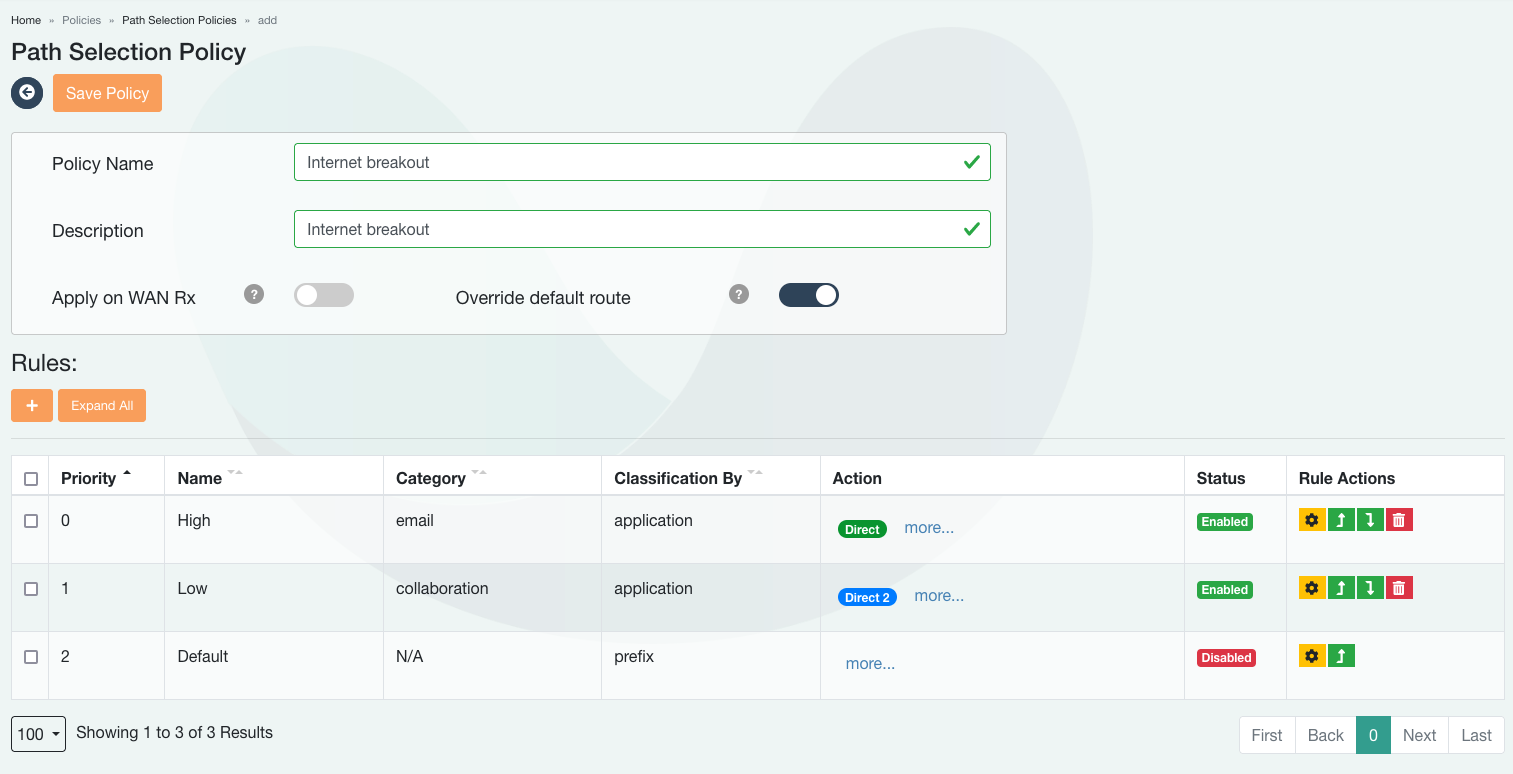
Policy routing specific applications
In this example we will policy route Microsoft Remote Desktop traffic across two load balanced interfaces. As in the previous example, navigate to Traffic Optimization > Path Selection and create a new policy. Add the rule with the following configuration:
Save and apply the policy. flexiEdge devices with this policy installed will load balance all RDP traffic (using port 3389) across two interfaces, labeled ISP1 and ISP2.
Policy routing with categories
The Application Category section includes the following categories based on which traffic can be routed:
Category
Service class
Importance
View Inventory > Traffic & App Identifications to explore each of the categories listed above. It’s possible to use a single category or combine multiple within a rule. When multiple categories are defined, the traffic is classified if all categories are matched. In the following example we will create a policy which routes all authentication services across ISP1 labeled interfaces:
Category “Auth-service” includes authentication services such as LDAP, RADIUS and Active Directory.
Navigate to Traffic Optimization > Path Selection and create a new policy. Add the advanced rule with the following configuration:

Save and apply the policy. flexiEdge devices with this policy installed will route all authentication services traffic using interfaces labeled ISP1.
Policy routing with IP based rules
In the following example we will create a IP based policy in order to route load balance traffic to specific IP across ISP1 and ISP2 labeled interfaces.
Navigate to Traffic Optimization > Path Selection and create a new policy. Add the advanced rule with the following configuration:
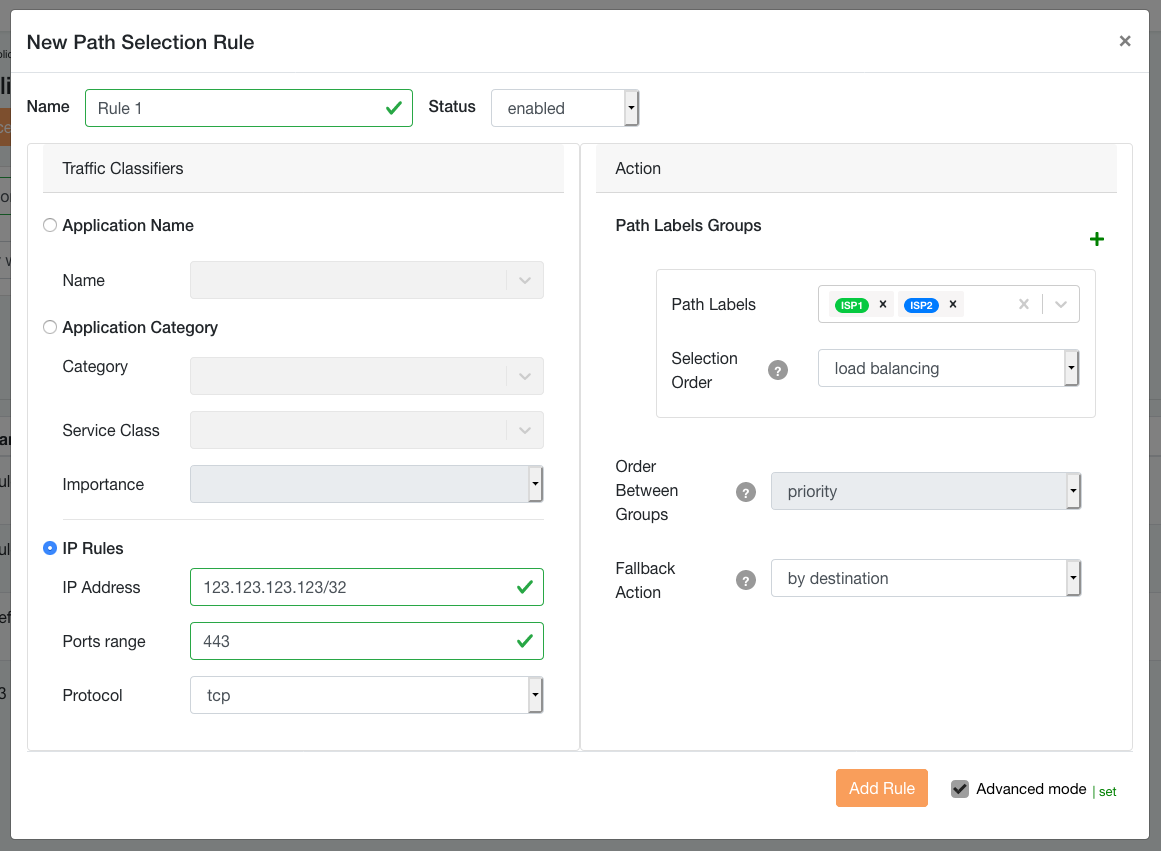
Save and apply the policy. flexiEdge devices with this policy installed will route outbound traffic towards the example IP 123.123.123.123/32, using port 443 and protocol TCP, across ISP1 and ISP2 labeled interfaces (in this case load balanced).
Quality Based Routing
Through this feature, flexiWAN enables dynamic routing decisions as part of the path selection policy according to the application and link performance. The path selection decision is fully autonomous and does not require any threshold configuration. Instead, it estimates the application requirements for optimal delivery and quality and according to the application service class, it determines the best tunnel to send the traffic on. The system measures, balances and selects the optimal tunnel (or tunnels) among all available paths in order to meet the following goals:
Provide good quality of experience for each application
Serve good application experience for as much as possible traffic
Utilize all available paths
Promptly detect network changes and act upon them
Prevent path flapping
QBR can be used with tunnel or DIA (internet breakout) Path Labels. See Seamless Failover with QBR use case below to learn how to deploy this feature.
Path Selection Use Cases
In order to enable and use Path Selection first create several different Path Labels as described in its documentation section.
There are several best practices and tricks we will cover:
Best way to load balance traffic across multiple link with importance category
Setting up failover across two links
Quality based routing
Routing across multiple local internet breakouts
Advanced groups setup
Any of the above scenarios can be used with Tunnel or DIA Path Labels.
Load balancing
With Path Selection, load balancing certain or all traffic across multiple links is possible in just a few clicks and a single policy. We will demonstrate the preferred way to load balance, however any rule and its configuration can be load balanced across multiple links.
In order to load balance traffic across multiple links, make sure to create and assign labels to the device interfaces first. For the purposes of this section, we will use ISP1 and ISP2 Path Labels. If Path Labels are using internet breakout (DIA), load balancing can be configured across two or more WAN’s. For this example we are demonstrating how to load balance tunnel traffic however the approach is the same with DIA Path Labels.
Navigate to Traffic Optimization > Path Selection and create a new policy. The quickest way to load balance ALL outgoing traffic across multiple links is to enable the Default policy. Using Default policy is the preferred way because it will match all traffic with just a single rule.
Under Rule Actions, click on the settings icon and enable the rule from the Status drop-down. Add ISP1 and ISP2 path labels in the Action > Path Labels section. Finally from “Select by” choose “Load balancing”.
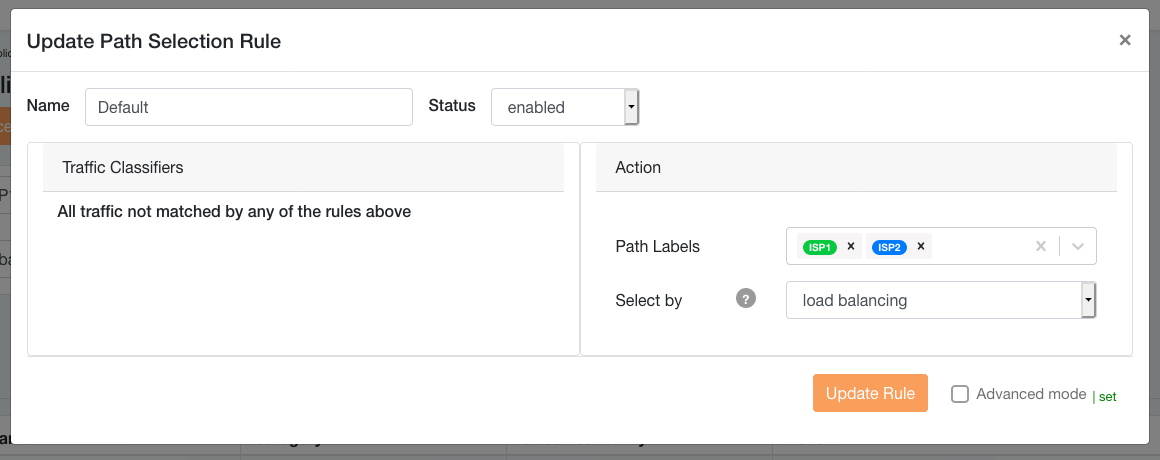
Verify that the rule is correctly configured and save the policy. From there navigate to Inventory > Devices and install the policy to the devices on which traffic will be load balanced.
Failover
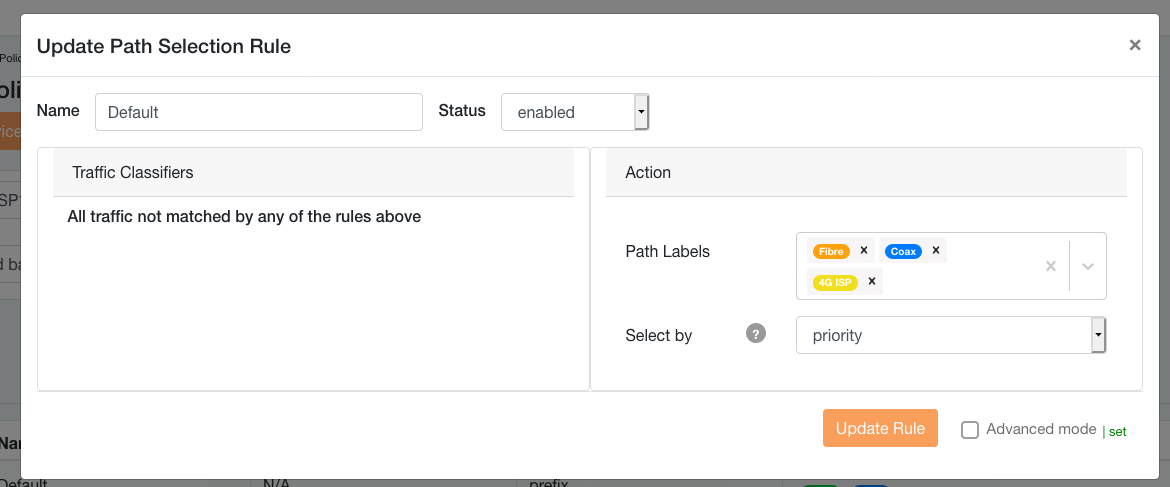
Path Selection feature enables to load balance traffic across multiple links and also offers failover functionality in a similar way. The use case for this functionality is if there are multiple internet links however they vary by quality or throughput. For the purposes of this section, we will use three internet links:
Fibre - considered the most stable connection
Coax - backup link over coaxial internet connection
4G ISP - third option in case terrestrial connectivity is missing
Prior to creating the Path Selection policy, navigate first to Inventory > Path Labels and add the three new Path Labels:
Fibre
Coax
4G ISP
In this section we will utilize the tunnel labels however the guide is applicable to Direct Internet Access labels as well. After creating the above labels, navigate to the Traffic Optimization > Path Selection and create a new Policy. Just like in the load balancing guide, we will also use the default rule to match all traffic. This is a particularly useful rule because any other traffic can easily directed elsewhere be defining by adding a second rule.
From the Rule Actions click on the settings icon and enable the rule. In the Actions > Path Labels section add Path Labels in the following order:
Fibre
Coax
4G ISP
Order is respected, so the first label will have top priority. Finally, keep the “Select by” Priority selected. This will ensure that interfaces with the above labels will be used for failover in the order they’re added.
That’s it, that’s all it takes to enable multi-link failover with flexiWAN. Confirm the rule is configured correctly and save it. Navigate to the Inventory > Devices and install the Path Selection Policy to the device which has the three path labels / internet connections assigned.
Seamless Failover with QBR
Link quality based selection enables Quality Based Routing functionality (QBR). When Link Quality is configured, traffic will be load balanced using link quality measurements and application characteristics, in order to minimize traffic interruption. This means QBR will detect link deterioration and switch to a better link if required by the applications quality requirement. The switch happens immediately when the link quality degrades, either if the link quality is bad or a link is fully down.
This section will show how to use QBR to achieve seamless failover / load balancing for link quality sensitive traffic from “Media” Traffic & App Identifications category, which includes popular services and protocols such as Zoom, MS Teams and Viber.
This approach requires two flexiEdge sites:
Branch flexiEdge - a local site containing two WAN connections, in our case wired and LTE.
Datacenter flexiEdge - remote datacenter site with a single WAN.
After configuring this example flexiEdge branch site will connect to datacenter flexiEdge site and send all outgoing traffic matching “Media” category through the tunnel. In this case services such as Zoom or MS Teams will see traffic originating from a single external IP, datacenter external IP.
Before configuring Quality Based Routing, create two tunnel Path Labels. QBR works when using tunnel or DIA (internet breakout) Path Labels, in this example we use tunnel Path Labels.
Create the following Path Labels:
WAN1 - primary WAN tunnel label
WAN2 - secondary WAN tunnel label
For the purpose of this example, it is expected that Path Labels will be assigned to primary and secondary WAN interfaces, using wired and LTE respectively. Specifically, branch flexiEdge will have WAN1 Path Label assigned to its wired WAN and WAN2 Path Label to its LTE WAN. On datacenter flexiEdge both WAN1 and WAN2 Path Labels will be assigned to its single WAN interface. This step is required in order to connect the tunnels between branch and datacenter sites.
After assigning the path labels to both branch and datacenter site interfaces, make sure to add tunnels using the WAN1 and WAN2 labels.
Navigate to Traffic Optimization > Path Selection and add a new policy. Click on a + sign to add a new rule and enable advanced mode. Configure the rule to use “Media” category and add the previously created Path Labels WAN1 and WAN2.
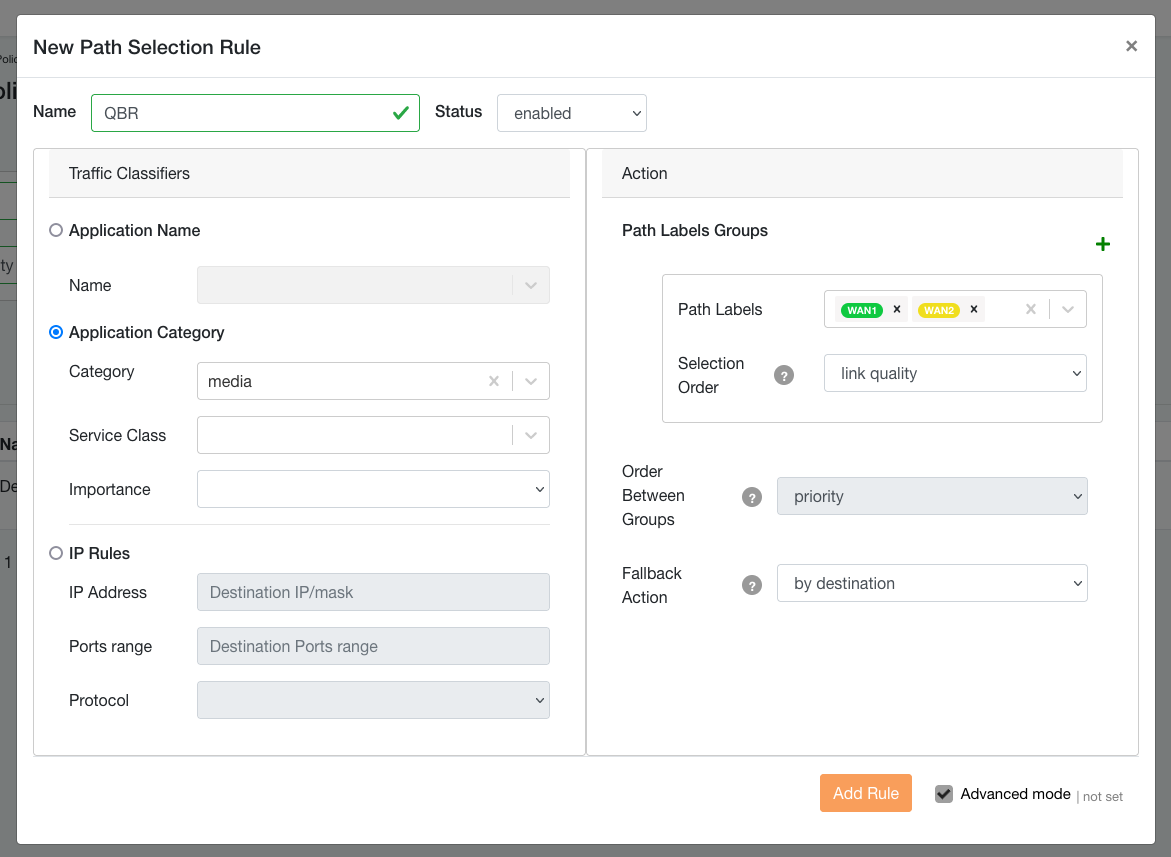
In this example, traffic matching “Media” category will be load balanced using QBR across WAN1 and WAN2 Path Labels. Verify the configuration and save the policy.
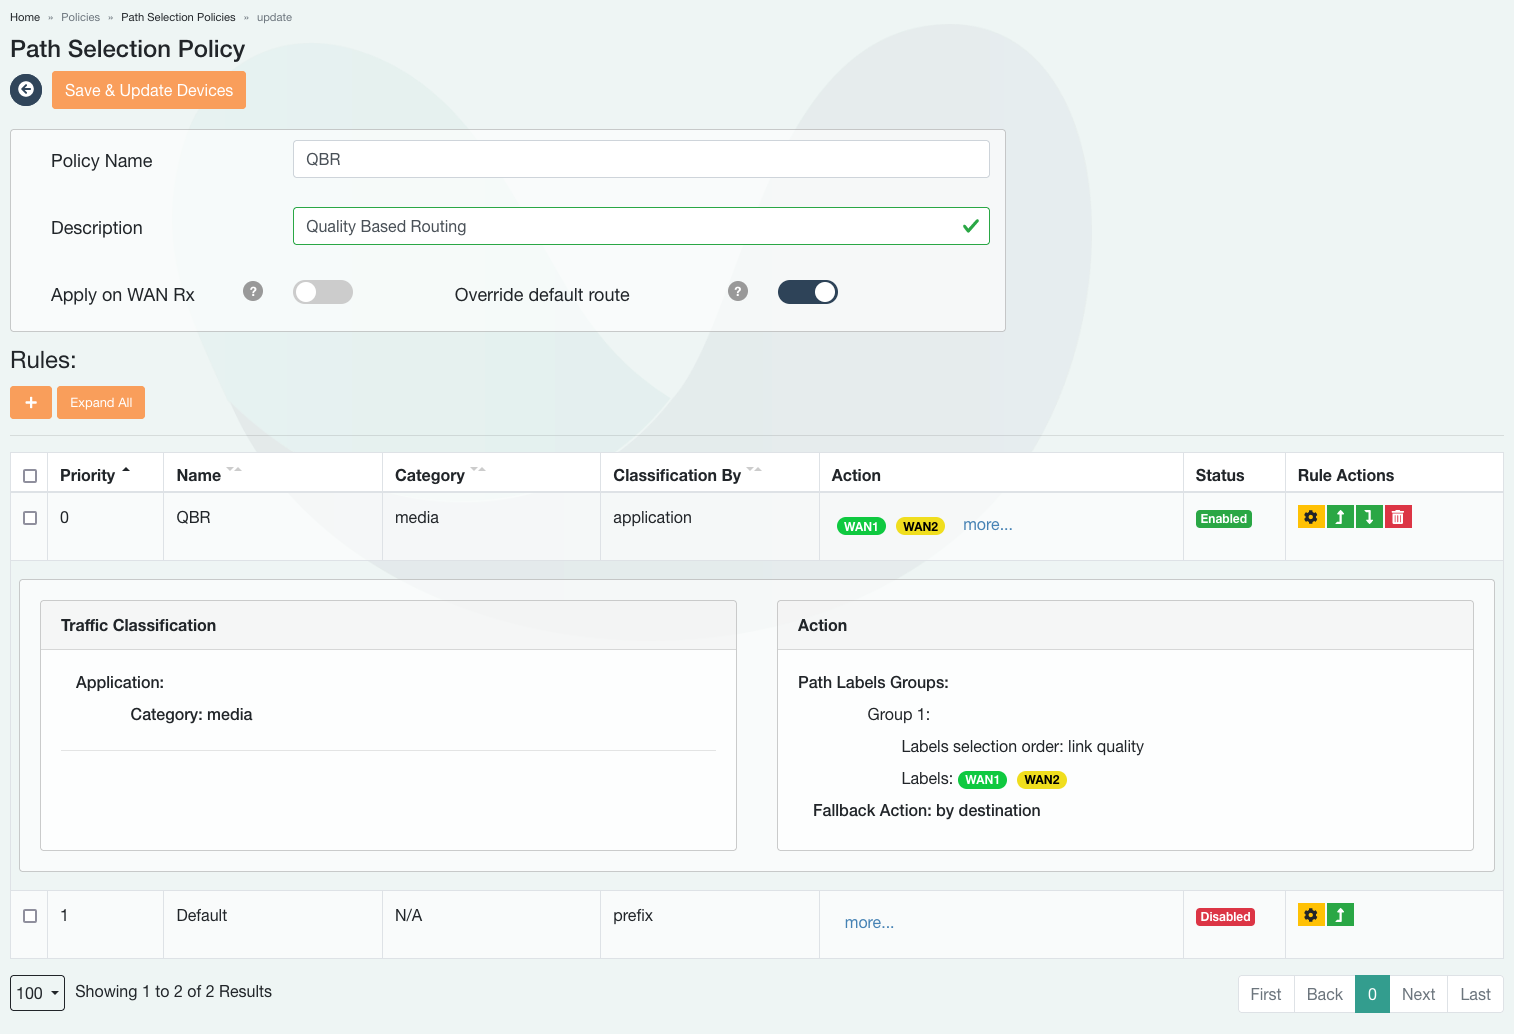
That’s it! After installing this policy to a device all traffic matching “Media” category will utilize QBR routing instead of regular routing and will exit the datacenter site.
Using multiple local internet breakouts
In this section we will rely only on DIA - Direct Internet Access Path Labels, which are used for utilizing internet breakout of a specific interface. This guide assumes the device has multiple WAN interfaces. The following Path Labels are required:
Direct - primary DIA label
Direct 2 - secondary DIA label
For the purpose of this guide we will consider interface to which Direct label is assigned to be a primary interface, while the “Direct 2” should be assigned to secondary WAN. The goal of this demonstration is to have high priority traffic only use primary WAN interfaces to which “Direct” Path Label is assigned. All low priority traffic should use secondary WAN.
In this demonstration two rules are added, one to route all traffic classified as high importance through primary WAN internet breakout and low importance traffic through secondary WAN. To view what exact traffic is high or low importance, navigate to Application Identification page.
The same approach is valid for all other types of traffic classification.
Note
For using path selection policy across multiple local internet breakouts, a DIA label has to be set to all WAN interfaces
Advanced groups setup
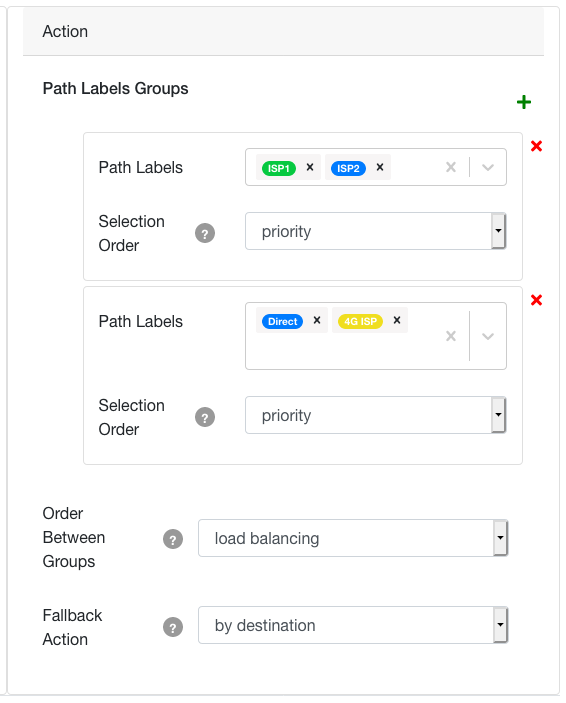
In this example we will explain and configure load balancing between multiple Path Labels Groups. For the purpose of this document, let’s assume that there are multiple sites, in our case two datacenter sites, each with two internet links and a single remote site, where the branch client is.
Site A: DC1
WAN1 - ISP1 label
WAN2 - ISP2 label
Site B: DC2
WAN1 - ISP3 label
WAN2 - ISP4 label
Site C: DC3
Single WAN - ISP1, ISP2, ISP3, ISP4 labels
In this example we want to make sure that branch device on Site C prefers site Site A via its two links. In case Site A fails, traffic is redirected and failover to Site B. To achieve such functionality first create Path Labels ISP1, ISP2, ISP2, ISP3, ISP4 and then assign them to three sites as described above.
After creating and assigning Path Labels, navigate to Traffic Optimization > Path Selection and create a new policy. Add a new rule to the policy and make sure to assign the Path Labels as depicted in the following image:

Save and apply the newly created Policy, then navigate to Inventory > Devices and install the policy on the remote branch Site C / DC3. That’s it, now all the outgoing RDP traffic from Site C will prioritize Site A and in case of connectivity issues with it, will switch to Site B.