Virtualization
About
flexiWAN fully supports virtualization and several hypervisors. This section covers preparing hypervisors for flexiWAN installation. The first guide available is for VMware ESXi, more guides for other hypervisors will follow soon.
Available virtualization best practices guide:
VMware ESXi 6.x / 7.x
Coming soon:
VMware Fusion
VirtualBox
Proxmox (KVM)
VMware ESXi 6.x / 7.x
Follow this in-depth guide to perpare, configure and deploy virtual machines with flexiWAN router running on VMware ESXi 6.7. The guide should apply to newer VMware ESXi versions as well.
Prerequisites
This guide assumes your virtualization host satisfies hardware requirements and runs VMware ESXi 6.7. See system requirements for more details regarding recommended hardware. The guide is likely applicable to earlier or later ESXi versions as well.
While the guide will cover most use cases and network layouts, it may not cover all possible uses cases.
Make sure to download the latest Ubuntu 18.04.5 and upload it to your ESXi datastore.
If you do not have an account with us yet, create a new one here.
Visit flexiManage page and login with your newly created account.
Follow this documentation section to set up your account and organization.
Create the token as described in this section.
Networking considerations
The guide applies when deploying flexiWAN with several network configurations:
Multi vSwitch environment.
SR-IOV / shared physical interfaces
PCI passthrough / VMDirectpath I/O interfaces
There are several caveats to be aware of when choosing the right type of network interfaces for your deployment. vSwitch approach is the easiest and likely the fastest way to configure ESXi networking for flexiWAN.
SR-IOV approach is more complex as it requires SR-IOV compatible host as well as a compatible network card which supports SR-IOV. SR-IOV approach brings the benefit of having multiple virtual machines connecting directly to a single physical NIC. See here for complete list of Intel network cards supporting SR-IOV.
If your network card doesn’t support SR-IOV but is still supported by DPDK and your host has PCI Passthrough support, you can passthrough the card directly to the VM for higher throughput. This approach maps a physical NIC to a single VM, without ability to use it with other VM’s.
Learn more about VMware’s approach on VMDirectPath I/O and SR-IOV here.
Virtual machine configuration
In this section we will cover configuring a new virtual machine without any interfaces. The goal is to have a virtual machine created first after which you can follow one of the below guides for your network layout. The following virtual machine configuration steps will match minimum system requirements in order to run flexiWAN.
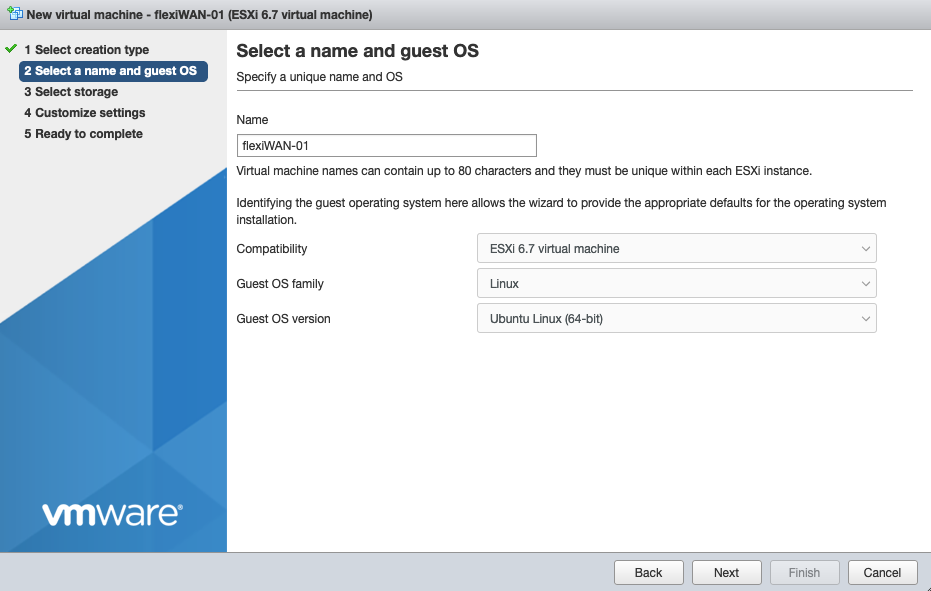
Start the new VM creation wizard and select Ubuntu Linux 64-bit as guest OS
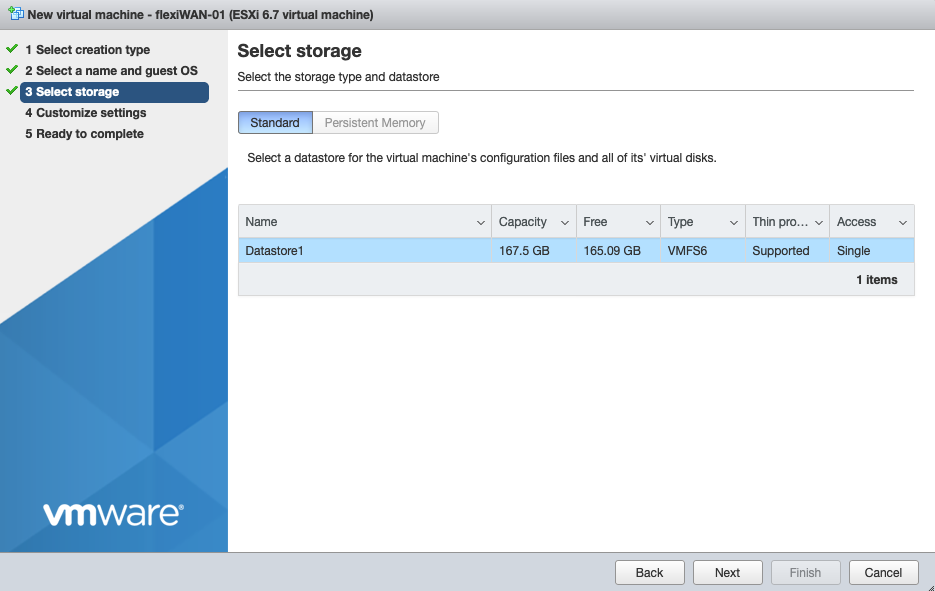
Select the datastore where you want to deploy flexiWAN virtual machine.
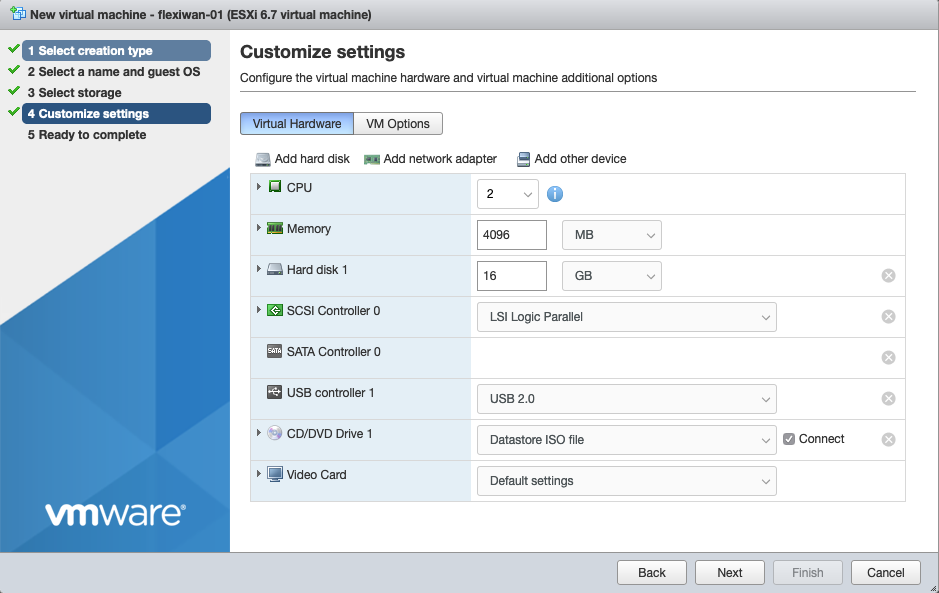
On the “Customize settings” wizard page choose 2 CPU’s and 4GB RAM. Do not add any network interfaces at this point, remove the default assigned one. Select the datastore where you want to deploy flexiWAN virtual machine. Attach the previously uploaded Ubuntu 18.04.5 ISO.
Once the flexiWAN VM is configured and created, follow one of the guides for your network layout:
vSwitch interfaces
SR-IOV virtual interfaces
PCI Passthrough physical network interfaces
flexiWAN works and supports any of the above mentioned network layouts.
Deploying flexiWAN using vSwitch configurations
FlexiWAN requires two interfaces in order to work, WAN and LAN. Create and assign two virtual switches to your physical network cards.
Note
If you’re setting up flexiWAN in production, we recommend assigning each vSwitch to a separate physical interface. For testing purposes, using default ESXi created VM Network as WAN is recommended.
Note
if you are deploying flexiWAN in a test environment, using the same VM host and two VM’s, make sure to create two different LAN networks for each VM. Do not share the same LAN port group / vSwitch between the two VM’s.
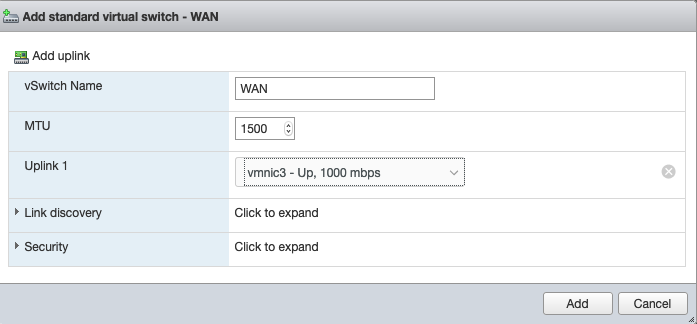
From Networking > Virtual switches tab, click “Add standard virtual switch”. Name it WAN and select the appropriate network interface, click “Add”.
Repeat the process for LAN interface. After that there will be WAN and LAN virtual switches.
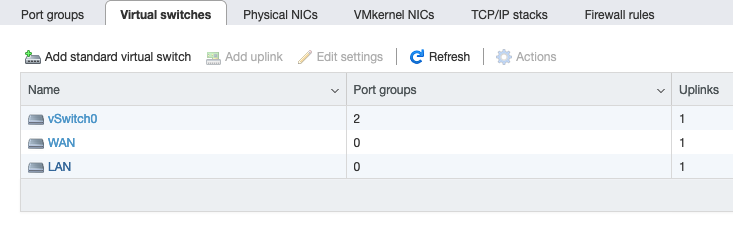
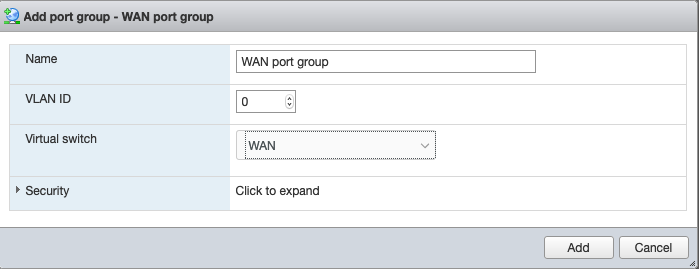
The next step is to add WAN and LAN port groups and attach them to the previously created virtual switches accordingly. While at the Networking page, simply go to Port groups tab and click “Add port group”. Name the port group WAN or External and select the previously created WAN vSwitch. Do the same for LAN.
After creating WAN and LAN port groups, attach the WAN and LAN virtual switches respectively, Port groups page should display the newly created port groups.

Next make sure to connect both physical network ports to the external and local networks accordingly (LAN can be internal network). Connect WAN to the external network, which may be directly connected to your ISP issued modem or a router, in which case WAN port will be behind NAT (supported scenario).
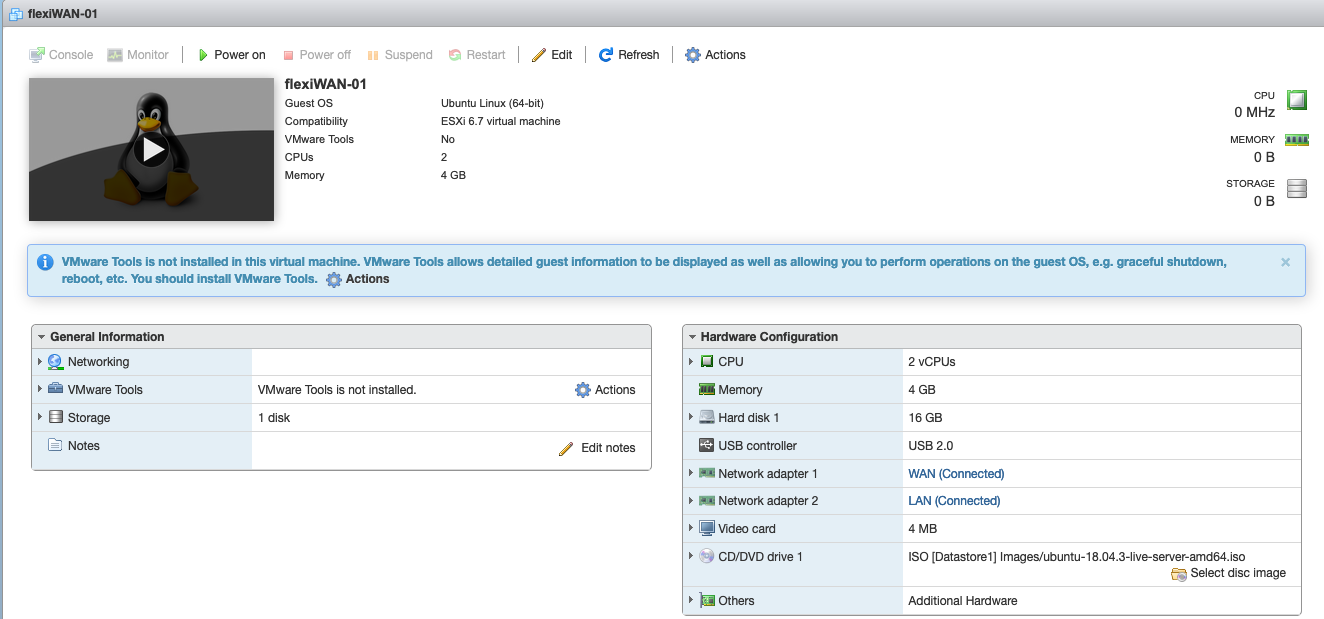
Edit the previously created flexiWAN virtual machine, add two vmxnet3 type network adapters connected to WAN and LAN.

Save the virtual machine changes and confirm the final configuration is as the following image.
This step concludes the vSwitch configuration, next step is to run the virtual machine and complete the Ubuntu installation, followed by flexiWAN installation.
Deploying flexiWAN using SR-IOV virtual interfaces
The following section shows how to configure VMware ESXi host to use SR-IOV capable network interface cards with flexiWAN VM. To be able to follow this guide, please first create a VM for flexiWAN, but without any network interfaces assigned.
From within the ESXi Navigator section, go to Host > Manage and click on Hardware tab.
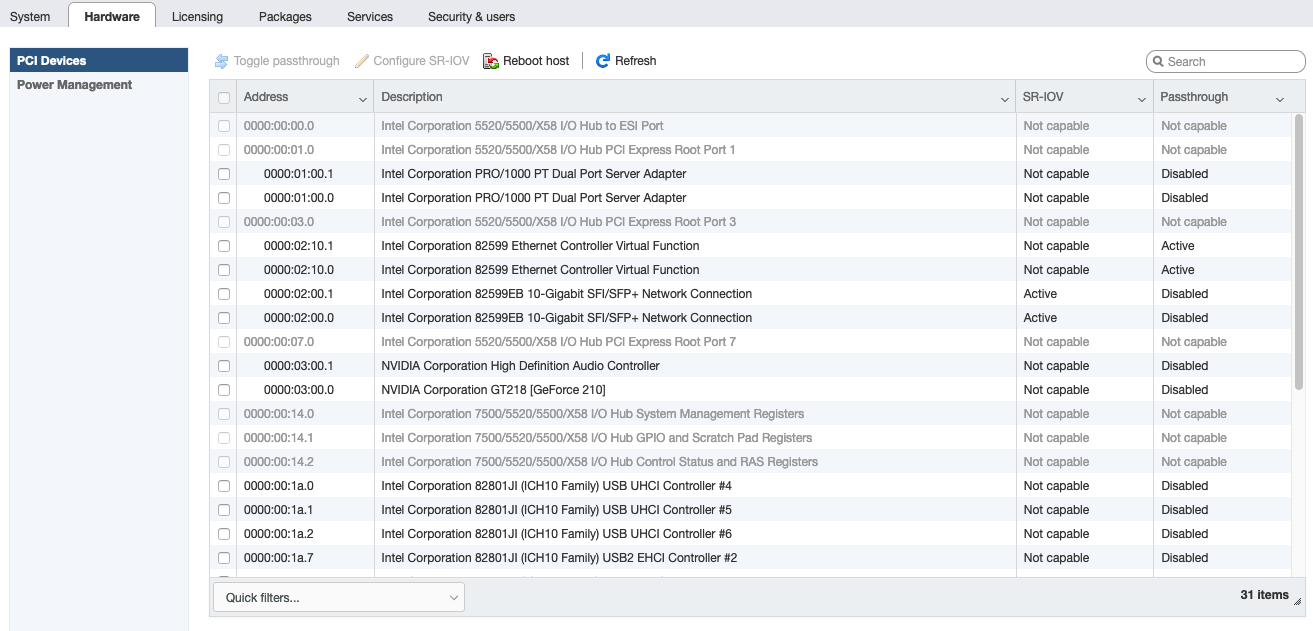
Select the interfaces that show SR-IOV is capable and click on “Configure SR-IOV” to enable it and configure virtual functions. Virtual functions represent a number of virtual machines which will use this adapter.
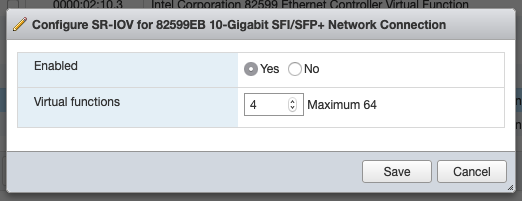
NOTE: Assuming you have supported hardware, you can combine SR-IOV virtual functions with vSwitches, in which case SR-IOV VF would be WAN and vSwitch would be LAN. For our guide both WAN and LAN use different SR-IOV virtual functions.
After host reboot, confirm two Virtual Functions are available and active from Host > Manage > Hardware tab.

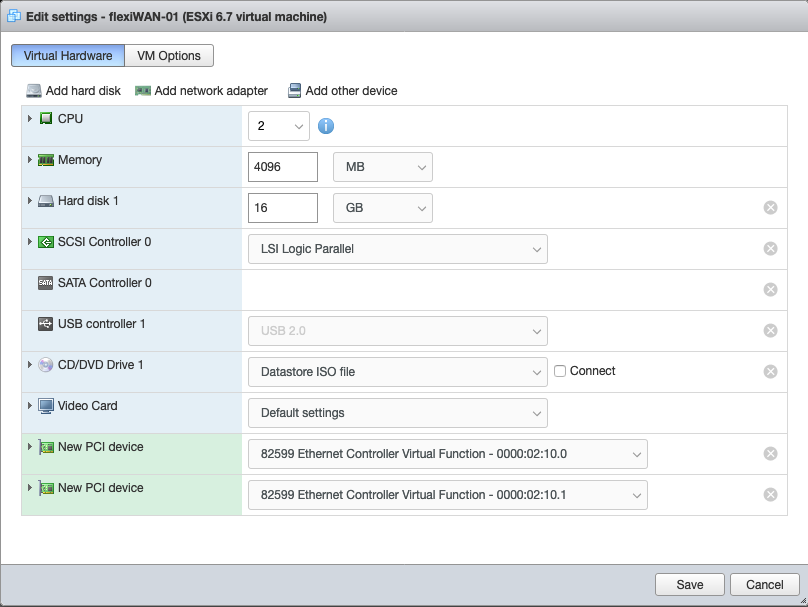
Next step is to edit the previously created VM from “Installing Ubuntu 18.04 LTS” and add PCI devices from “Add other device” menu. Add two VF’s representing your WAN and LAN interfaces.
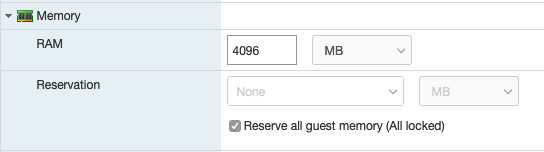
Before saving the added VF’s, make sure to expand the Memory section and select “Reserve all guest memory (all locked)”, otherwise VM will not start.
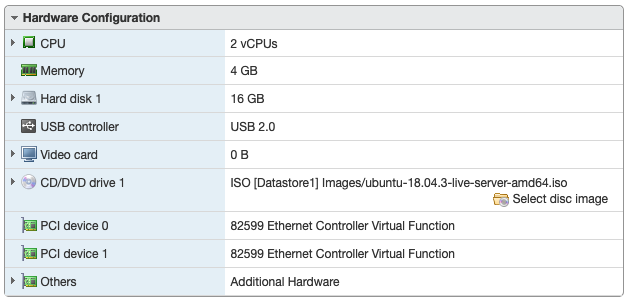
After saving new VM changes, confirm your VM hardware configuration looks like the following:
After confirming the configuration is correct, start the VM and make sure all NIC’s have connectivity. Follow the “FlexiWAN installation and setup” part of the guide to install and deploy flexiWAN.
Deploying flexiWAN with PCI Passthrough network interfaces
This section explains how to configure ESXi and flexiWAN virtual machine for hardware PCI passthrough. Unlike for SR-IOV, theoretically any PCIe device can be used for passthrough, and almost all network interface cards with DPDK support will work without issues with flexiWAN in passthrough mode.
From within the ESXi Navigator section, go to Host > Manage and click on Hardware tab.

Select the supported network card for passthrough and click “Toggle passthrough”.
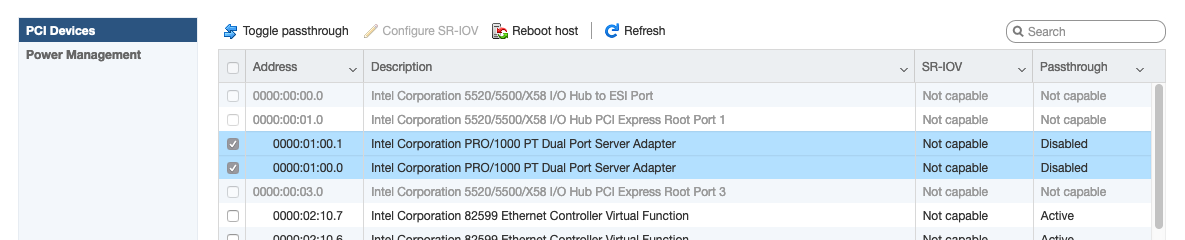
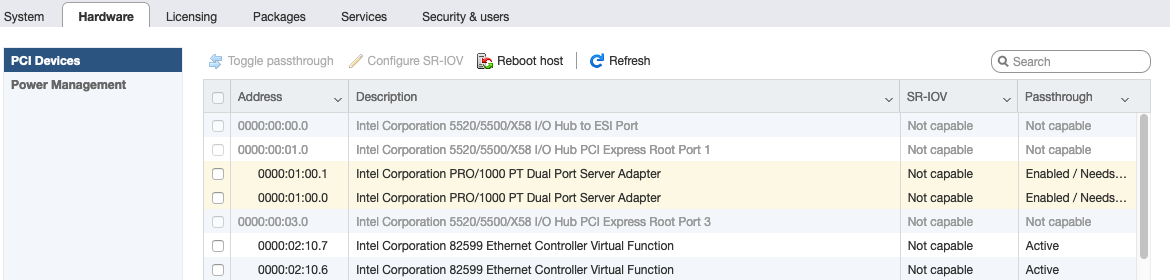
Confirm the selected network card is in passthrough mode and reboot the host in order to have it available for flexiWAN virtual machine.
After the VM host reboots, go to the previously created VM and add the PCI passthrough NIC’s via “Add other device” menu.
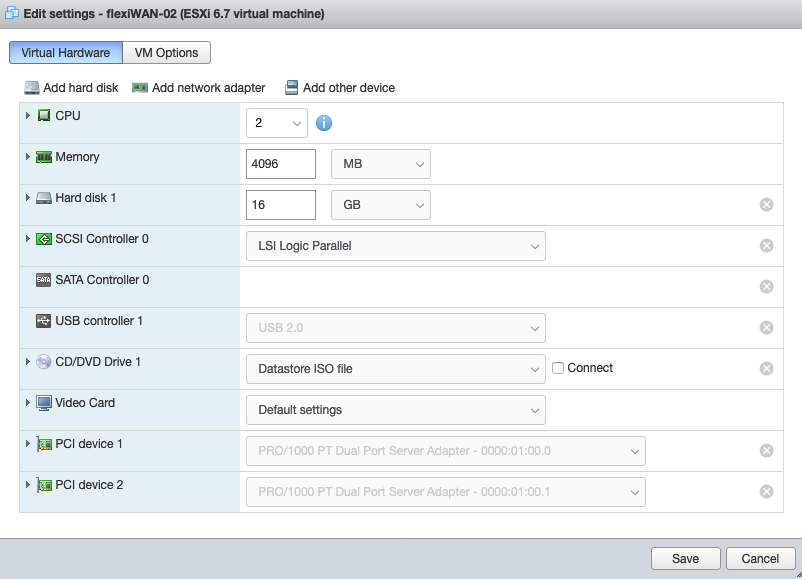
Before saving the changes, under Memory make sure to check “Reserve all guest memory (all locked) and save changes.
After saving new VM changes, confirm your VM hardware configuration looks like the following:

After confirming, start the VM and make sure all NIC’s have connectivity. Follow the “FlexiWAN installation and setup” part of the guide to install and deploy flexiWAN.