Device Management
Every flexiEdge device can be centrally managed and configured from flexiManage. This documentation section covers the steps required in order to sucessfully deploy flexiWAN.
If you found an error, let us know! Drop us an email to yourfriends@flexiwan.com
Device registration
To register a device, first create your organization token. The organization token needs to be generated only once and is used for all the devices in a single organization. Having multiple tokens in single organization is also supported, where it introduces additional security in case of unauthorized physical access of device. In the flexiManage, navigate to Inventory > Tokens and click on “New Token” button.

Provide a token name and click “Add”. A new token will be created and presented in the Tokens page.
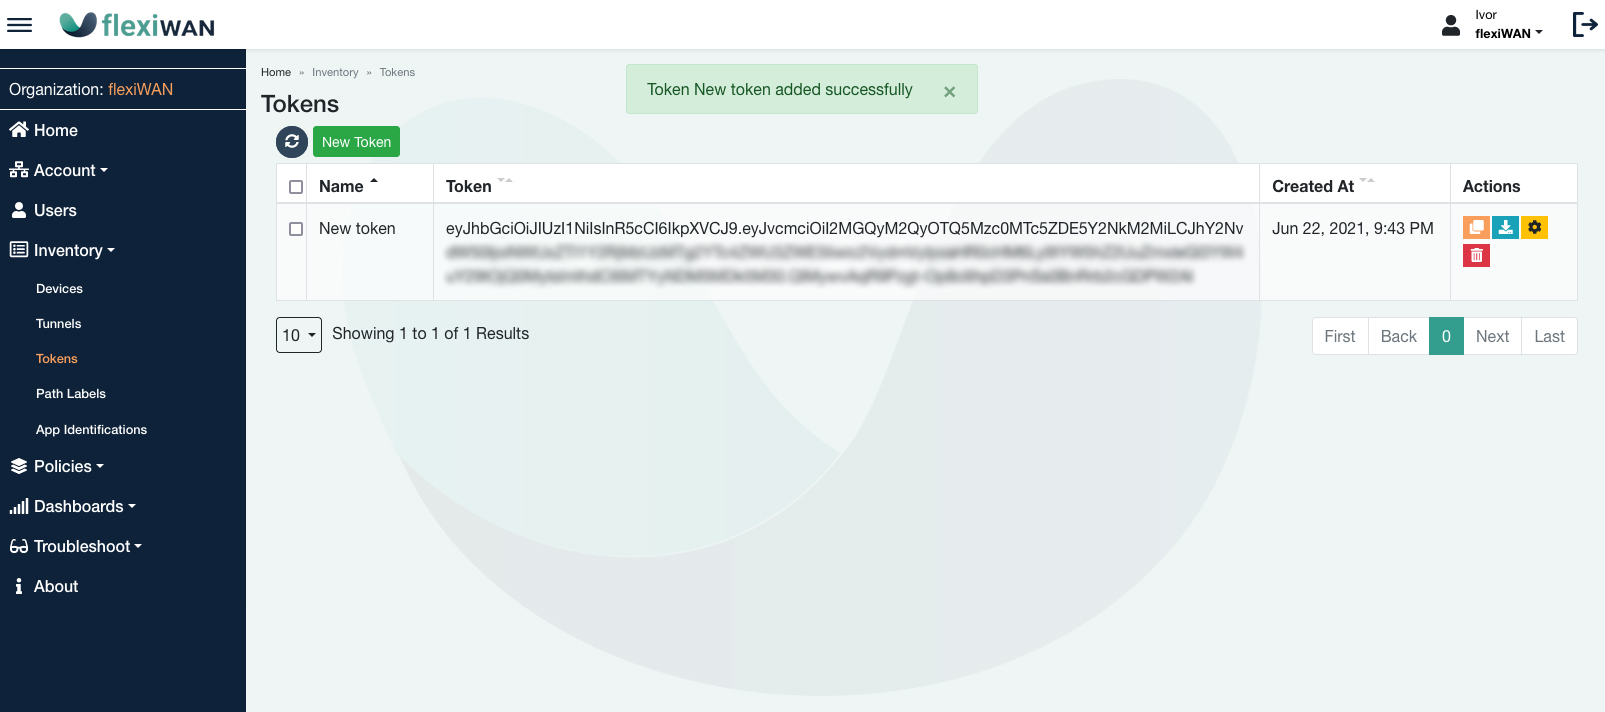
Copy or download the token in order to add it locally on your device. Token can be added to the device in two ways:
connect to flexiEdge UI web interface
ssh or using direct console.
Adding the token through the flexiEdge UI
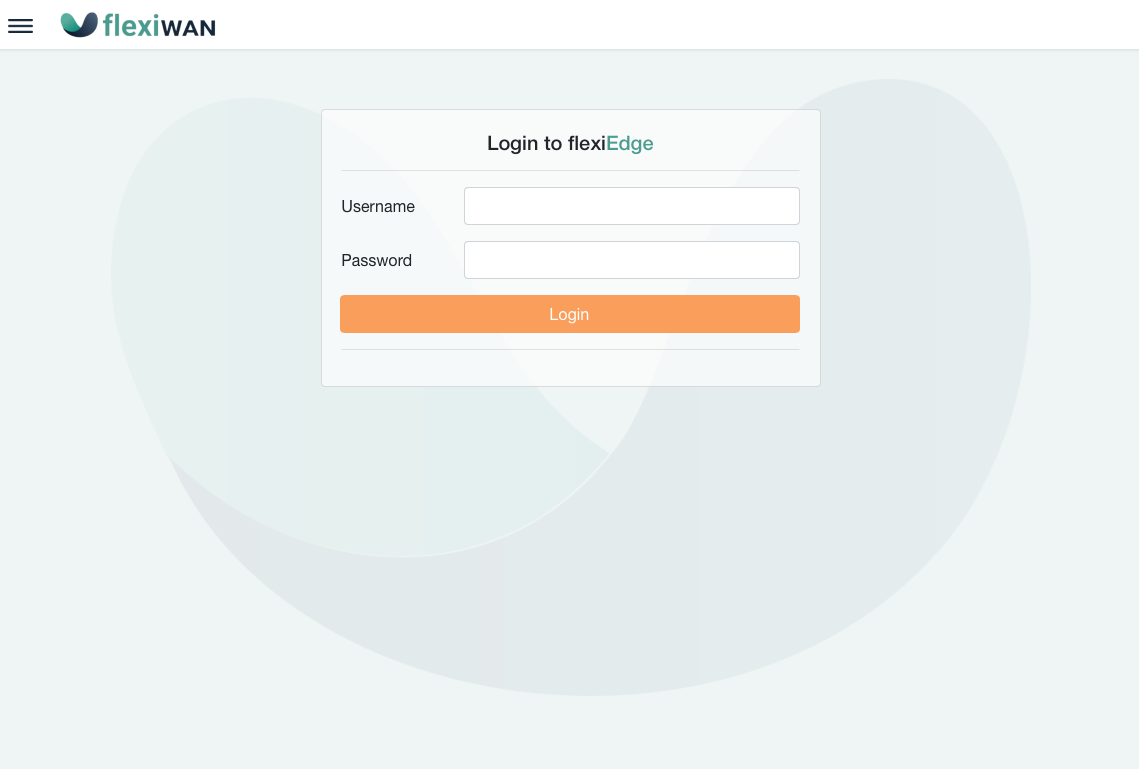
Open a browser and point it to the IP and port 8080 of currently active network interface on flexEdge device. Example:
HTTP://192.168.100.10:8080/
After opening the flexiEdge UI page, enter username and password from Linux.
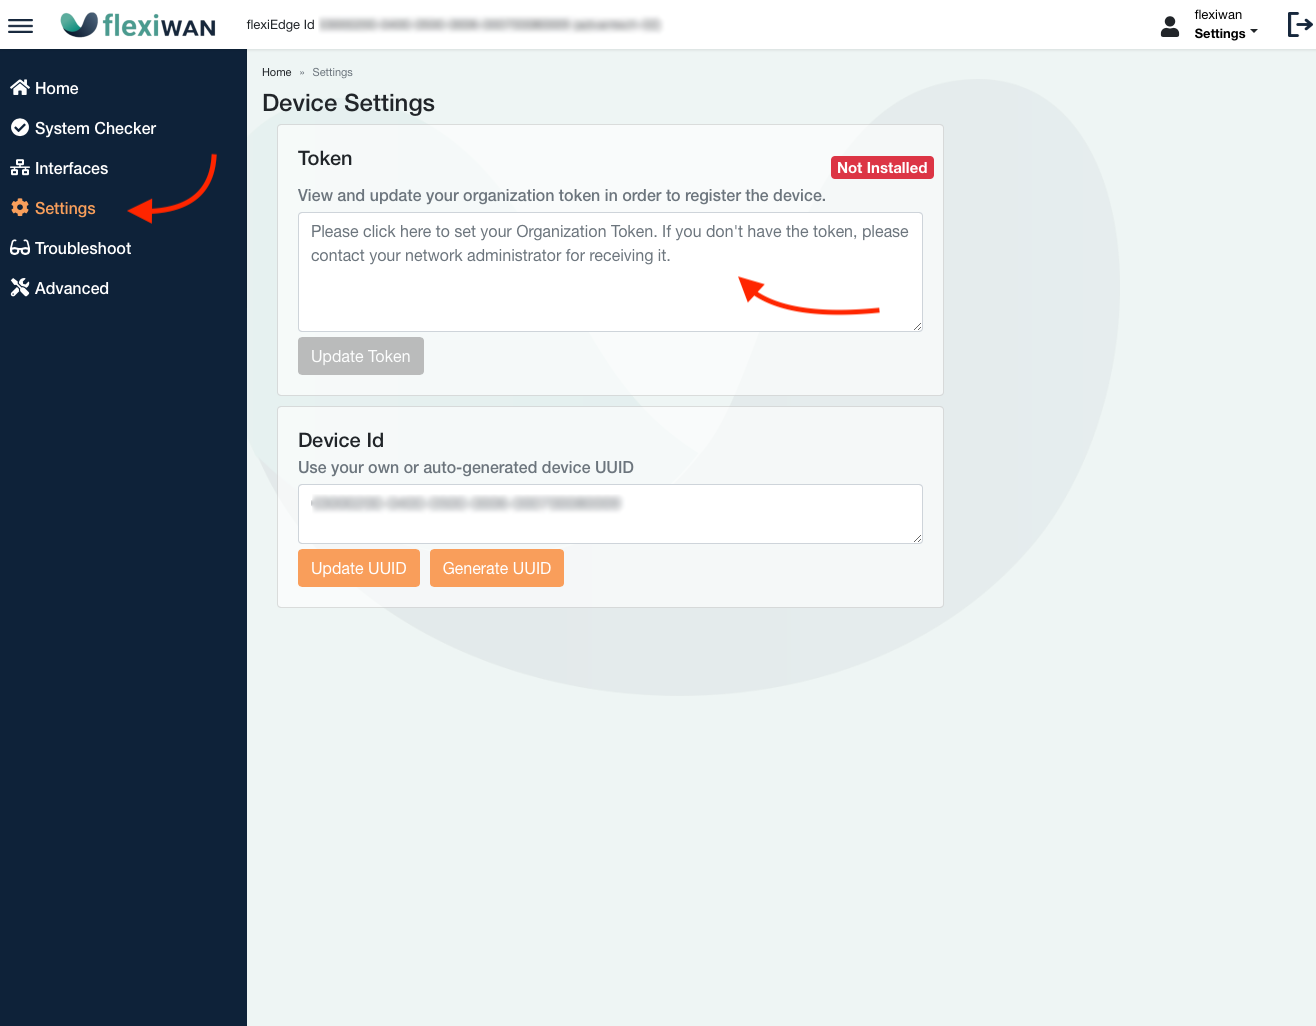
Navigate to Settings section and then enter the token copied from flexiManage. Click Update Token and after that continue to flexiManage Devices page to complete the device registration.
Note
Make sure to follow flexiEdge documentation and first run and pass system checker. Check flexiEdge UI to learn more.
Adding the token using SSH or console
For this step connect to a direct console or ssh connection to the device is required. Insert the token using text editor such as nano or vi:
nano /etc/flexiwan/agent/token.txt

Inserting the token is the final step where local EdgeUI or direct console / ssh connection to physical device are needed. Afterwards all management is done through flexiManage.
Completing the device registration
Once the token is added, the device will appear in the Inventory -> Devices page as a new and unapproved device:
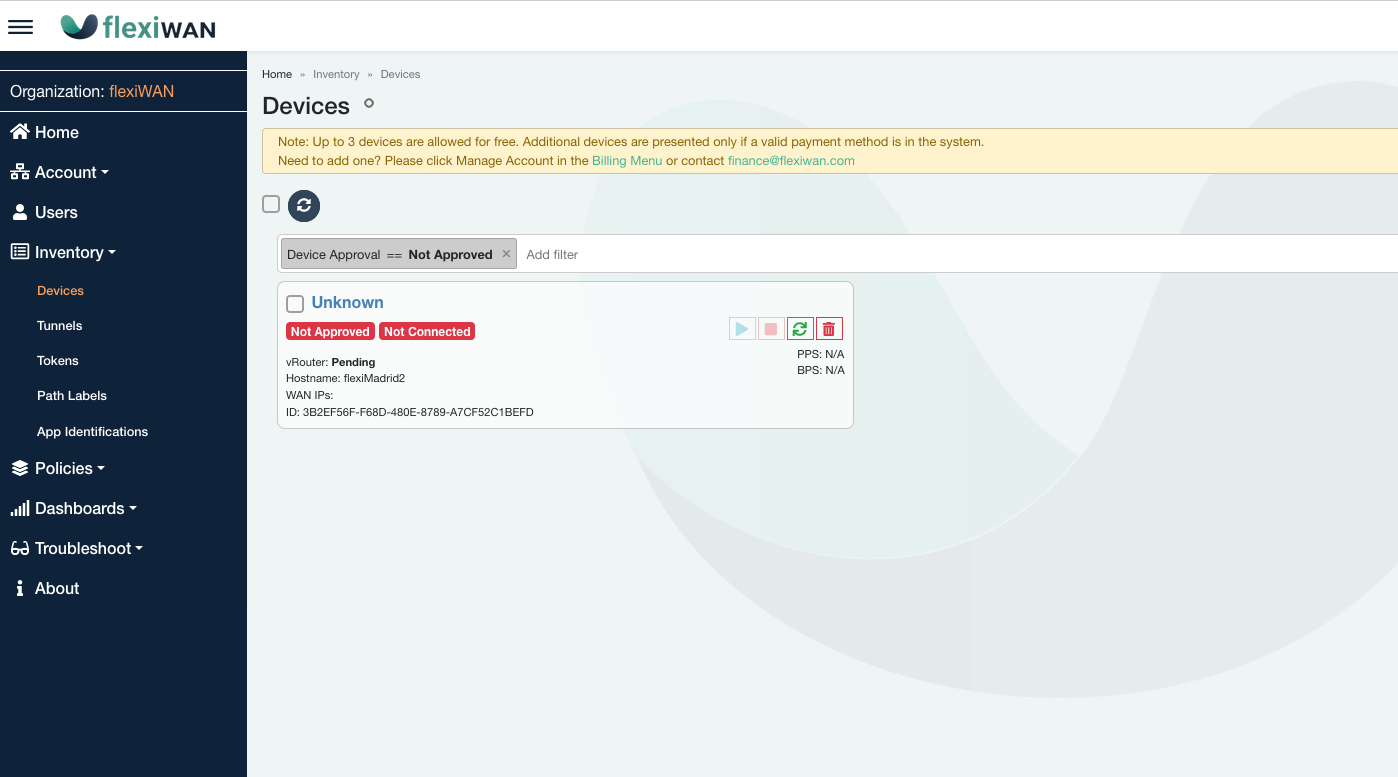
Click on the newly appeared “Unknown” device name to open the device settings. Enter the device name and description, then approve it.
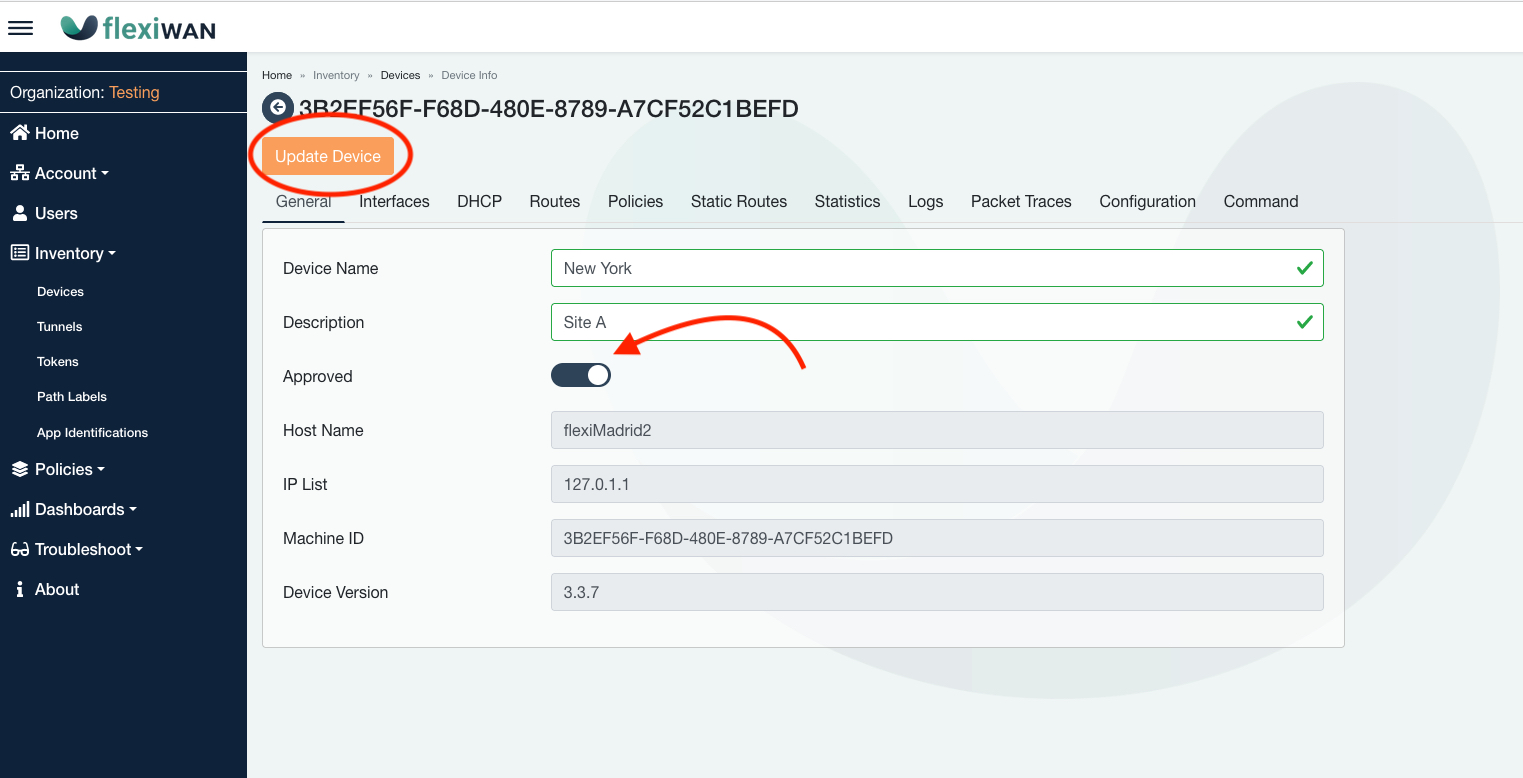
Click on “Update Device” at any time to apply the latest configuration. Follow the next section for device configuration.
Device configuration
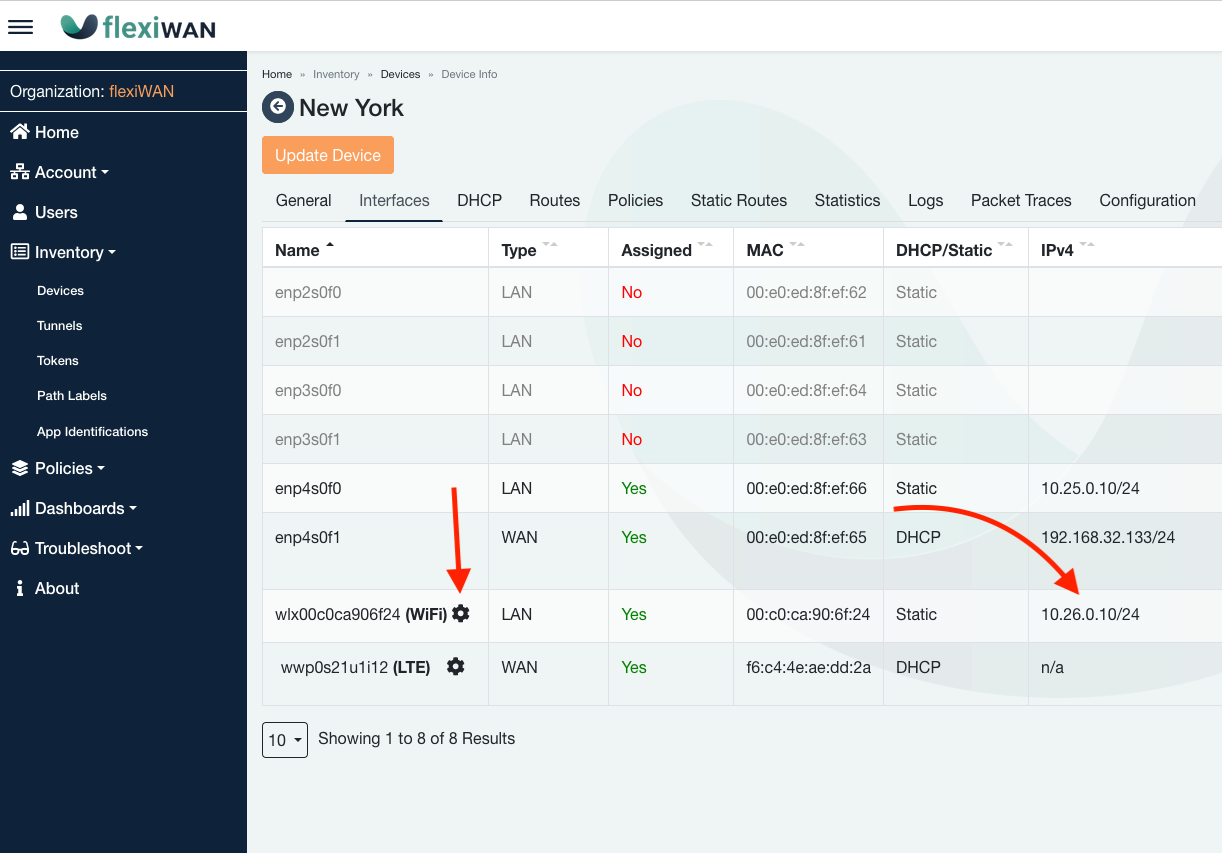
Navigate to the Interfaces tab from where all network interfaces can be viewed and configured.
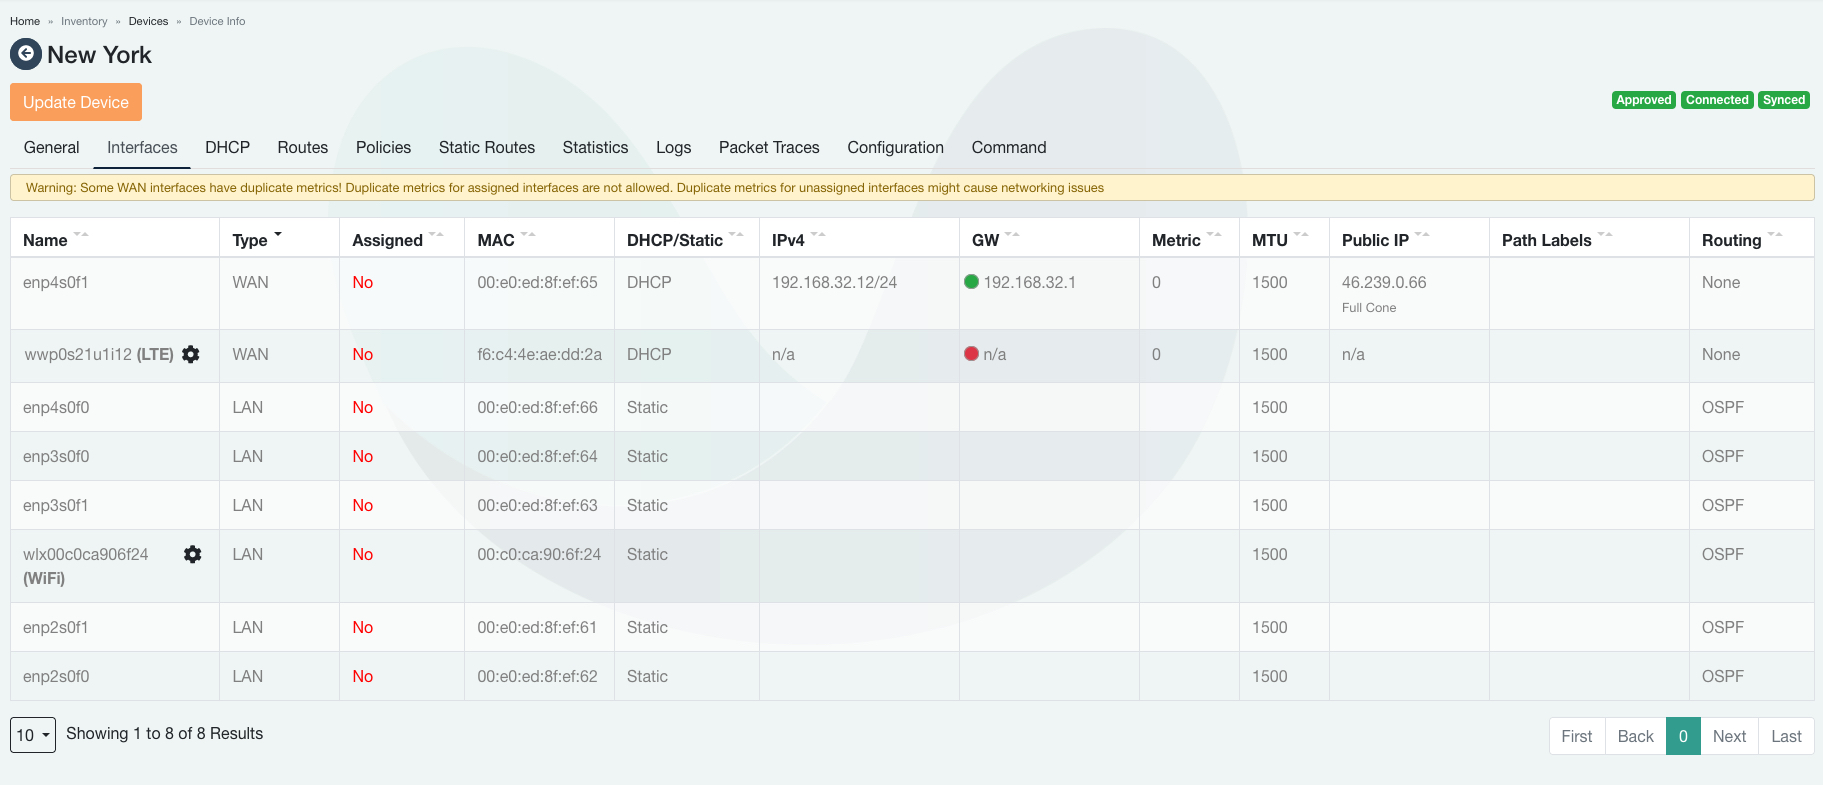
Interfaces can be configured by changing “No” to “Yes” in the Assigned column. In most cases, WAN interface IP’s will be automatically recognized assuming link is up, and default to DHCP. Fields can be modified directly by clicking and modifying them. In case of LTE or WiFi interfaces, click on settings (Gear Icon) next to each of the interfaces for detailed configuration. WiFi and LTE configuration is covered below in greater detail.
Configuration overview
The following network configurations are available on the Interfaces page:
Type - mark interface as WAN or LAN. flexiWAN requires at least one WAN and LAN for operation. Multiple WAN and LAN interfaces are supported.
Assigned - when set to “Yes” interface can be configured. Select “No” to not use the interface with flexiWAN.
DHCP/Static - used with WAN interfaces, WAN can be configured with static IP or set to receive an IP via DHCP.
DNS settings - within DHCP/Static column click on settings to open DNS settings. Users can assign manaul DNS or allow upstream override.
Metric - use metrics to define primary, secondary etc. interfaces.
MTU - set custom MTU per interface. Also applied on tunnels.
Public IP - automatically detected external IP using STUN. If your flexiWAN device is behind a NAT or a router, the public IP colunm will show the external IP.
Path Labels - assign Path Lables to logically label or filter traffic. See Path Labels section for more detials.
OSPF - LAN interfaces have OSPF automatically enabled in Routing column. OSPF is available on LAN interfaces only.
Note
Wired or LTE interfaces are supported as WAN interfaces.
Wired or WiFi AP mode supported on LAN interfaces.
Make sure to assign interfaces by changing “No” to “Yes” in the Assigned column.
Multiple LAN and WAN interfaces are supported.
Status icons (green, red, gray) in GW column show if the device has internet connectivity.
Netplan is used for networking configuration, all flexiManage network configuration is saved to Netplan.
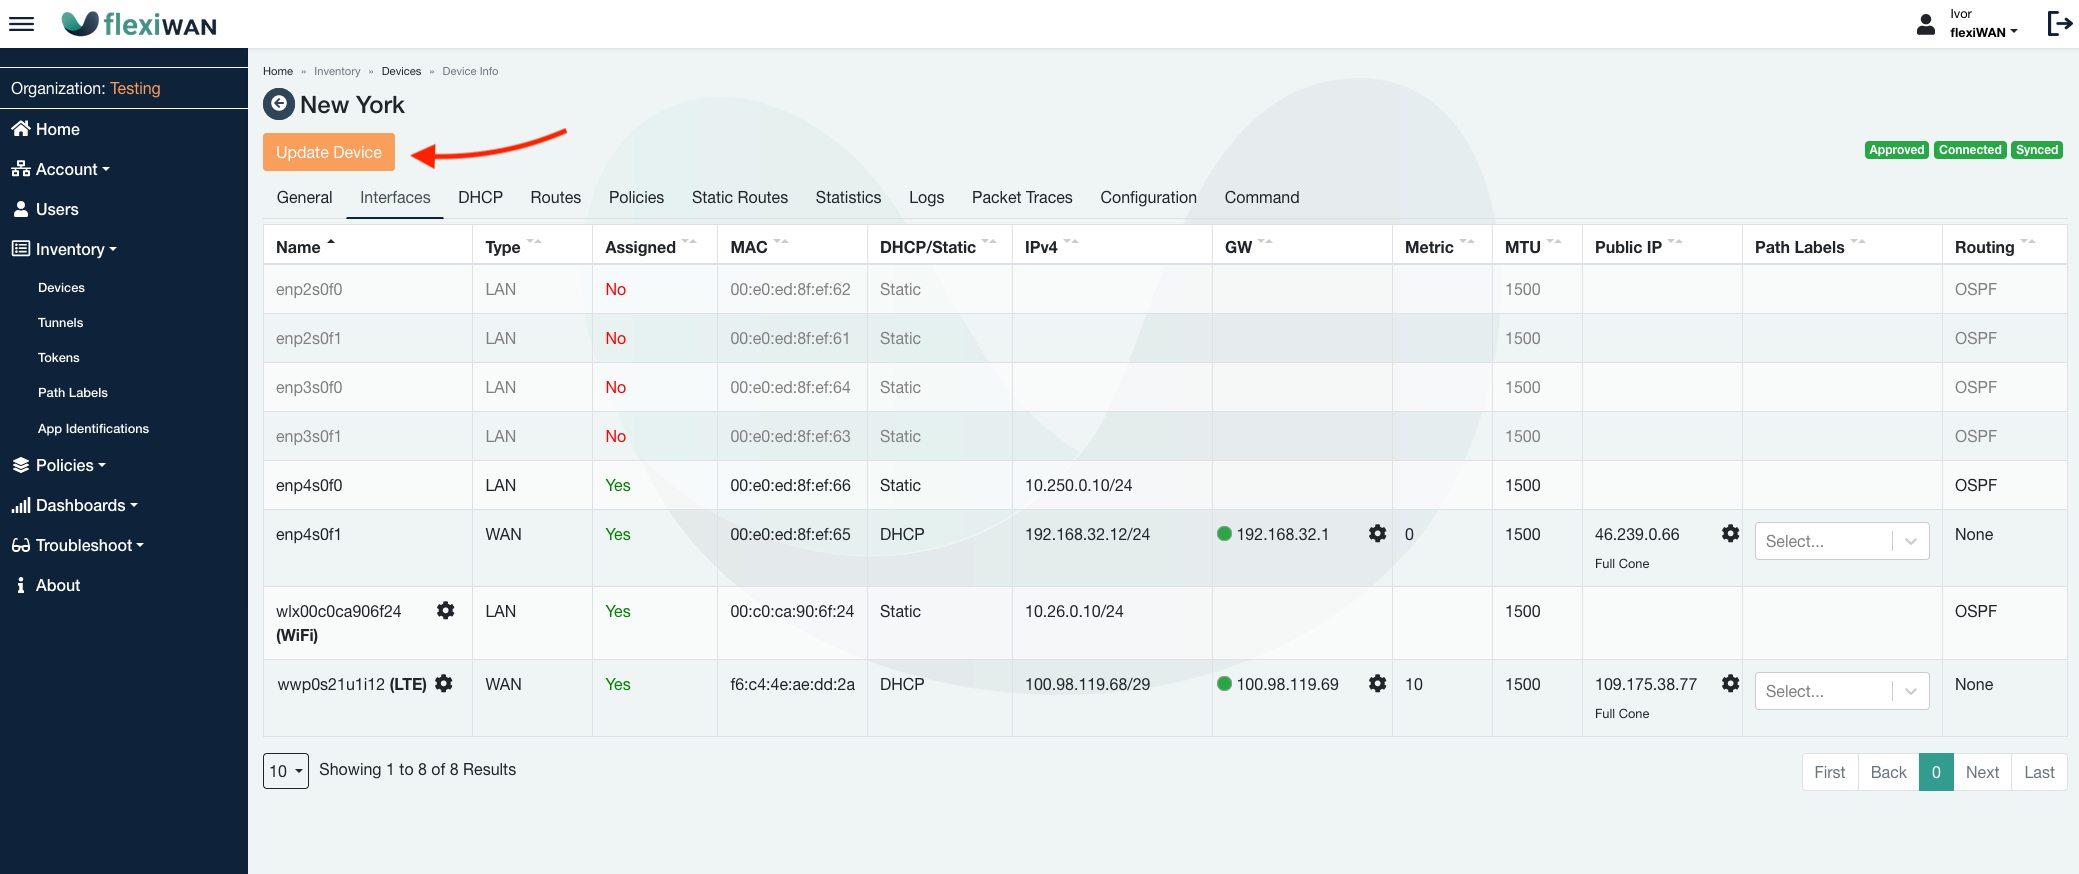
Internet monitoring and failover
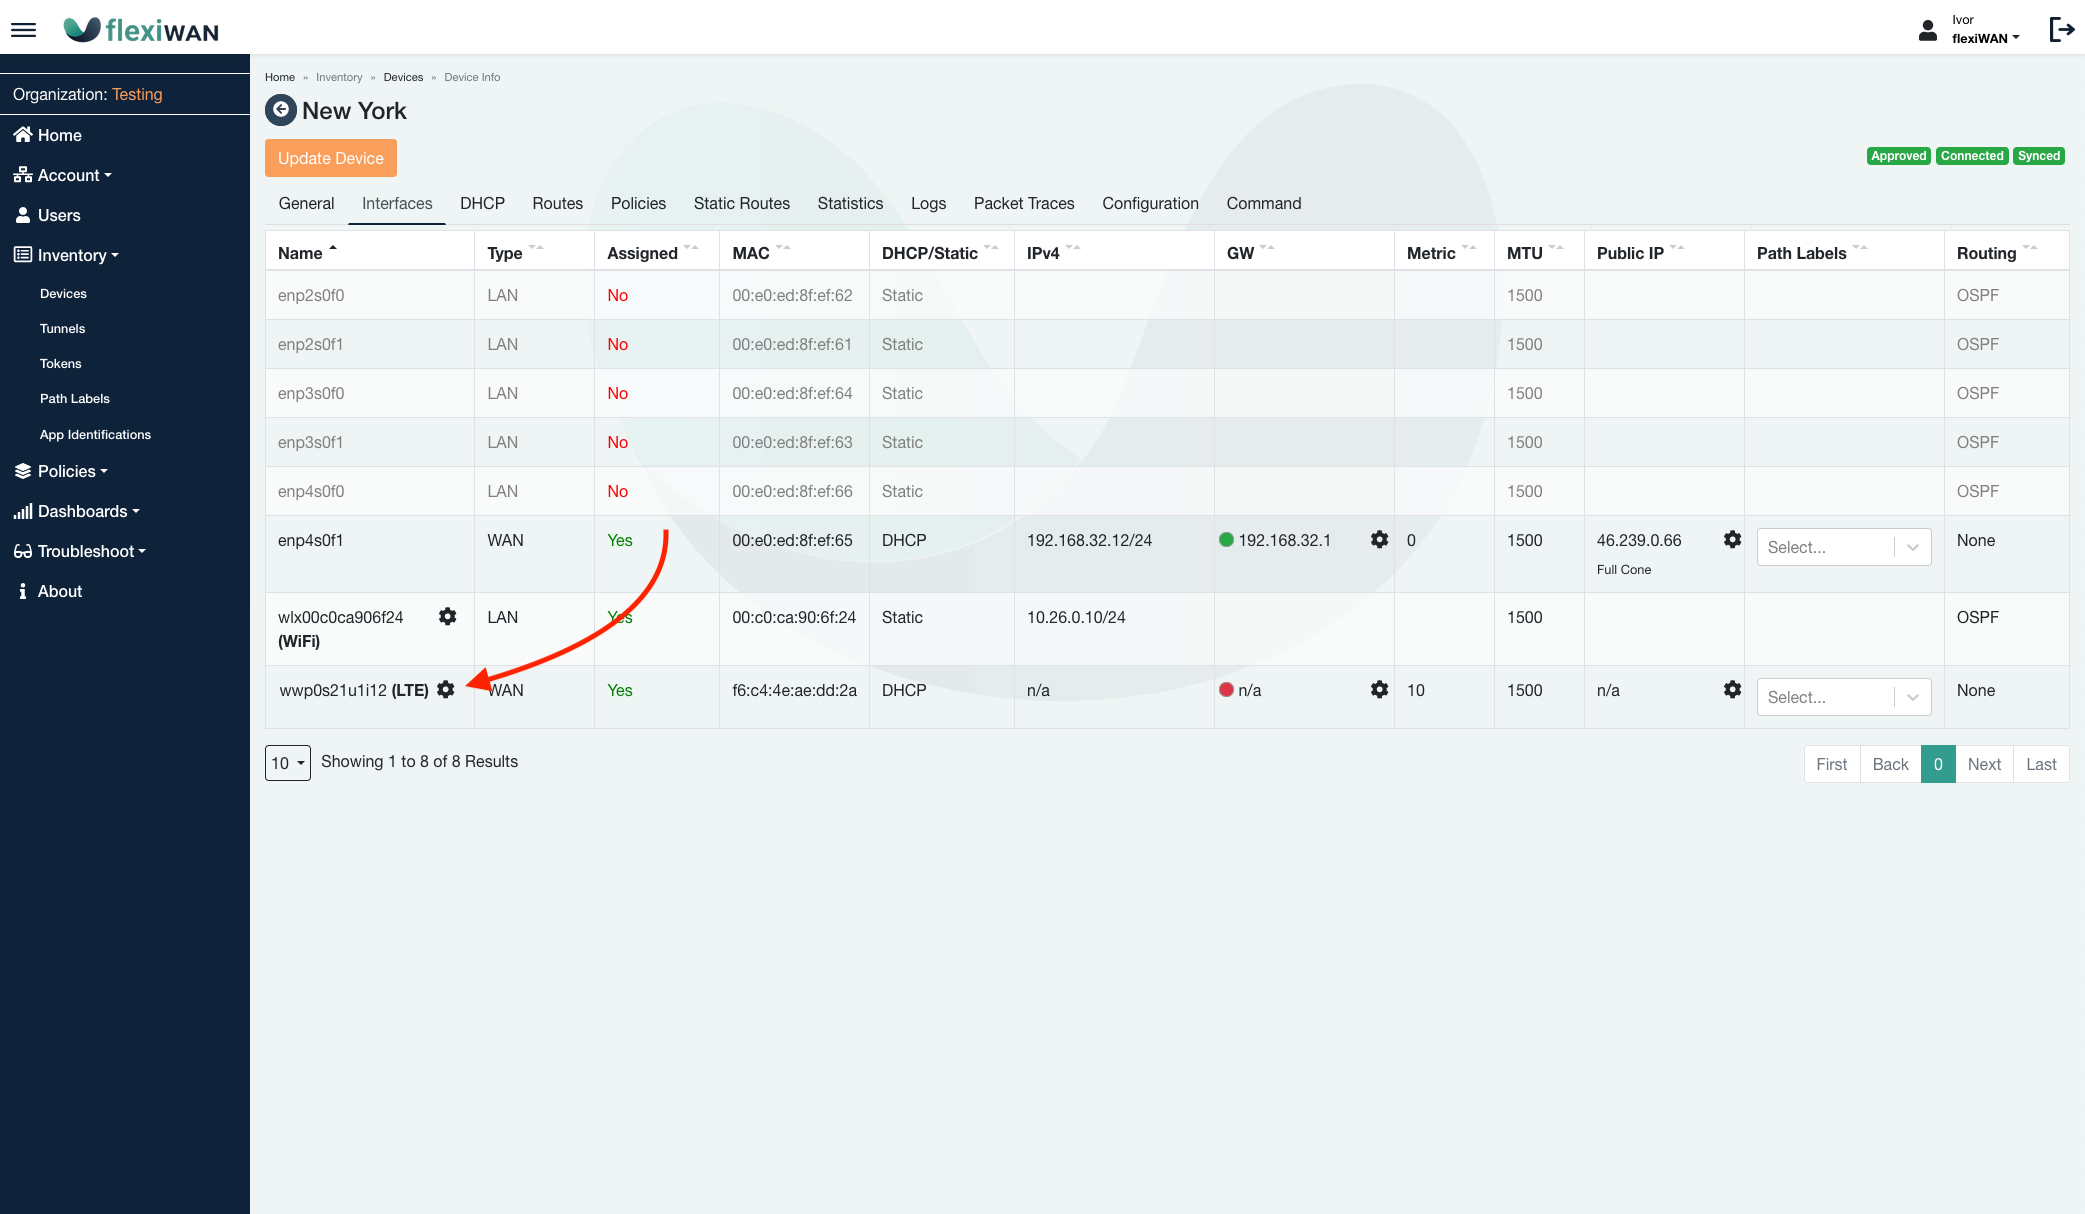
By default each WAN interface has gateway monitoring enabled. Its purpuse is to monitor and signal to the user if WAN interface is down. Gateway monitoring is part of automatic failover functionality, allowing failover between multiple WAN interfaces. Automatic failover works out-of-the-box and automatically when there are multiple WAN interfaces present. Interface which has lower metric, will have higher priority. Eg. bottom interface from the screenshot has higher priority.
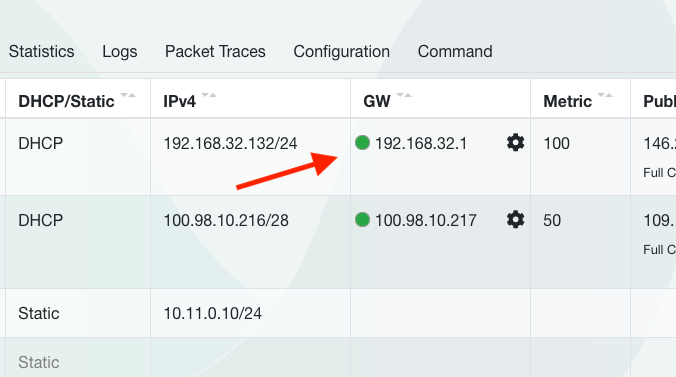
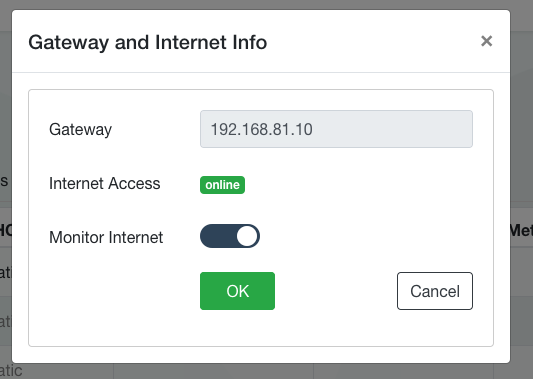
Monitoring option can be viewed and changed by clicking on “Setup Gateway” icon in the Gateway (GW) column.
NAT Traversal (STUN) configuration
flexiWAN enables NAT Traversal by default, allowing devices to establish tunnels behind NAT, when there is a private IP on flexiEdge WAN. NAT Traversal setting is automatically adjusted if it detects public or private IP on WAN, so there is no need to disable it in most cases.
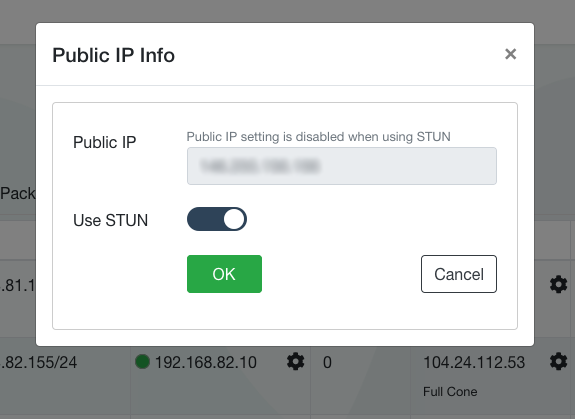
To configure NAT Traversal or change Public IP, simply click on settings icon in the Public IP column within WAN row:
Note
Public IP can be changed by clicking on interface Public IP column. Note that this is possible only when IP is statically assigned, and not when using DHCP.
flexiWAN can detect if it’s establishing tunnels locally (devices within the same net3work) or remotely (geographically remote site) and adjust NAT Traversal accordingly.
Under Public IP column detected NAT type is displayed. Most common NAT type detected is Full Cone. In case it says “Blocked”, try updating device settings after assigning interfaces. When flexiWAN detects bridged / direct external IP on WAN, NAT traversal will be automatically disabled and status will be “Open Internet”
Warning
When using NAT Traversal (STUN), make sure to disable NAT randomization on your upstream router / edge device. Otherwise it may change outgoing port for every connection and prevent tunnels from being connected. If possible, put flexiWAN in DMZ on your upstream router.
DNS configuration
Each WAN interface, whether configured statically or set to DHCP can have DNS servers set. The DNS servers configured on WAN will be used by flexiEdge device for DNS resolution. This is not to be confused with DNS setup for LAN clients, which can be configured when configuring DHCP server on LAN.
To check current or set manual DNS servers for WAN, simply click on the Settings icon within “DHCP/Static” column. In same window DNS doman can be set.
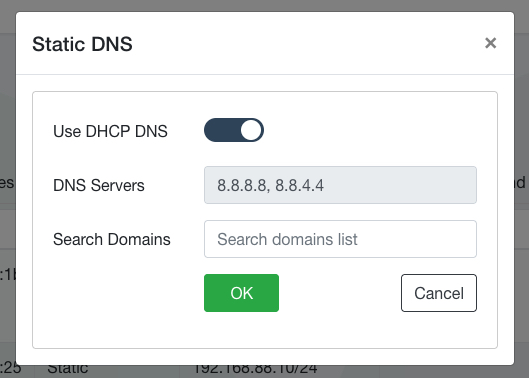
By default and if DHCP is set for WAN, device will use DNS servers received from DHCP. However by disabling the “Use DHCP DNS” users can assign DNS serves manually.
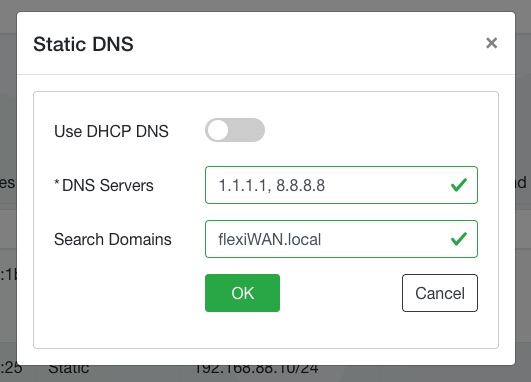
We recommend using and combining the below DNS providers:
Google DNS - 8.8.8.8. 8.8.4.4
dns.watch - 84.200.69.80. 84.200.70.40
Cloudflare - 1.1.1.1, 1.0.0.1
Quad9 - 9.9.9.9, 149.112.112.112
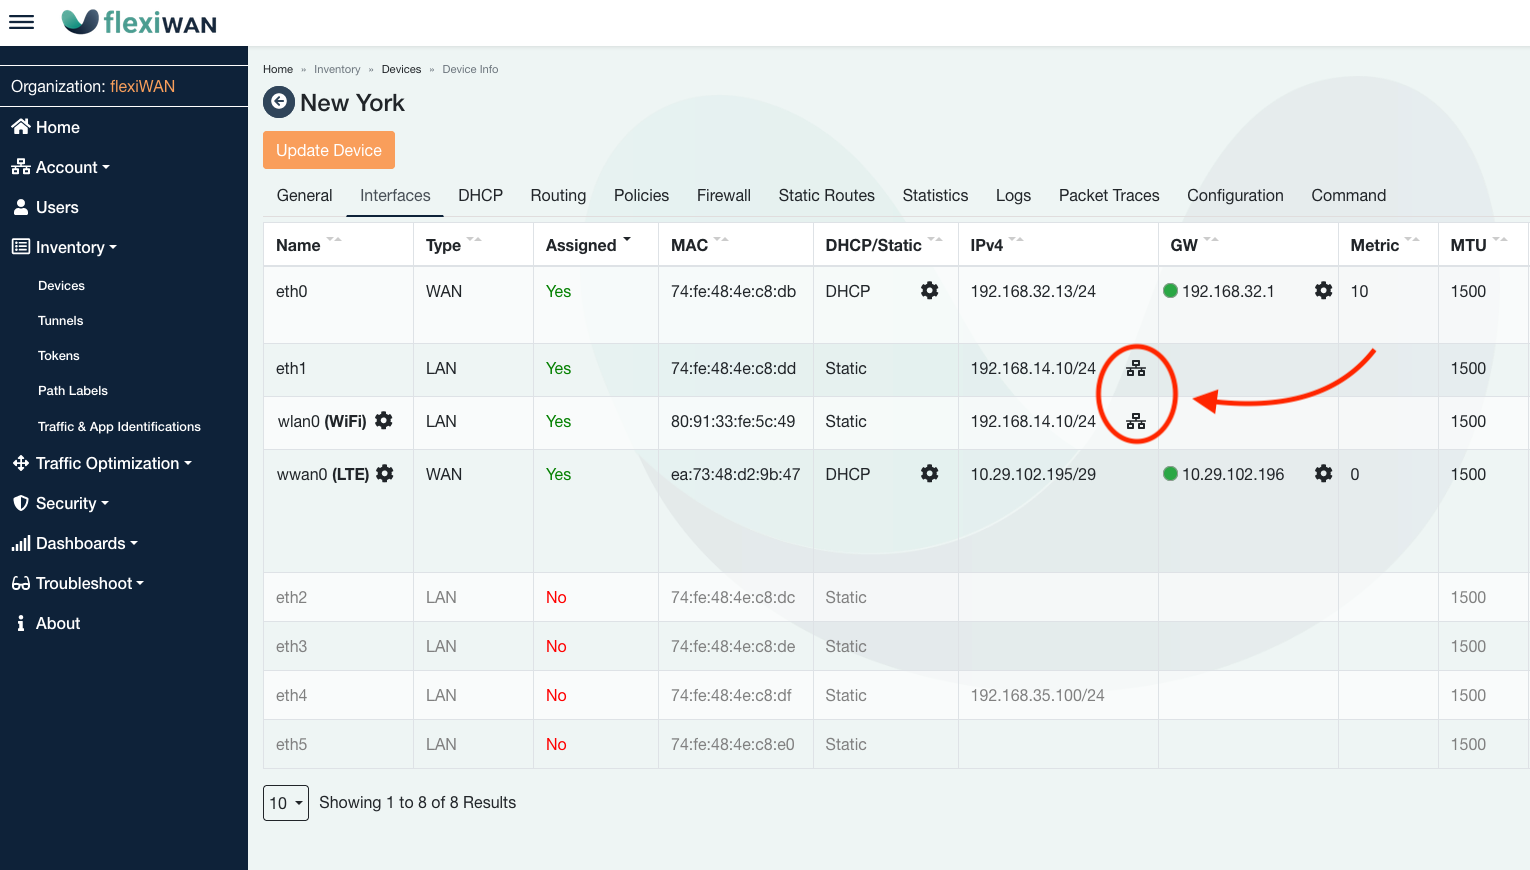
LAN Bridge configuration
Two or more network interfaces can be bridged when assigned the same IP and CIDR. Clients connected to both or more interfaces will assign or receive an IP from the same range.
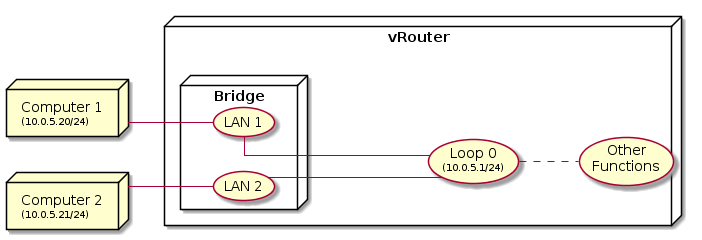
Bridge is automatically created when multiple LAN interfaces are configured with the same IP address and CIDR. Both DHCP server and OSPF continue to work on bridged interfaces.
Once two or more interfaces are configured with the same IP and CIDR, the symbol  will indicate bridge mode is configured. Make sure to update device to apply changes.
Note
Vhen using virtual machines make sure to attach different virtual switch to each LAN interface, in order to avoid network loops.
LTE configuration
flexiWAN supports LTE network interfaces in addition to wired interfaces. Since LTE functionality is configured through flexiManage, it’s required to have an active wired network interface in addition to the LTE interface. The wired interface does not have to be assigned, but it must be recognized and have internet access through which the device can connect to flexiManage. Currently flexiWAN supports specific M.2 LTE modems from the list below.
Please see the list of devices Certified by flexiWAN on our website. We recommend checking with us or with the hardware vendor that the LTE or WiFi of the device you purchase has been certified for flexiWAN.
Known working and supported LTE cards:
Vendor |
Module Type |
|---|---|
Sierra Wireless |
EM7455 |
Quectel |
EM06-E |
Quectel |
EC25 |
Quectel |
EC20 |
Note
Other models by Sierra Wireless and Quectel may work as well. If you use a non-listed card which works flexiWAN, let us know and we’ll add it to the list.
Modems must be set as
MBIMand notQMI. Run System Checker to change toMBIMon supported modems.
In order to configure the LTE interface, navigate to device settings and click on Interfaces tab. From there, click on settings (Gear Icon) next to LTE interface name to configure its settings.
After clicking on the LTE settings, LTE configuration options will appear. Configure the following settings:
Correctly enter SIM PIN.
Set the LTE to enabled.
Enter interface metric (must not be same as wired WAN).
Confirm APN is detected correctly. In case the APN is not detected, enter your APN manually.
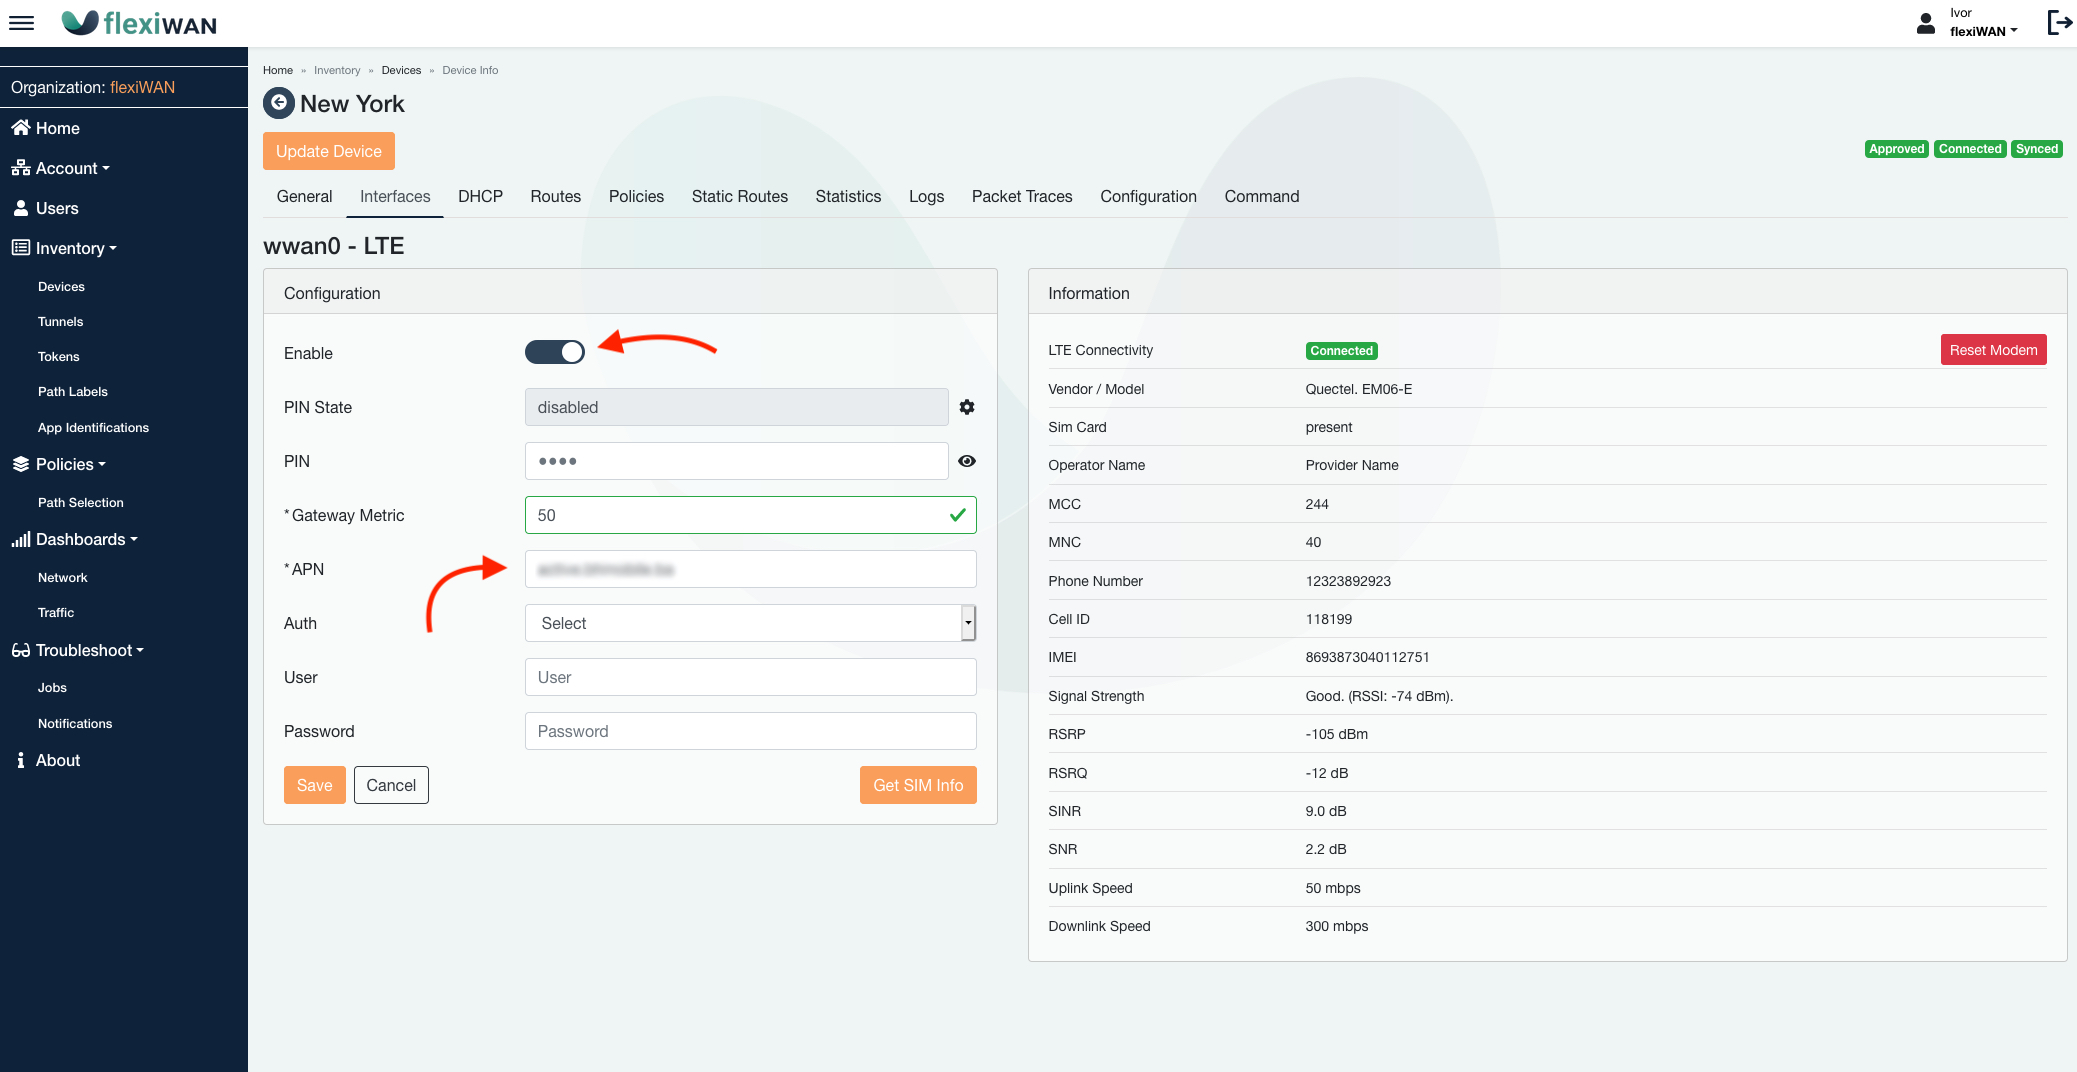
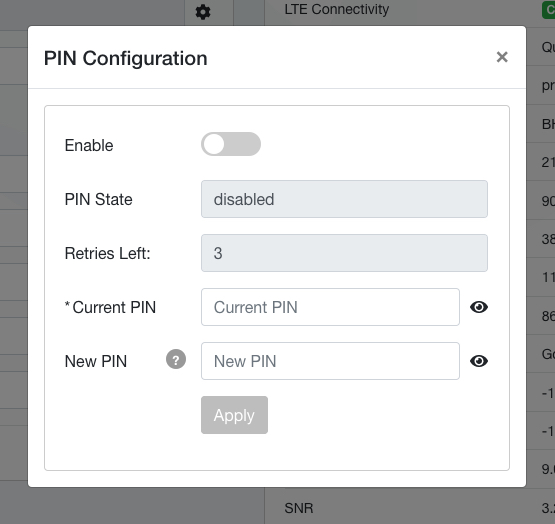
SIM PIN can be changed or disabled by clicking on settings icon next to PIN state.
After entering settings, click Save and then click on Update Device from Interfaces tab.
Note
Important considerations when configuring LTE network interfaces:
Always make sure to keep NAT Traversal enabled for LTE interfaces, otherwise tunnels may not connect.
When adding tunnels between LTE and other devices, STUN can take up to several minutes until providing port to NAT Traversal. Monitor “Device-modify” and “add tunnel” jobs from Troubleshooting > Jobs section.
If interfaces page doesn’t show LTE interface, try to reset and re-add the device to flexiManage.
Supported LTE cards are listed above. Using non-supported LTE cards require testing prior to deployment. USB LTE cards were not tested at this point.
WiFi AP configuration
flexiWAN supports WiFi AP for LAN, assuming the WiFi card is recognized and supported by the underlying Ubuntu (see list of pre-tested WiFi cards below). flexiWAN uses hostapd for wireleess access point, supported standards are b/g/n and AC. Both 2.4Ghz and 5Ghz modes are supported, however dual band is not supported currently.
WiFi cards tested by flexiWAN:
Module |
Driver |
Notes |
|---|---|---|
QCA6174 802.11ac |
ath10k |
Out-of-the-box (OOB) support |
ALFA AWUS036AC |
RTL8812AU |
requires drivers via DKMS |
ALFA AWUS036NEH |
RT3070 |
OOB support |
ALFA AWUS036NH |
RT3070 |
OOB support |
ALFA AWUS036NHR v2 |
RTL8188RU |
OOB support |
Comfast CF-812AC |
RTL8812BU |
requires drivers via DKMS |
TP-LINK TL-WN722N v1 |
ath9k_htc |
OOB support |
Note
Most WiFi cards can work if the correct drivers are installed. Use DKMS and install approperiate WiFi drivers with it.
In order to configure WiFi AP on LAN, navigate to the device settings and click on Interfaces tab. From there set the WiFi recognized interface as assigned and add the local IP. Then click on the settings icon next to WIFI interface name.
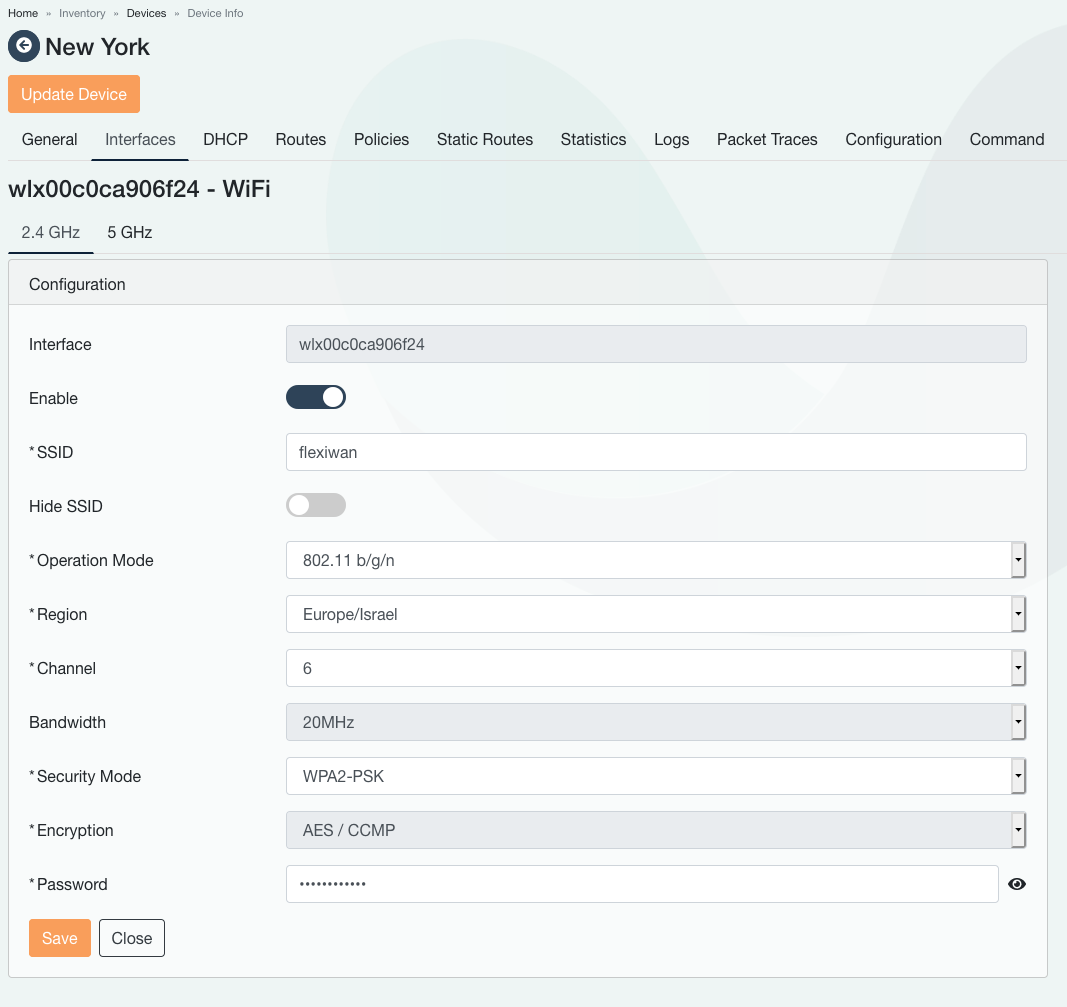
On WiFi settings page, configure the following to enable its operation:
Select between 2.4Ghz and 5Ghz bands via tabs on top.
Enable the wifi interface
Add SSID / WiFi network name
Choose Operation Mode. Make sure your WiFi card supprots the selected mode.
Pick a Region.
Set Channel or keep it set as Automatic. In most cases Automatic moode will select the best Channel, however with some cards it is required to manually set the Channel.
Pick security Mode and enter WiFi network password.
Enter WiFi AP settings and click save at the bottom of the page. Make sure to also click on “Update Device” while on Interfaces page.
Note
WiFi AP considerations:
WiFi functionality is limited to the WiFi card capabilities.
When using 5Ghz, the vRouter may fail to start due WiFi ACS not collecting survey data. Try setting the Channel manually instead of configuring it as Automatic.
If your WiFi card is not recognized, try to reset and re-add the device to flexiManage.
In most cases, if your WiFi card is not recognized, but has support for linux, drivers for it can be added via DKMS and it should work with flexiWAN afterwards.
Some WiFi cards have world regulatory domain hardcoded and may not be able to run when configured to some specific Channels.
Be sure to enable DHCP on WiFi LAN interface so AP clients can get an IP.
Completing the configuration
Once network interfaces are configured, click on “Update Device” button to apply your configuration.
Note
Changes to the device configuration can be applied dynamically even when the device is running
Changes in the interface assignments will result in router restart
WAN changes may momentary disconnect tunnels.
WAN IP change will trigger automatic tunnel reconstruction.
After the device is approved and interfaces configuration is complete, it will show status as approved, connected and synced after a few seconds.
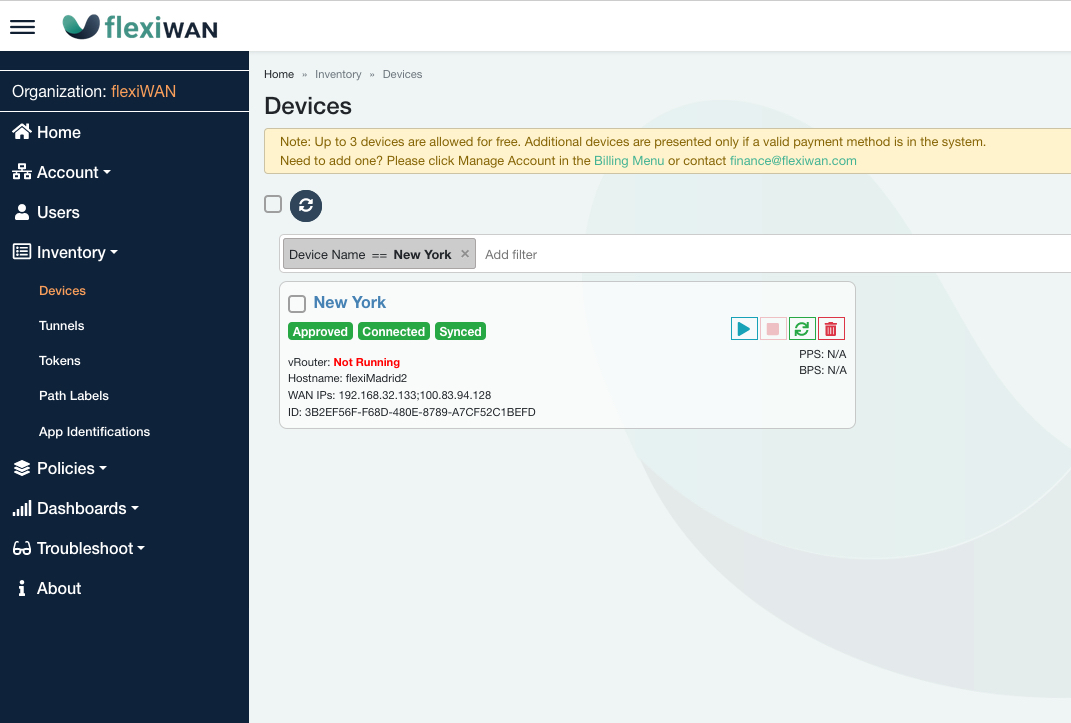
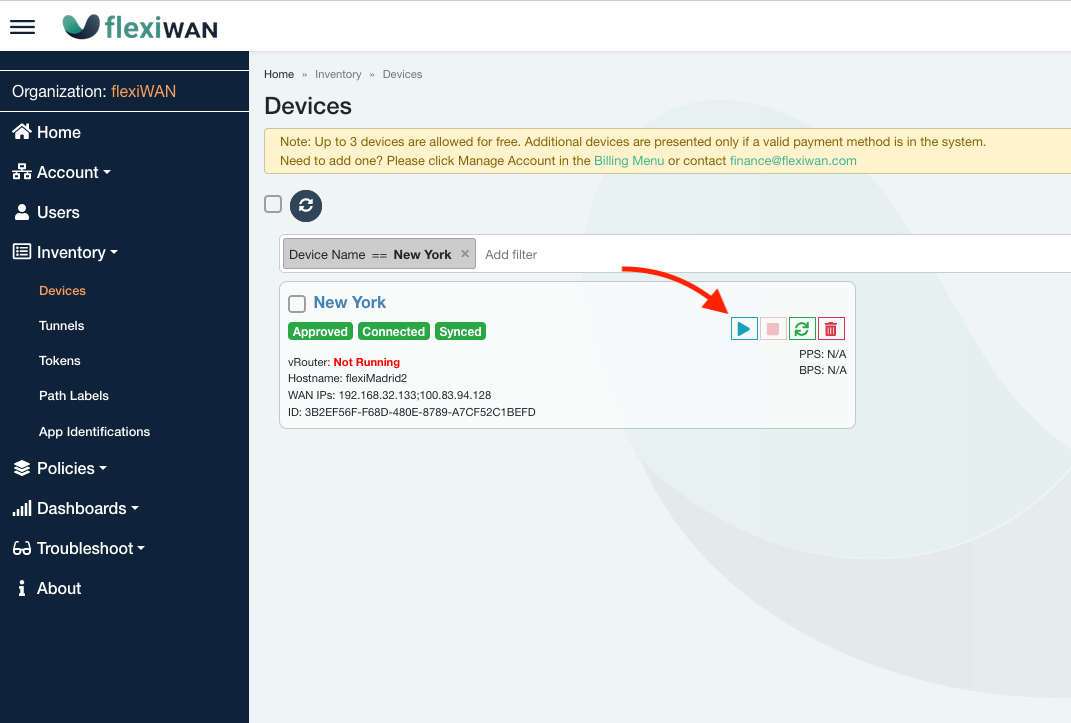
Starting/Stopping the vRouter
The device is connected to the management but the router is not running yet. To start a device click on the “Start Device” button.
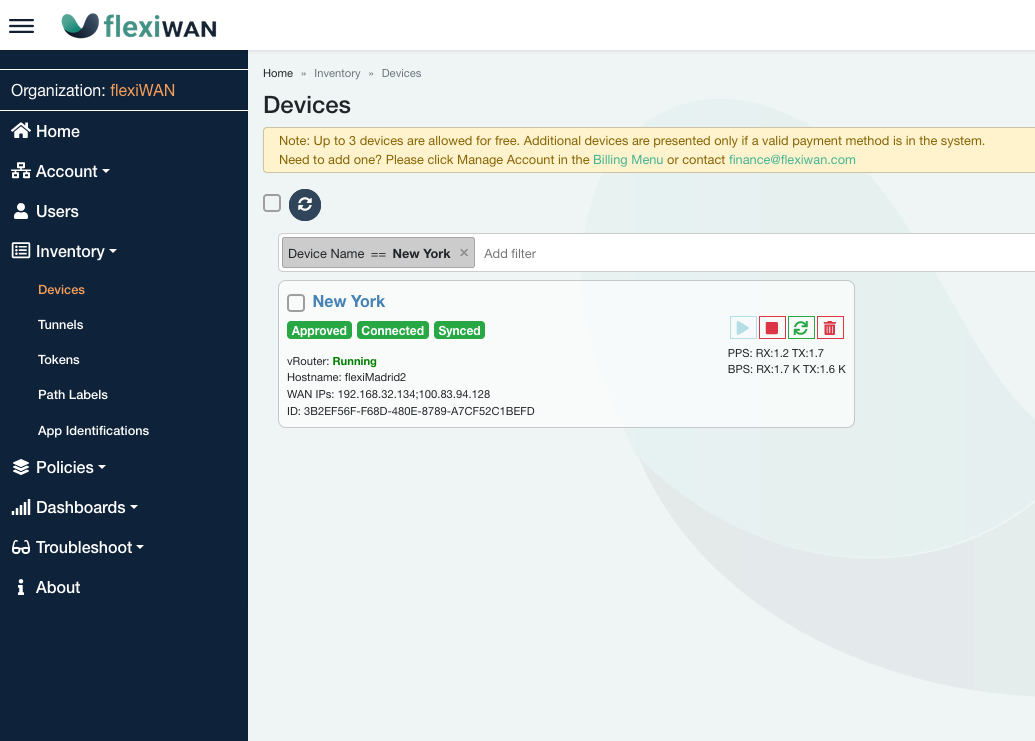
After a few seconds the device will start and show that the router is running. During the start or stop process, the device may disconnect from the management for a few moments, as the vRouter takes control of the interfaces.
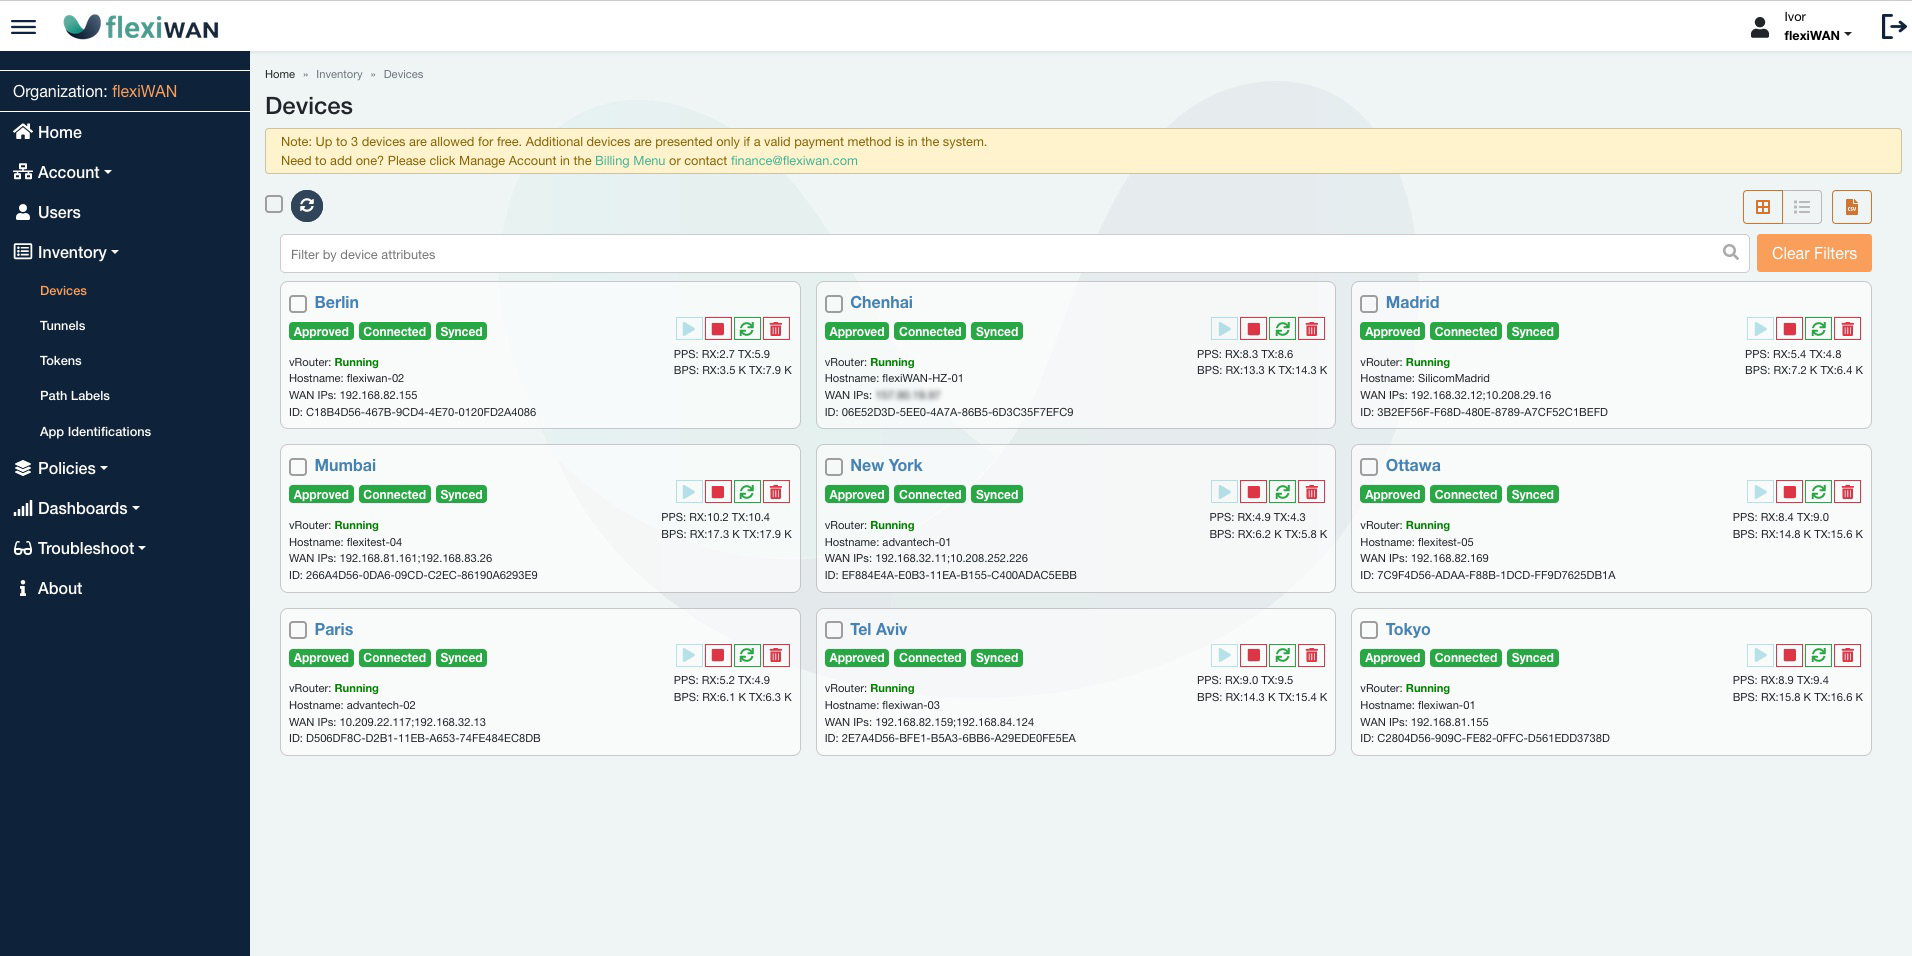
Follow the same steps to create multiple devices in your network:
To stop the router click on the “Stop Device” button.
Deleting Devices
To delete a device click on the “Delete Device” button. Make sure to delete all Tunnels connected to that device before attempting to delete it.
Note
Every device change or configuration will schedule a job to apply the changes. This is done for scalability purposes and so the UI will not halt. The job is queued in the system and executed when the device is connected and ready. The operation succeeds only if the job is completed successfully. Jobs can be viewed in the Troubleshooting -> Jobs menu. An error during an operation is reported as a failed job. If the job fails, the system rolls the job back and returns to the previous state.